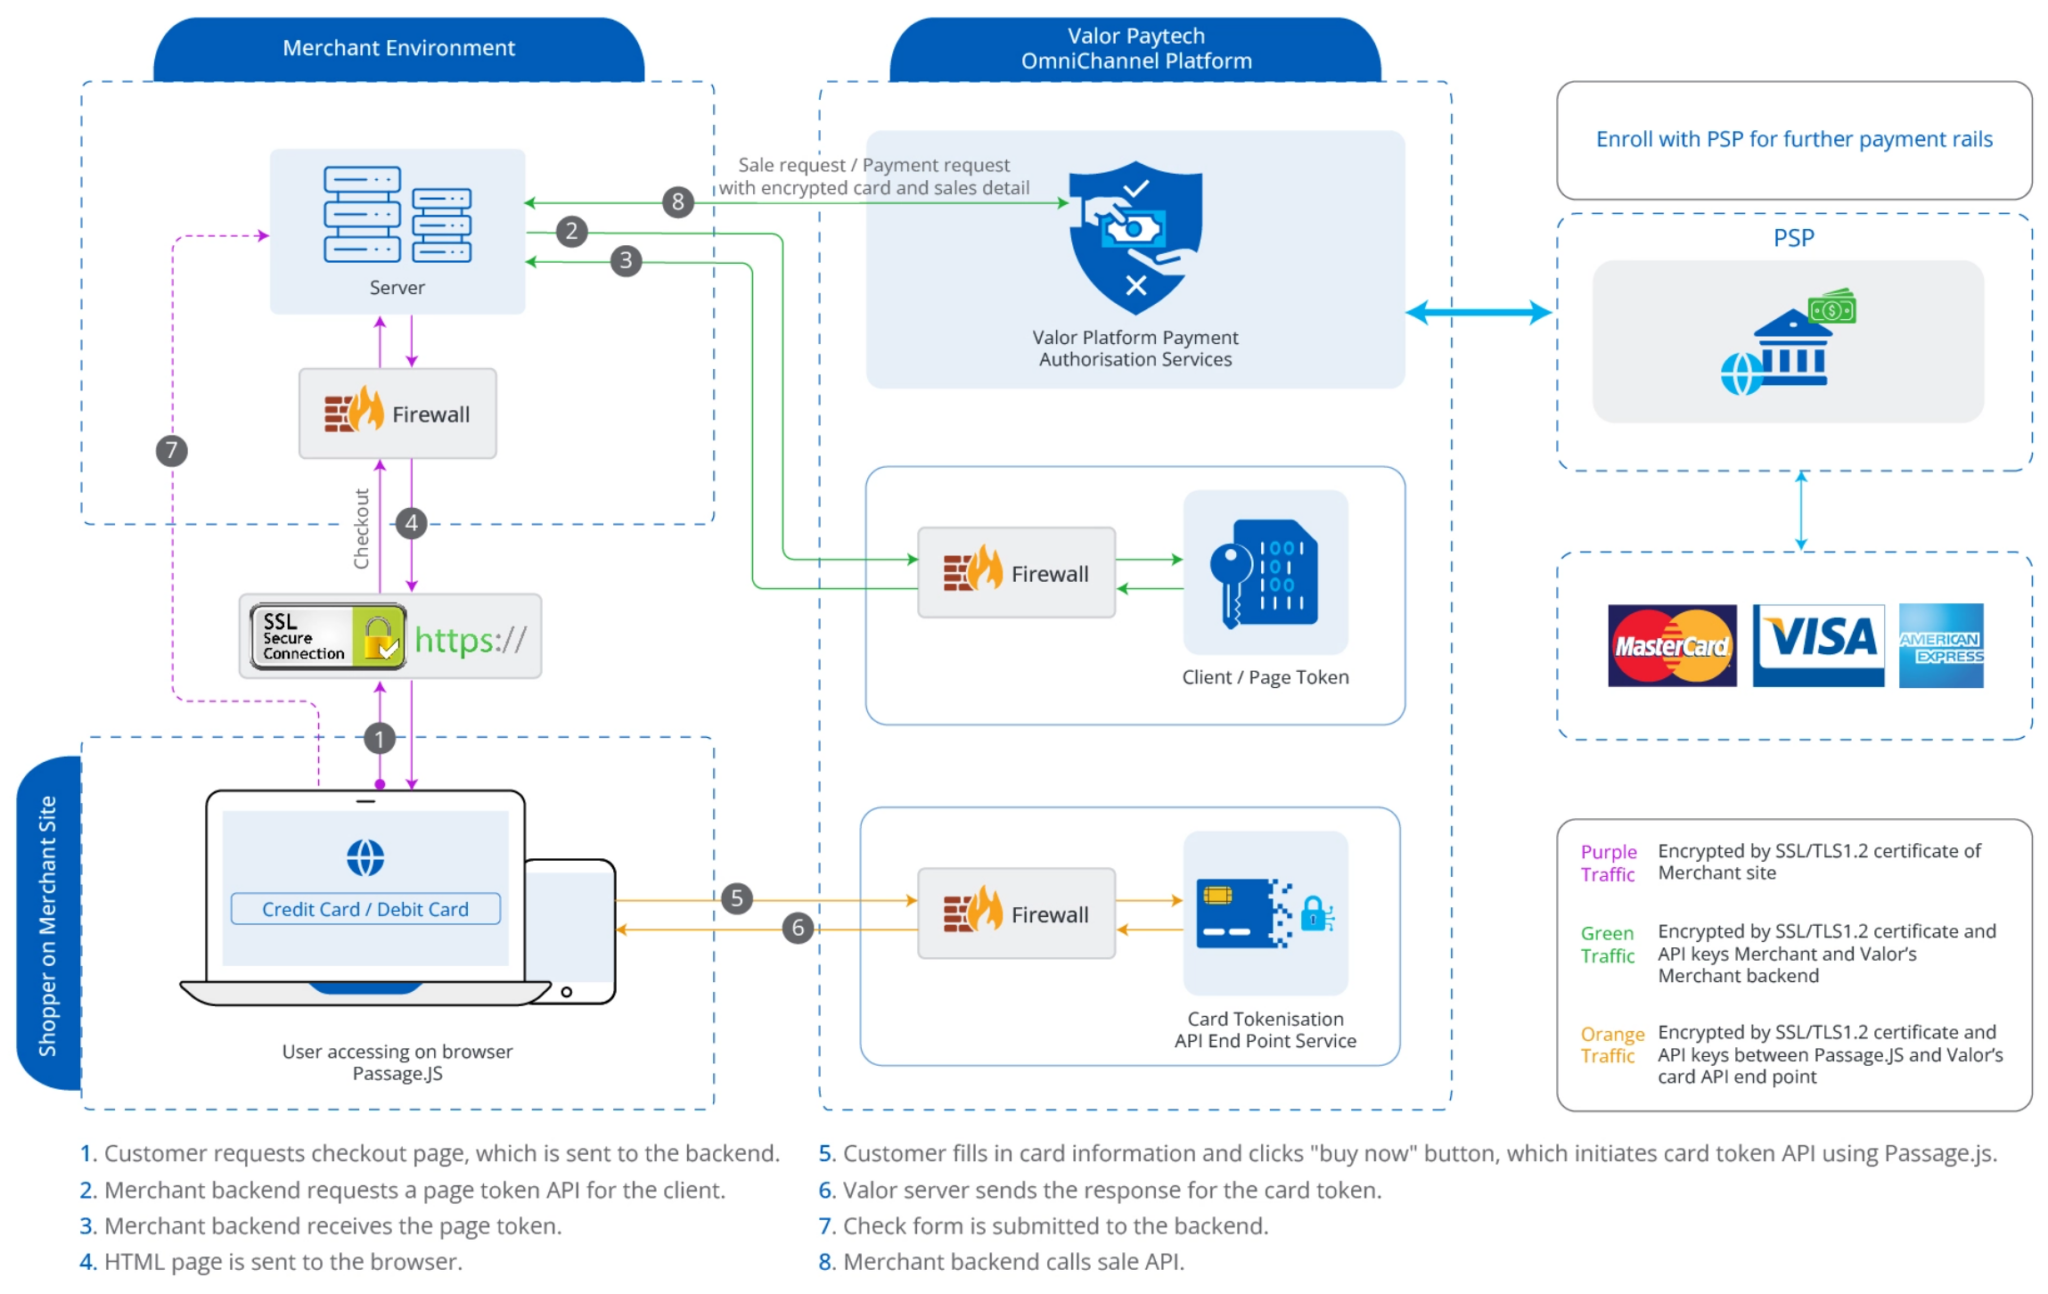
Passage.Js
Passage.js is a JavaScript library that allows merchants to securely collect sensitive payment information from users and send it directly to Valor. Merchants can integrate the library and fully customize the checkout form according to their requirements. Authentication is handled using a Client Token, which is generated via the GetClientToken API (explained in a later section).
Integrating Valor Payment Gateway with Passage.js
You can integrate Valor Payment Gateway using Passage.js by following these simple steps:
-
Generate Credentials
Obtain your APP ID, APP Key, and EPI, which are required for integration. -
Retrieve Client Token
Use the GetClientToken API to generate a secure client token for authentication. -
Include Passage.js Script
Add the Passage.js library to your frontend and pass the received token to thedata-clientTokenattribute in your checkout form. -
Create Checkout Form
Build a form with the required fields for payment collection. Set the form’sactionto the API endpoint that calls Valor’s Sale API. -
Handle Sale API Response
Process the response returned from the Sale API to confirm payment success or handle errors.
Getting ID and Keys
In order to integrate and use Passage.js, the merchants will need to use their APP ID, APP Key and EPI to generate a Client Token.
You can take the following steps to generate or retrieve your keys:
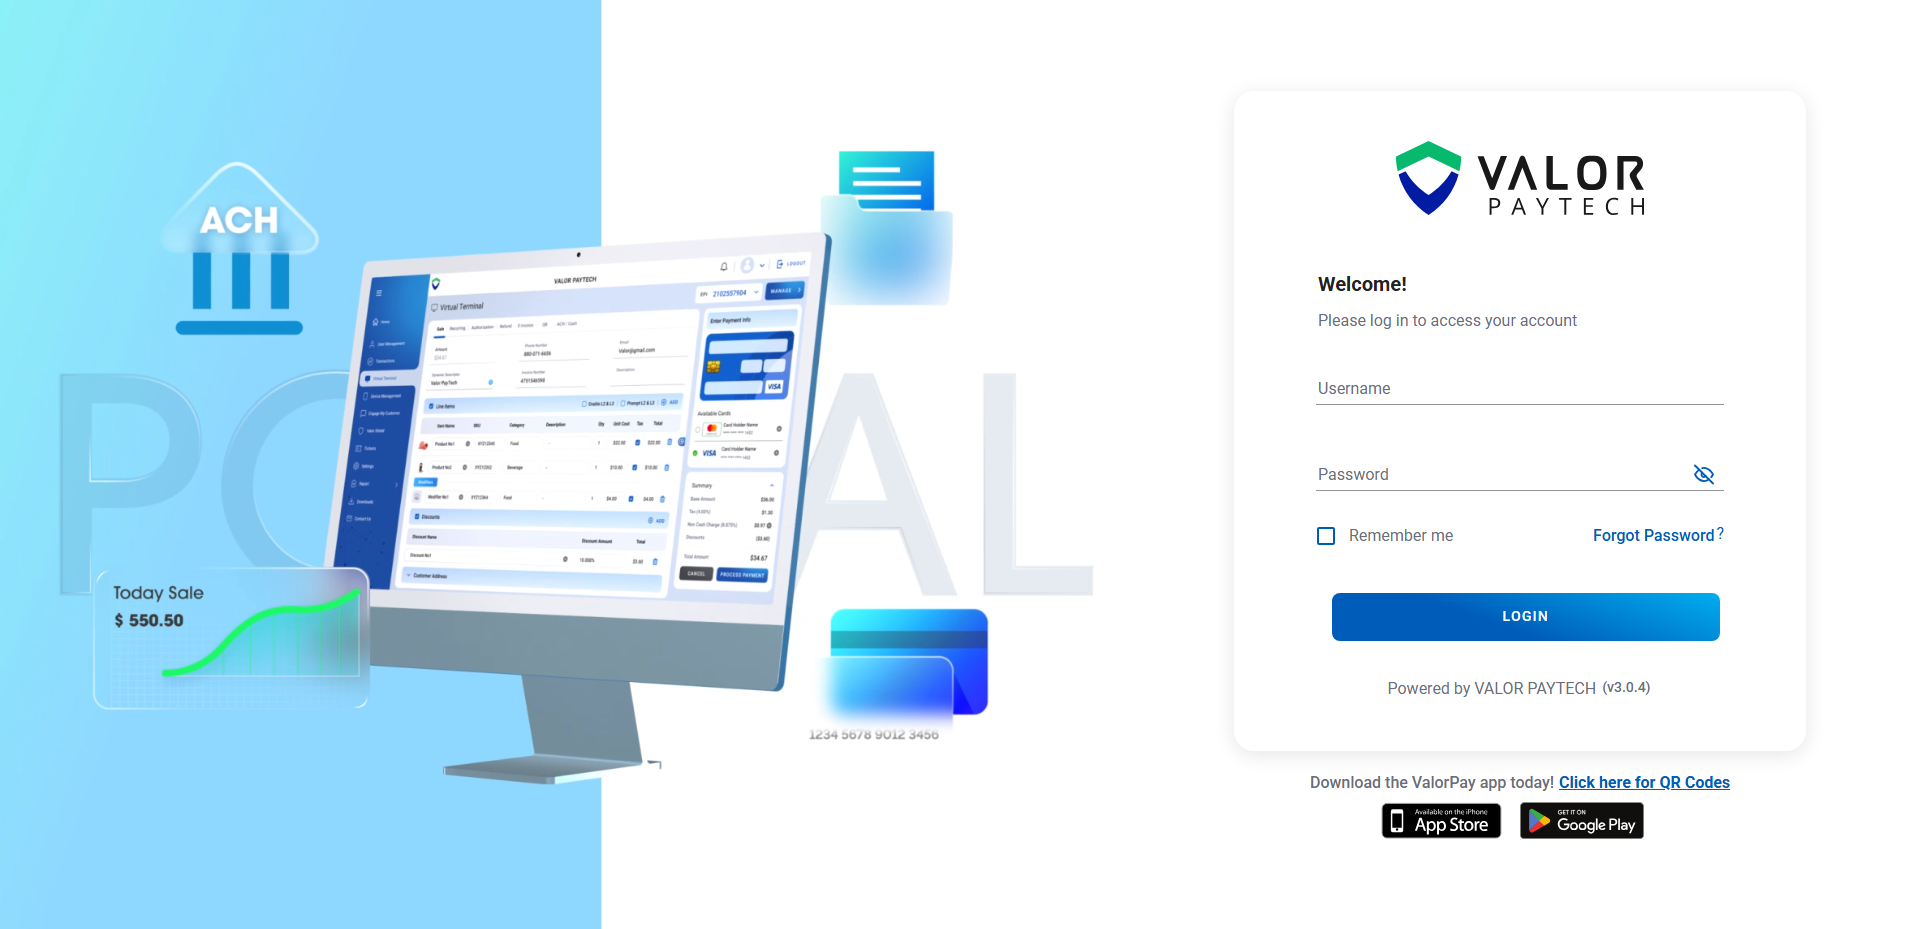
Step 1: Login to the Valor portal
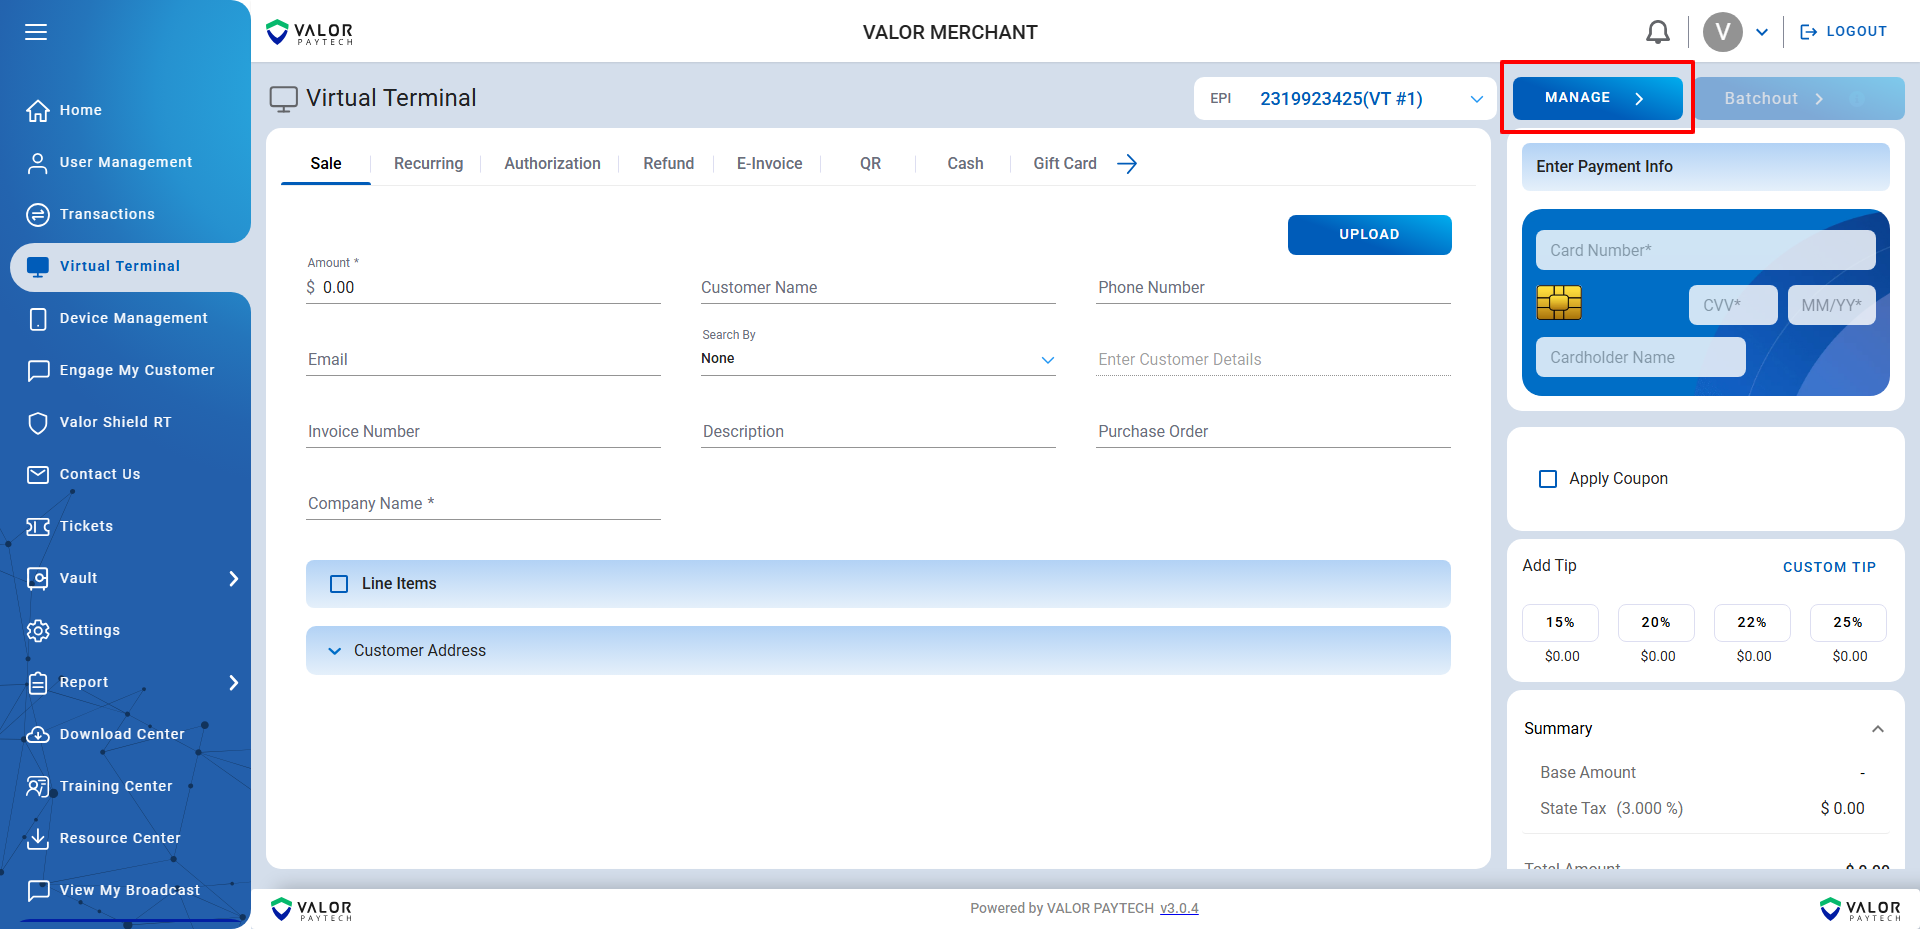
Step 2: Click on "Manage" option in "Virtual Terminal" in side menu
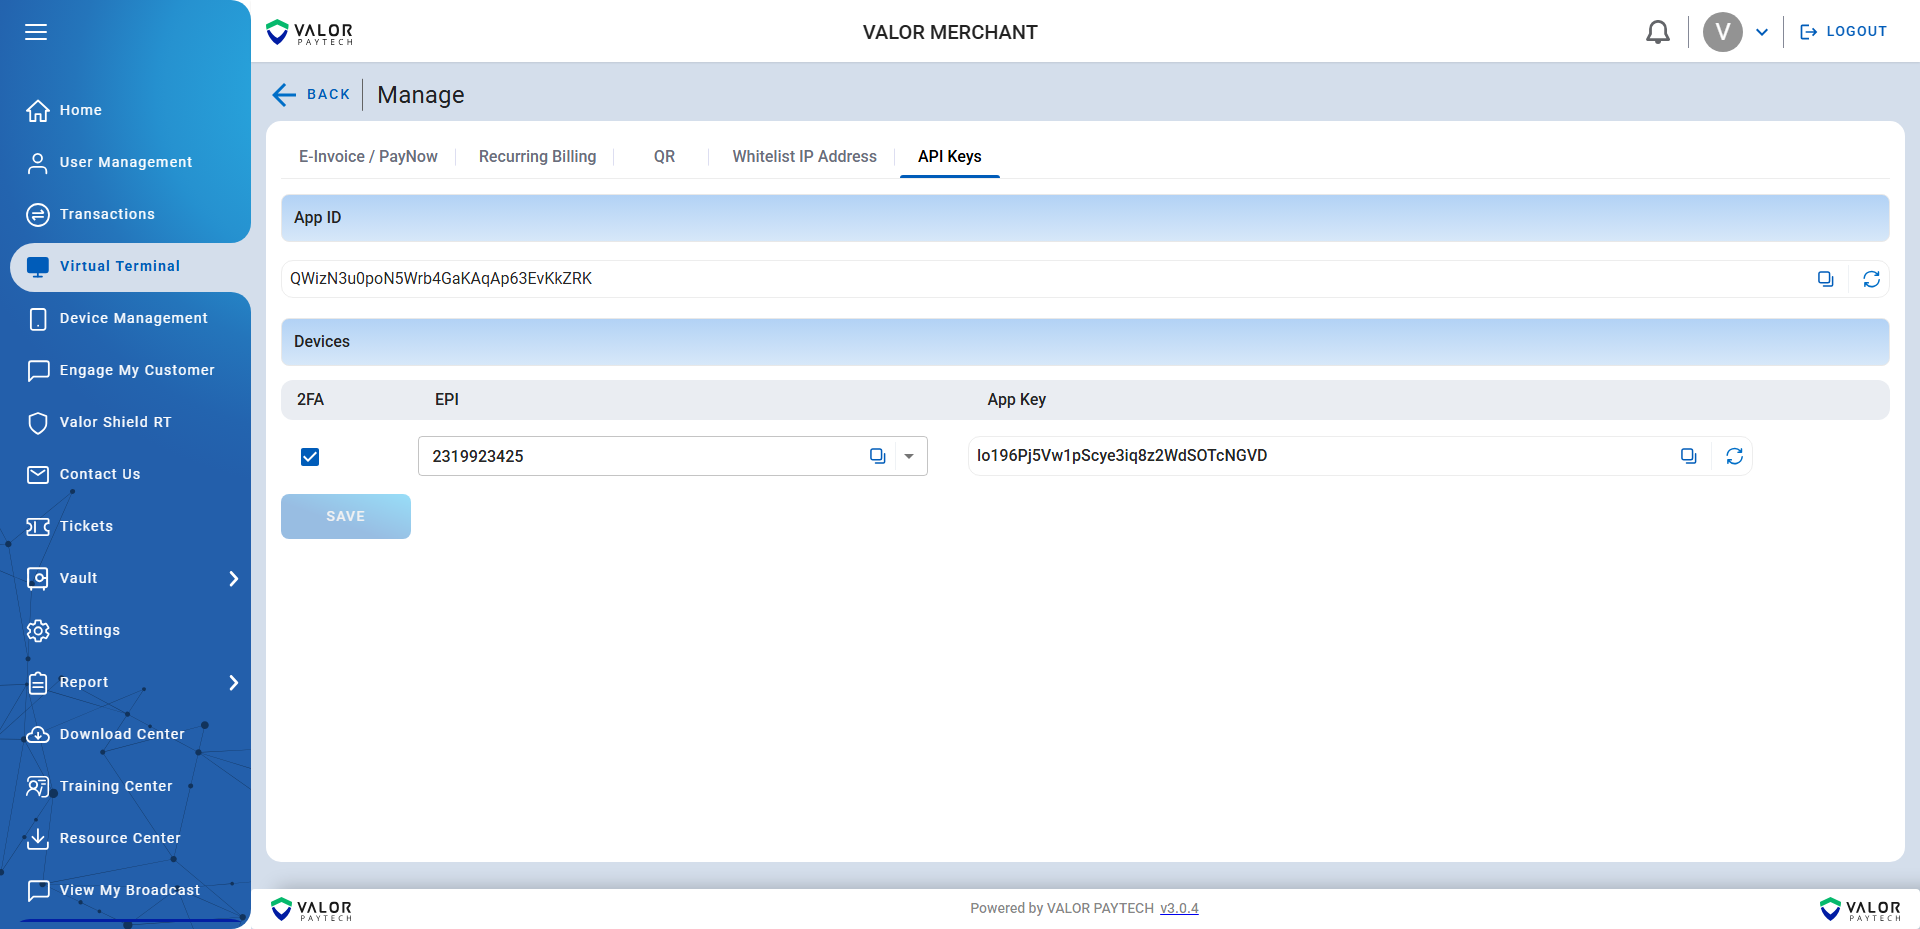
Step 3: Under "API KEYS" you can find your APP ID, APP Key and EPI
Generating Client Token
Merchants can generate a Client Token to handle authentication instead of using APP ID and APP Key. The generated token should be used in the Passage.js script via the data-clientToken attribute.
Example Client Token:
7b9e2a55-720d-4533-bb70-9376a378eae4
API Endpoints for Client Token
| Environment | URL |
|---|---|
| Demo | https://securelink-staging.valorpaytech.com:4430 |
Sample API Calls
<?php
require_once('vendor/autoload.php');

$client = new \GuzzleHttp\Client();

$response = $client->request('POST', 'https://securelink-staging.valorpaytech.com:4430/?saleapi=', [
  'body' => '{"appid":"QWizN3u0poN5Wrb4GaKAqAp63EvKkZRK","appkey":"lo196Pj5Vw1pScye3iq8z2WdSOTcNGVD","epi":"2319923425","txn_type":"sale","amount":"84.00","phone":"9677193050","email":"[email protected]","tax_amount":"0","surchargeIndicator":1,"surchargeAmount":"1.20","address1":"8320","address2":"2nd street","city":"New York","state":"CO","zip":"85284","billing_country":"US","shipping_country":"US","cardnumber":"4111111111111111","status":"Y","cvv":"999","expirydate":"1224"}',
  'headers' => [
    'accept' => 'application/json',
    'content-type' => 'application/json',
  ],
]);

echo $response->getBody();
import requests

url = "https://securelink-staging.valorpaytech.com:4430/?saleapi="

payload = {
    "appid": "QWizN3u0poN5Wrb4GaKAqAp63EvKkZRK",
    "appkey": "lo196Pj5Vw1pScye3iq8z2WdSOTcNGVD",
    "epi": "2319923425",
    "txn_type": "sale",
    "amount": "84.00",
    "phone": "9677193050",
    "email": "[email protected]",
    "tax_amount": "0",
    "surchargeIndicator": 1,
    "surchargeAmount": "1.20",
    "address1": "8320",
    "address2": "2nd street",
    "city": "New York",
    "state": "CO",
    "zip": "85284",
    "billing_country": "US",
    "shipping_country": "US",
    "cardnumber": "4111111111111111",
    "status": "Y",
    "cvv": "999",
    "expirydate": "1224"
}
headers = {
    "accept": "application/json",
    "content-type": "application/json"
}

response = requests.post(url, json=payload, headers=headers)

print(response.text)
const url = 'https://securelink-staging.valorpaytech.com:4430/?saleapi=';
const options = {
  method: 'POST',
  headers: {accept: 'application/json', 'content-type': 'application/json'},
  body: JSON.stringify({
    appid: 'QWizN3u0poN5Wrb4GaKAqAp63EvKkZRK',
    appkey: 'lo196Pj5Vw1pScye3iq8z2WdSOTcNGVD',
    epi: '2319923425',
    txn_type: 'sale',
    amount: '84.00',
    phone: '9677193050',
    email: '[email protected]',
    tax_amount: '0',
    surchargeIndicator: 1,
    surchargeAmount: '1.20',
    address1: '8320',
    address2: '2nd street',
    city: 'New York',
    state: 'CO',
    zip: '85284',
    billing_country: 'US',
    shipping_country: 'US',
    cardnumber: '4111111111111111',
    status: 'Y',
    cvv: '999',
    expirydate: '1224'
  })
};

fetch(url, options)
  .then(res => res.json())
  .then(json => console.log(json))
  .catch(err => console.error(err));
CURL *hnd = curl_easy_init();

curl_easy_setopt(hnd, CURLOPT_CUSTOMREQUEST, "POST");
curl_easy_setopt(hnd, CURLOPT_WRITEDATA, stdout);
curl_easy_setopt(hnd, CURLOPT_URL, "https://securelink-staging.valorpaytech.com:4430/?saleapi=");

struct curl_slist *headers = NULL;
headers = curl_slist_append(headers, "accept: application/json");
headers = curl_slist_append(headers, "content-type: application/json");
curl_easy_setopt(hnd, CURLOPT_HTTPHEADER, headers);

curl_easy_setopt(hnd, CURLOPT_POSTFIELDS, "{\"appid\":\"QWizN3u0poN5Wrb4GaKAqAp63EvKkZRK\",\"appkey\":\"lo196Pj5Vw1pScye3iq8z2WdSOTcNGVD\",\"epi\":\"2319923425\",\"txn_type\":\"sale\",\"amount\":\"84.00\",\"phone\":\"9677193050\",\"email\":\"[email protected]\",\"tax_amount\":\"0\",\"surchargeIndicator\":1,\"surchargeAmount\":\"1.20\",\"address1\":\"8320\",\"address2\":\"2nd street\",\"city\":\"New York\",\"state\":\"CO\",\"zip\":\"85284\",\"billing_country\":\"US\",\"shipping_country\":\"US\",\"cardnumber\":\"4111111111111111\",\"status\":\"Y\",\"cvv\":\"999\",\"expirydate\":\"1224\"}");

CURLcode ret = curl_easy_perform(hnd);
using RestSharp;


var options = new RestClientOptions("https://securelink-staging.valorpaytech.com:4430/?saleapi=");
var client = new RestClient(options);
var request = new RestRequest("");
request.AddHeader("accept", "application/json");
request.AddJsonBody("{\"appid\":\"QWizN3u0poN5Wrb4GaKAqAp63EvKkZRK\",\"appkey\":\"lo196Pj5Vw1pScye3iq8z2WdSOTcNGVD\",\"epi\":\"2319923425\",\"txn_type\":\"sale\",\"amount\":\"84.00\",\"phone\":\"9677193050\",\"email\":\"[email protected]\",\"tax_amount\":\"0\",\"surchargeIndicator\":1,\"surchargeAmount\":\"1.20\",\"address1\":\"8320\",\"address2\":\"2nd street\",\"city\":\"New York\",\"state\":\"CO\",\"zip\":\"85284\",\"billing_country\":\"US\",\"shipping_country\":\"US\",\"cardnumber\":\"4111111111111111\",\"status\":\"Y\",\"cvv\":\"999\",\"expirydate\":\"1224\"}", false);
var response = await client.PostAsync(request);

Console.WriteLine("{0}", response.Content);
package main

import (
	"fmt"
	"strings"
	"net/http"
	"io"
)

func main() {

	url := "https://securelink-staging.valorpaytech.com:4430/?saleapi="

	payload := strings.NewReader("{\"appid\":\"QWizN3u0poN5Wrb4GaKAqAp63EvKkZRK\",\"appkey\":\"lo196Pj5Vw1pScye3iq8z2WdSOTcNGVD\",\"epi\":\"2319923425\",\"txn_type\":\"sale\",\"amount\":\"84.00\",\"phone\":\"9677193050\",\"email\":\"[email protected]\",\"tax_amount\":\"0\",\"surchargeIndicator\":1,\"surchargeAmount\":\"1.20\",\"address1\":\"8320\",\"address2\":\"2nd street\",\"city\":\"New York\",\"state\":\"CO\",\"zip\":\"85284\",\"billing_country\":\"US\",\"shipping_country\":\"US\",\"cardnumber\":\"4111111111111111\",\"status\":\"Y\",\"cvv\":\"999\",\"expirydate\":\"1224\"}")

	req, _ := http.NewRequest("POST", url, payload)

	req.Header.Add("accept", "application/json")
	req.Header.Add("content-type", "application/json")

	res, _ := http.DefaultClient.Do(req)

	defer res.Body.Close()
	body, _ := io.ReadAll(res.Body)

	fmt.Println(string(body))

}
require 'uri'
require 'net/http'

url = URI("https://securelink-staging.valorpaytech.com:4430/?saleapi=")

http = Net::HTTP.new(url.host, url.port)
http.use_ssl = true

request = Net::HTTP::Post.new(url)
request["accept"] = 'application/json'
request["content-type"] = 'application/json'
request.body = "{\"appid\":\"QWizN3u0poN5Wrb4GaKAqAp63EvKkZRK\",\"appkey\":\"lo196Pj5Vw1pScye3iq8z2WdSOTcNGVD\",\"epi\":\"2319923425\",\"txn_type\":\"sale\",\"amount\":\"84.00\",\"phone\":\"9677193050\",\"email\":\"[email protected]\",\"tax_amount\":\"0\",\"surchargeIndicator\":1,\"surchargeAmount\":\"1.20\",\"address1\":\"8320\",\"address2\":\"2nd street\",\"city\":\"New York\",\"state\":\"CO\",\"zip\":\"85284\",\"billing_country\":\"US\",\"shipping_country\":\"US\",\"cardnumber\":\"4111111111111111\",\"status\":\"Y\",\"cvv\":\"999\",\"expirydate\":\"1224\"}"

response = http.request(request)
puts response.read_body
Sample Response
{
  "error_no": "S00",
  "error_code": "00",
  "clientToken": "7b9e2a55-720d-4533-bb70-9376a378eae4",
  "validity": "2023-01-05 12:44:01"
}
Required Fields
| Field | Type | Length | Mandatory | Description |
|---|---|---|---|---|
appid | string | 32 | Yes | Contact Valor PayTech |
appkey | string | 32 | Yes | Contact Valor PayTech |
txn_type | string | 15 | Yes | Type of transaction (e.g., sale) |
epi | numeric | 10 | Yes | Merchant EPI number |
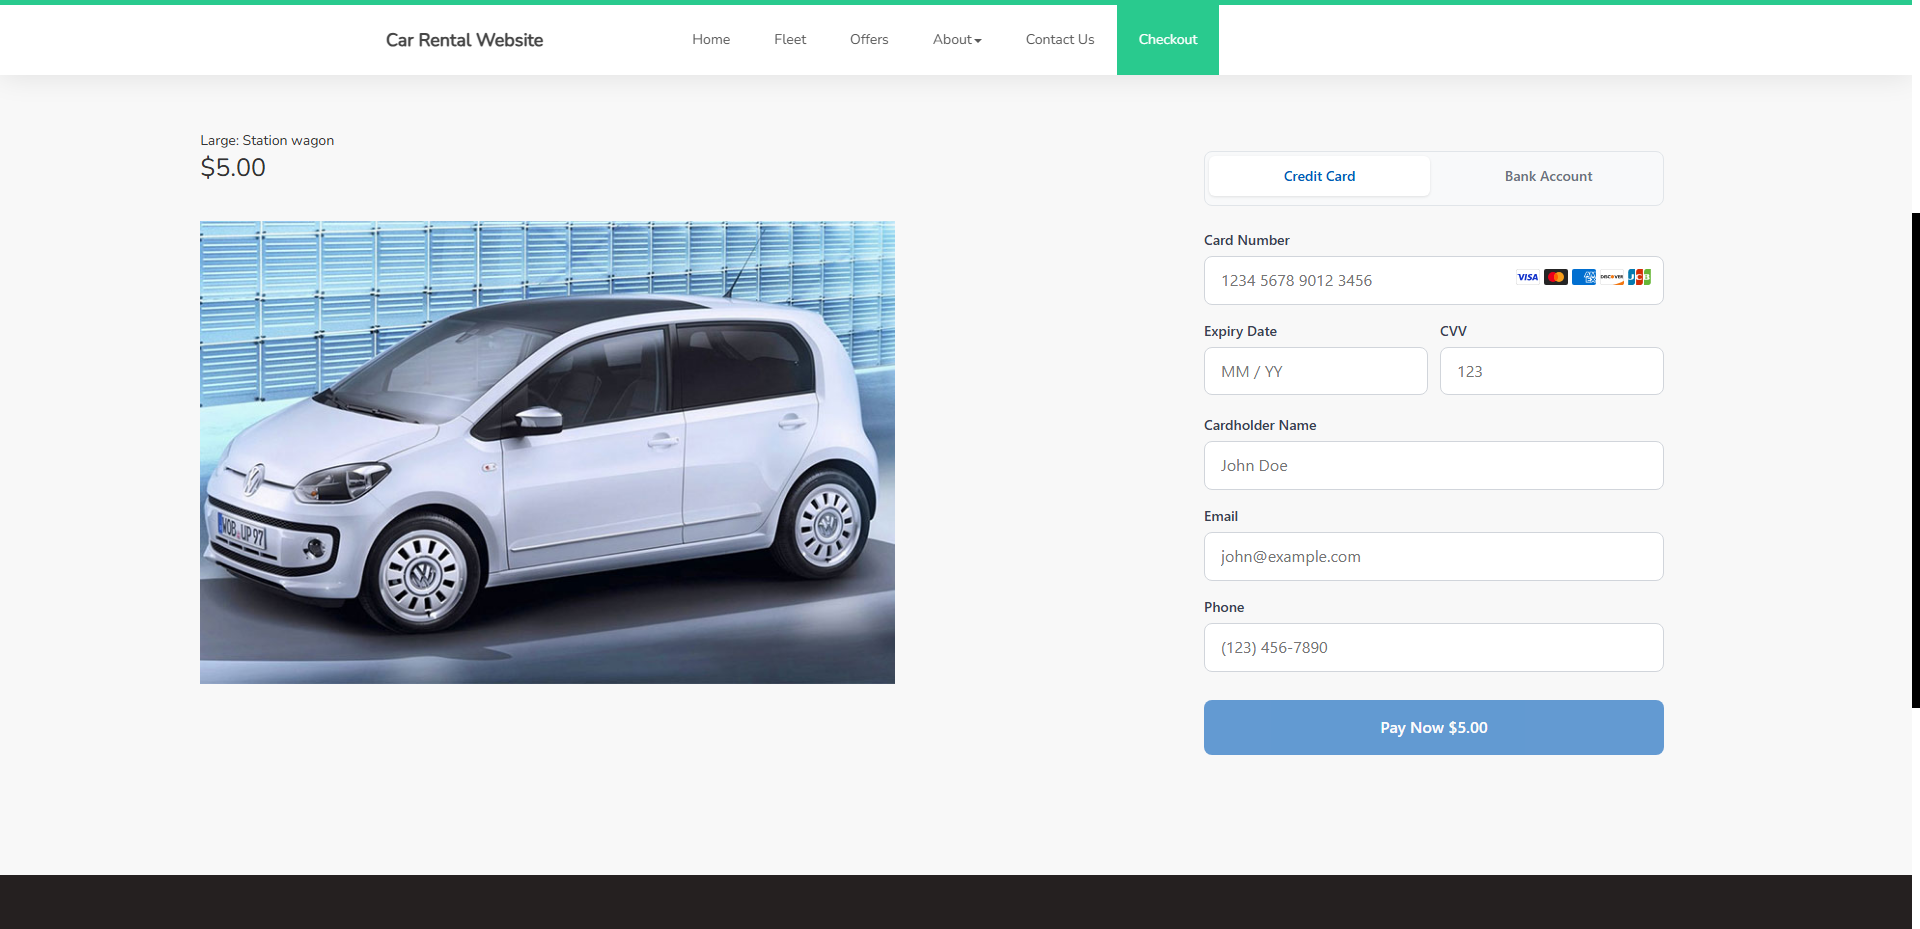
Integrating the Script
After retrieving the client token, integrate the Passage.js script in your checkout page where you want to process card details and payments. Pass the token to the script using the data-clientToken attribute.
Passage.js is a comprehensive payment form library supporting both Credit Cards and ACH payments with secure tokenization and seamless integration.
Table of Contents
- Overview
- Features
- Installation
- Quick Start
- Configuration
- Payment Methods
- Events & Callbacks
- Custom Data
- API Reference
- Integration Examples
- Security
- Troubleshooting
Overview
PassageJS v2.0 is a vanilla JavaScript payment library that provides secure, PCI-compliant payment processing for both credit cards and ACH (bank account) payments. Key features include:
- Automatic card tokenization
- Real-time validation
- Comprehensive event system for seamless integration
Key Benefits
- 🔒 Secure – Card tokenization ensures sensitive data never touches your servers
- 🎨 Customizable – Flexible UI with inline and lightbox modes
- 📱 Responsive – Mobile-optimized design for all devices
- ⚡ Fast – Vanilla JavaScript with no dependencies
- 🔧 Flexible – Comprehensive event system and custom data support
Features
Payment Processing
- Credit card tokenization via Valor PayTech API
- Direct ACH payment submission
- Real-time form validation and automatic field formatting
- Session management
UI/UX
- Inline and lightbox display modes
- Responsive design
- Custom styling options
- Card type detection with icons
- Loading states and error messages
Integration
- Comprehensive event system
- Custom data injection
- Parent form integration
- Multiple callback options
- Easy configuration updates
Installation
Option 1: Direct Script Include
<script src="https://js.valorpaytech.com/V2/js/Passage.min.js"></script>
Option 2: Module Import
import PassageJS from './passage-v2.js';
HTML Setup
Add a container element where the payment form will render:
<div id="valor-fields"></div>
Or, for custom form IDs:
<div id="custom_form_id"></div>
Quick Start
Basic Credit Card Setup
const passage = new PassageJS({
  clientToken: 'your_valor_client_token',
  epi: 'your_valor_epi',
  formAction: '/process-payment',

  onSuccess: (result) => {
    console.log('Payment successful:', result);
    window.location.href = '/success';
  },

  onError: (error) => {
    console.error('Payment failed:', error);
    alert('Payment failed. Please try again.');
  }
});
Lightbox Mode
const passage = new PassageJS({
  clientToken: 'your_valor_client_token',
  epi: 'your_valor_epi',
  formAction: '/process-payment',
  variant: 'lightbox',
  submitText: 'Pay Now'
});
Configuration
Required Settings
| Option | Type | Description |
|---|---|---|
clientToken | string | Your Valor PayTech client token |
epi | string | Your Valor PayTech EPI identifier |
formAction | string | URL where payment data will be submitted |
Core Settings Example
const config = {
  clientToken: 'your_client_token',
  epi: 'your_epi',
  formAction: '/process-payment',

  // Optional
  isDemo: true,
  formMethod: 'POST',
  customData: {},

  // UI Settings
  variant: 'inline', // 'inline' | 'lightbox'
  theme: 'default',
  submitText: 'Pay Now',
  submitBg: '#005cb9',
  submitColor: '#fff',

  enableACH: true,
  defaultPaymentMethod: 'credit-card',

  // Form Fields
  showLogo: false,
  showCardholderName: true,
  showEmail: false,
  showPhone: false,
  showBillingAddress: false,
  showAdditonalInput1: false,
  showAdditonalInput2: false,
  showAdditonalInput3: false,
  showCustomAmount: false,

  // Custom form container ID
  formFieldId: "custom_form_id",

  // Session
  sessionExpiryMinutes: 5
};
Default Values
const passage = new PassageJS({
  defaults: {
    cardholderName: 'John Doe',
    email: '[email protected]',
    phone: '(555) 123-4567',
    address1: '123 Main St',
    zip: '10001'
  }
});
Payment Configuration
| Property | Type | Required | Default | Description |
|---|---|---|---|---|
clientToken | string | ✅ Yes | — | Unique token provided to authenticate and authorize the client request. |
epi | string | ✅ Yes | — | Merchant identifier (EPI) used to identify the merchant account. |
formAction | string | ✅ Yes | — | Endpoint or route where the payment form data will be submitted. |
isDemo | boolean | ❌ No | true | Routes to demo (sandbox) environment if true, otherwise production. |
formMethod | string | ❌ No | POST | HTTP method used to submit the form. |
customData | object | ❌ No | {} | Custom key-value data to send along with the payment request. |
variant | string | ❌ No | inline | Form display type: inline (embedded) or lightbox (modal popup). |
theme | string | ❌ No | default | UI theme applied to the payment form. |
submitText | string | ❌ No | Pay Now | Text displayed on the submit button. |
submitBg | string | ❌ No | #005cb9 | Background color of the submit button. |
submitColor | string | ❌ No | #fff | Text color of the submit button. |
enableACH | boolean | ❌ No | false | Enables ACH (bank transfer) payment option when true. |
defaultPaymentMethod | string | ❌ No | credit-card | Default selected payment method (e.g., credit-card, ach). |
enableBinValidation | boolean | ❌ No | false | Enables BIN (Bank Identification Number) validation to verify card type and issuer details during entry. |
showCvvField | boolean | ❌ No | true | Controls visibility of the CVV (Card Verification Value) field in the payment form. |
showLogo | boolean | ❌ No | false | Displays merchant logo on the payment form. |
showCardholderName | boolean | ❌ No | true | Shows input field for cardholder name. |
showEmail | boolean | ❌ No | false | Shows input field for customer email. |
showPhone | boolean | ❌ No | false | Shows input field for customer phone number. |
showBillingAddress | boolean | ❌ No | false | Displays billing address fields. |
showAdditonalInput1 | boolean | ❌ No | false | Enables custom additional input field 1. |
showAdditonalInput2 | boolean | ❌ No | false | Enables custom additional input field 2. |
showAdditonalInput3 | boolean | ❌ No | false | Enables custom additional input field 3. |
showCustomAmount | boolean | ❌ No | false | Allows user to enter a custom payment amount. |
formFieldId | string | ❌ No | — | HTML container ID where the form will be rendered. |
sessionExpiryMinutes | number | ❌ No | 5 | Time in minutes before the payment session expires. |
enableCardDetails | boolean | ❌ No | false | The sale response will include the card brand and the last four digits of the card number. |
Payment Methods
Credit Card Processing
- User enters card details → real-time validation
- Form submission → card data sent to Valor for tokenization
- Token received → sensitive data replaced with secure token
- Form submitted → only token and metadata sent to your server
Server receives:
card_tokenpayment_method(credit-card)cardholder_name(if enabled)- Customer and custom data
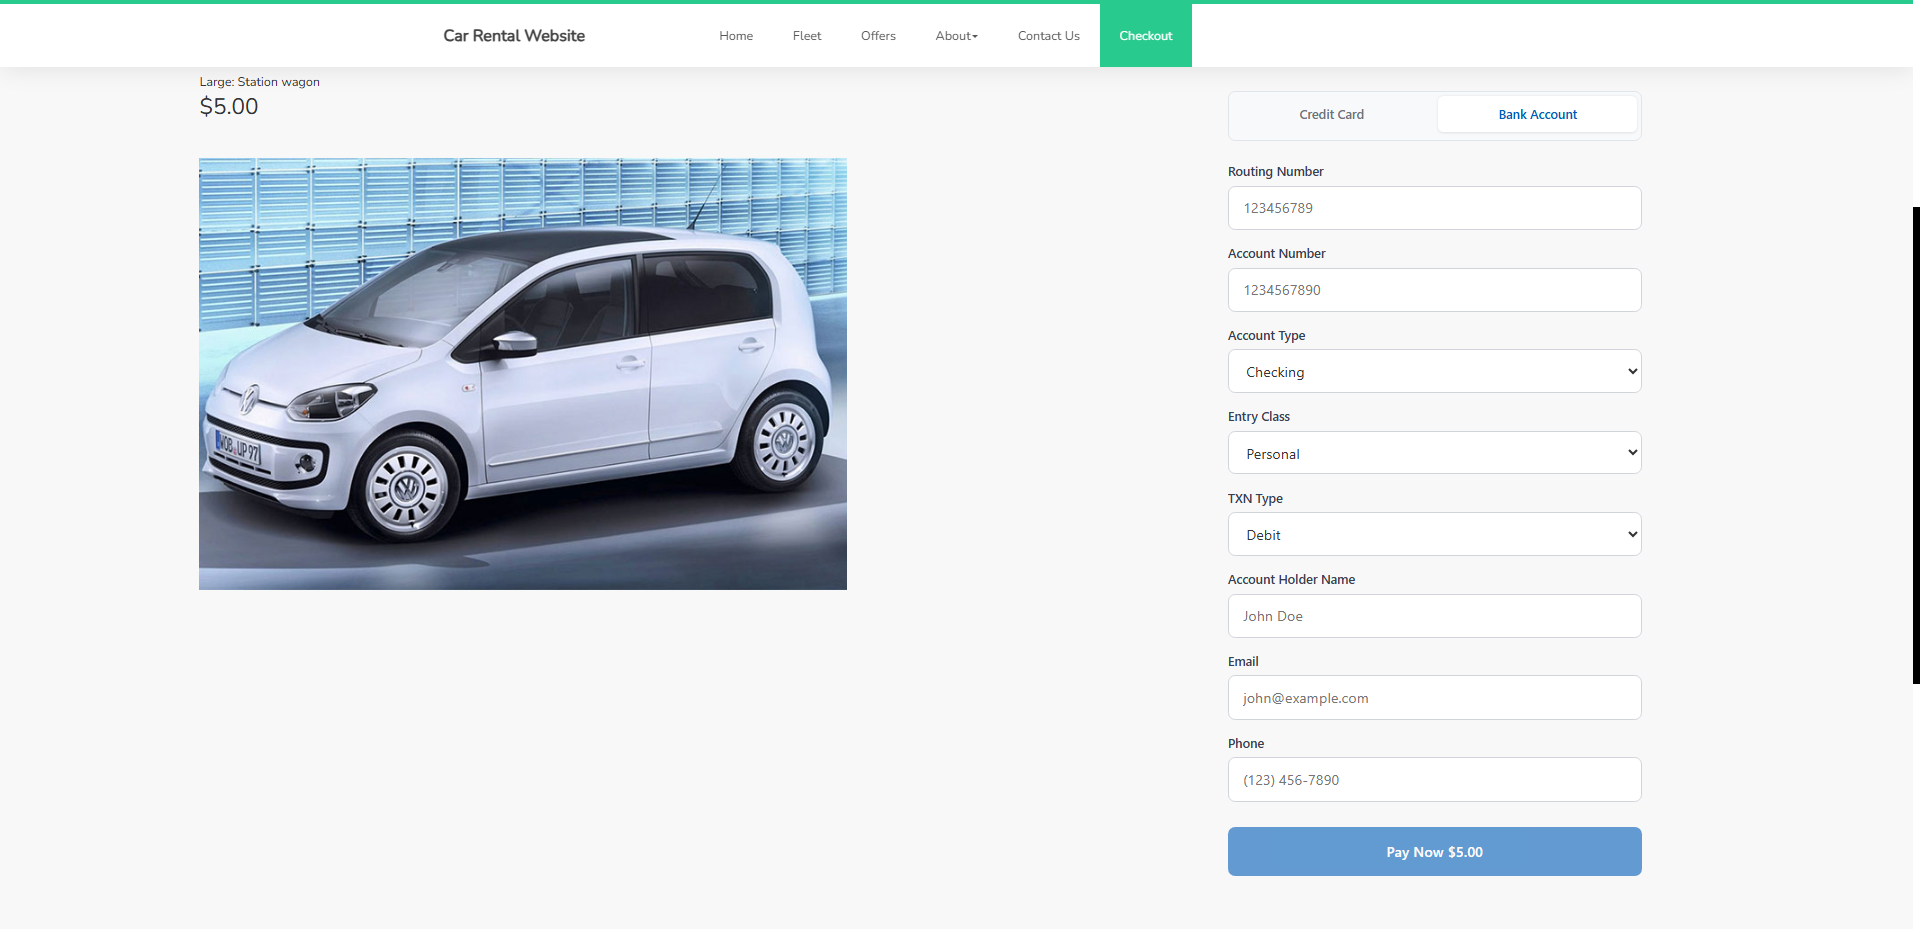
ACH (Bank Account) Processing
Server receives:
payment_method(ach)routing_numberaccount_numberaccount_type(checkingorsavings)account_holder_name- Customer and custom data
Events & Callbacks
Event System Example
passage.on('tokenReceived', (data) => {
  console.log('Card tokenized:', data.token);
});

passage.on('formSubmitting', (data) => {
  console.log('Submitting to:', data.action);
});

passage.on('validationChanged', (data) => {
  console.log('Form valid:', data.isValid);
});
Available Events
| Event | Description |
|---|---|
initialized | Library loaded and ready |
lightboxOpened | Lightbox modal opened |
lightboxClosed | Lightbox modal closed |
paymentMethodChanged | User switched payment method |
fieldChanged | Form field value changed |
fieldBlurred | Form field lost focus |
validationChanged | Form validation state changed |
beforeSubmit | Before payment processing starts |
tokenReceived | Credit card token received |
formSubmitting | Form being submitted to server |
afterSubmit | After form submission |
success | Payment completed successfully |
error | Payment processing failed |
sessionExpired | Payment session expired |
Legacy Callbacks Example
const passage = new PassageJS({
  onSuccess: (result) => console.log('Payment successful:', result),
  onError: (error) => console.error('Payment failed:', error),
  onValidationChange: (isValid, validation) => console.log('Form valid:', isValid),
  onTokenReceived: (token, method) => console.log('Token received:', token),
  onFormSubmit: (formData, action) => console.log('Form submitting to:', action)
});
Custom Data
During Initialization
customData: {
  order_id: 'ORDER-12345',
  amount: '99.99',
  currency: 'USD',
  customer_id: 'CUST-789'
}
Dynamically
passage.setCustomData({ promo_code: 'SUMMER20', discount_amount: '10.00' });
Event-Based
passage.on('beforeSubmit', () => {
  passage.setCustomData({
    timestamp: new Date().toISOString(),
    session_id: getSessionId()
  });
});
Using Parent Form
<form id="checkout-form">
  <input type="hidden" name="order_id" value="ORDER-12345">
  <div id="valor-fields"></div>
</form>
API Reference
Constructor: new PassageJS(config)
Public Methods
setCustomData(data)– Add/update custom datagetCustomData()– Get current custom dataupdateConfig(newConfig)– Update configuration dynamicallygetValidationState()– Get form validation statereset()– Reset form to initial statedestroy()– Remove PassageJS instance
Event Methods
on(eventName, callback)– Listen to eventsoff(eventName, callback)– Remove event listeneronce(eventName, callback)– Listen once
E-commerce Checkout
// Complete e-commerce integration
function initializeCheckout(cart) {
  const passage = new PassageJS({
    clientToken: 'your_token',
    epi: 'your_epi',
    formAction: '/process-payment',
    variant: 'lightbox',

    customData: {
      order_id: generateOrderId(),
      subtotal: cart.subtotal,
      tax: cart.tax,
      shipping: cart.shipping,
      total: cart.total,
      items_count: cart.items.length
    }
  });

  // Update total when payment method changes
  passage.on('paymentMethodChanged', (data) => {
    const fee = data.method === 'ach' ? 0 : 2.99;
    updateOrderTotal(cart.total + fee);
  });

  // Track successful payments
  passage.on('success', (result) => {
    analytics.track('payment_completed', {
      order_id: passage.getCustomData().order_id,
      payment_method: result.paymentMethod,
      amount: cart.total
    });

    window.location.href = '/order-confirmation';
  });
}
Handling the Response
Once the form is submitted, it triggers the Sale API call to process the payment.
After the transaction is completed, the API will return a response object that can be used to display a confirmation or error message to the customer, for example, by redirecting them to a Thank You page or showing an error popup.
The response will contain information such as the transaction status, response code, and authorization details.
You can find detailed information about the Sale API request and response structure, including all parameters, in the official API documentation.
For a comprehensive list of error codes and their meanings, refer to the Valor API Documentation.
Test Card & AVS Information
| Field | Value |
|---|---|
| Address | 8320 |
| Zip Code | 85284 |