
Integrations Q&A
Q&A - EPI Host Processor Info Not Found
Q1: My ecommerce site is integrated with Valor and every attempted transaction on my site gives a "EPI Host Processor Info Not Found" error? Why is that?
This error occurs when a transaction is attempted on the Cash Discounting profile or traditional profile of a merchants file build without proper processor information being set up. If you’re getting “EPI Host Processor Info Not Found” and you have disabled surcharge mode within your eCommerce panel , the traditional profile in the merchant file build likely looks like this :
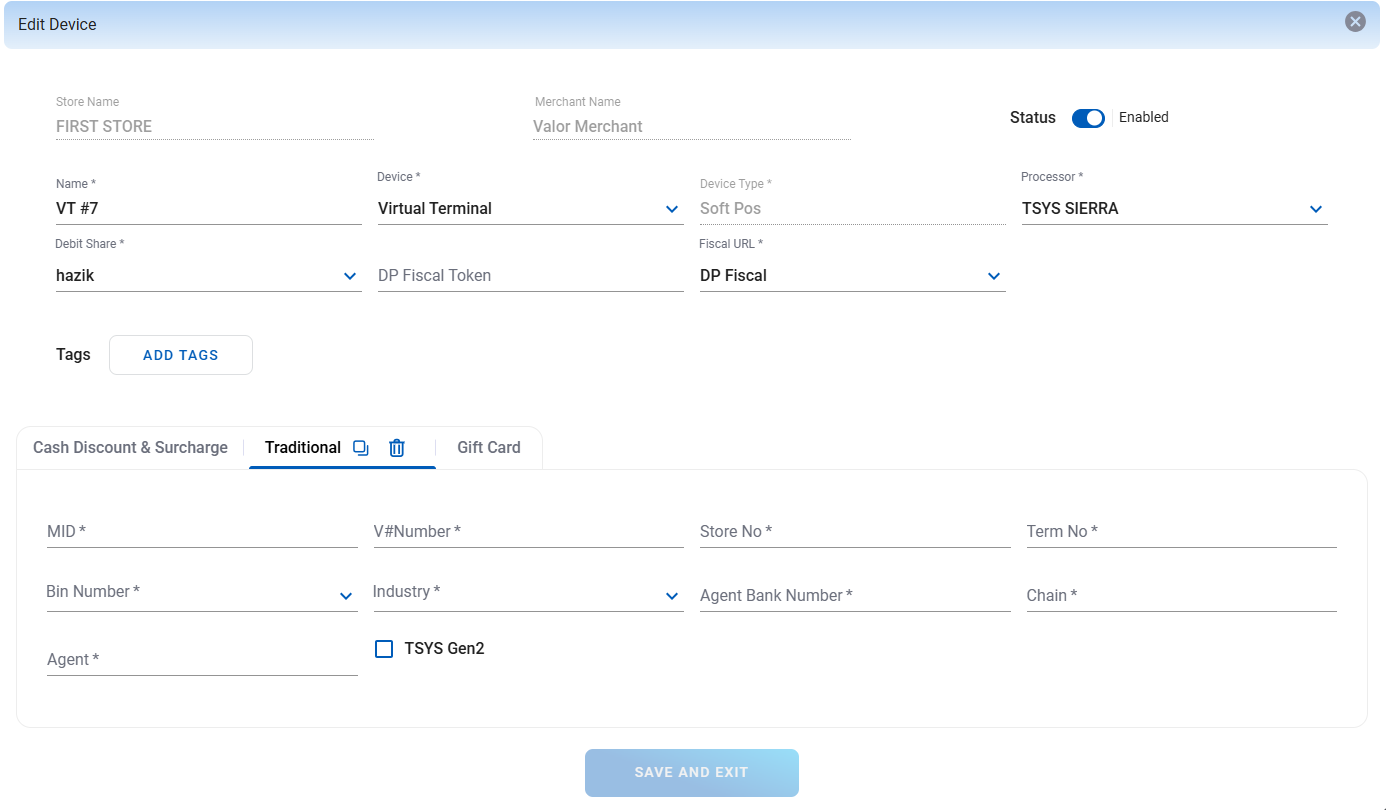
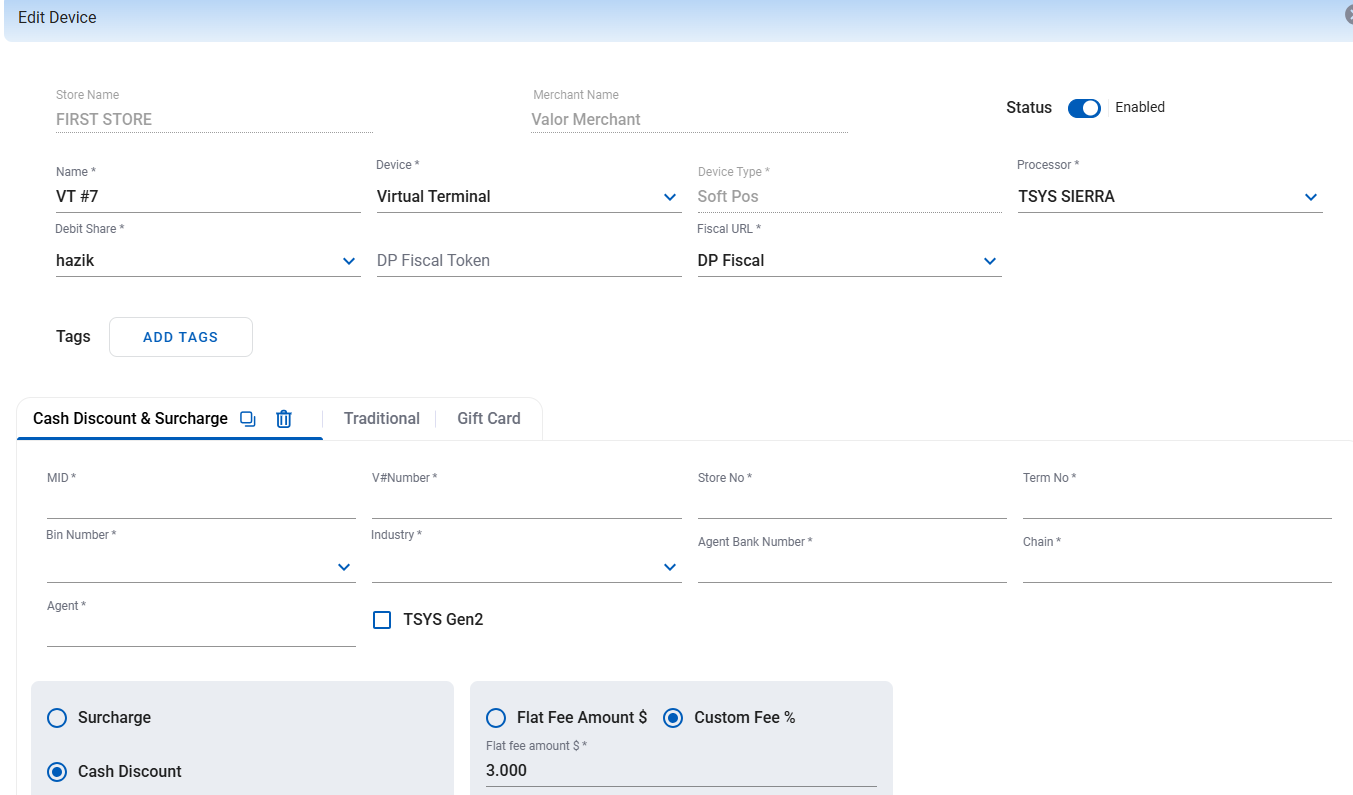
If you have surcharge mode enabled and are getting “EPI Host Processor Info Not Found” , your Cash Discounting Profile of the merchant file build likely will look like this :
Q2: What can I do to resolve “EPI Host Processor Info Not Found” on my ecommerce site ?
You will need to either verify processor info is set in the corresponding fields according to if surcharge mode is enabled or disabled.
Q3: I am using one of the Valor API to perform a transaction and receive the response “EPI Host Processor Info Not Found”. What causes this ?
The error is typically caused by missing processor information in the Cash Discounting profile or Traditional Profile if the surcharge indicator flag is set on a value linked to a profile that has missing information :
- 0: Runs on the traditional MID (no custom fee added).
- 1: Runs on the Cash Discounting MID (custom fee added).
If processor information is missing in the Cash Discounting profile, transactions using surchargeIndicator = 1 may fail . If processor information is missing in the Traditional profile, transactions using surchargeIndicator = 0 may fail
Q4: How can I resolve the EPI Host Processor Info Not Found API error?
Update the surchargeIndicator value to the corresponding profile that is configured in the merchant file build.
Q5: How can I prevent EPI Host Processor Info Not Found issue in the future?
Always verify merchant profile settings when onboarding new MID configurations. Ensure processor details are correctly set up for the profile that is desired for running transactions.
Q&A - Merchant Profile Update Required
Q1: What does the "Merchant Profile Update Required. Kindly Contact ISO" error mean?
A1: This error occurs when the merchant’s provided details (such as MID, TID, MCC Code, or other information) do not match the details stored on the processor's end when attempting a transaction via API.
Q2: What causes this error?
A2: The error is triggered due to discrepancies in the merchant profile, including:
- Incorrect MID (Merchant ID) or TID (Terminal ID)
- Mismatched MCC (Merchant Category Code)
- Inaccurate device configuration details
- Outdated or incomplete merchant profile information
Q3: How can I resolve this issue?
A3: Follow these steps to update the merchant profile and fix the mismatch:
- Login to the Valor Portal

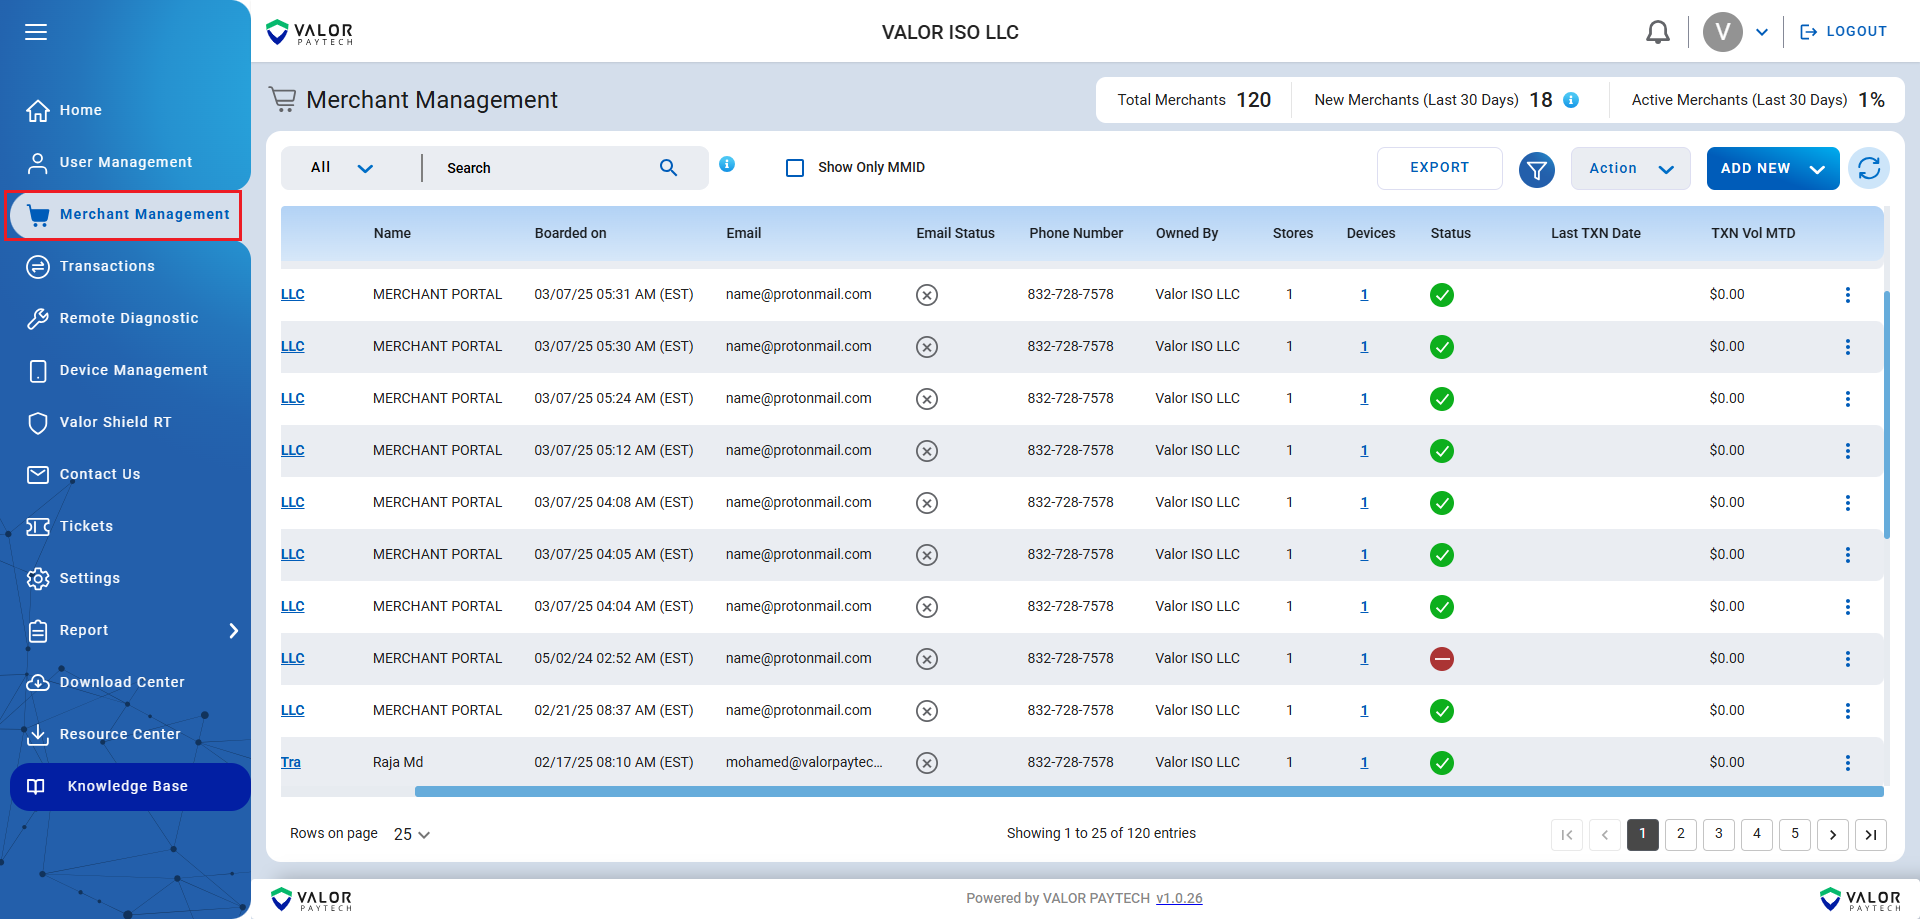
- Click Merchant Management in the side panel

- Use the search bar to find the merchant account
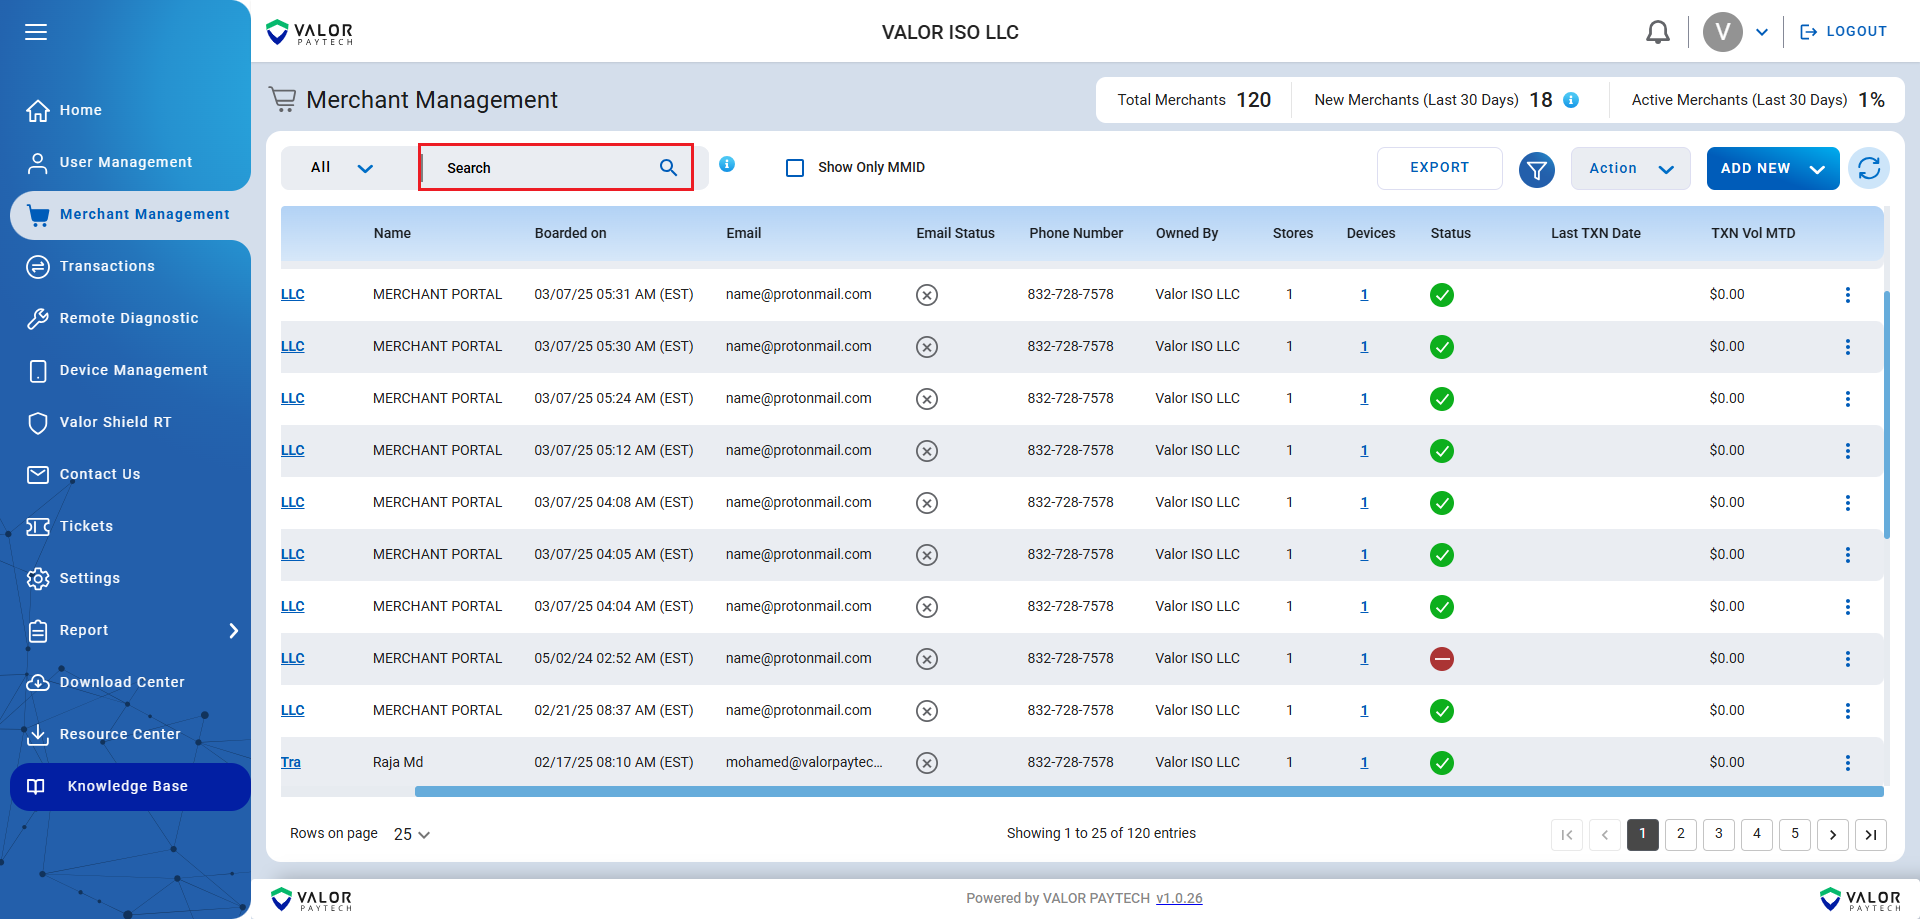
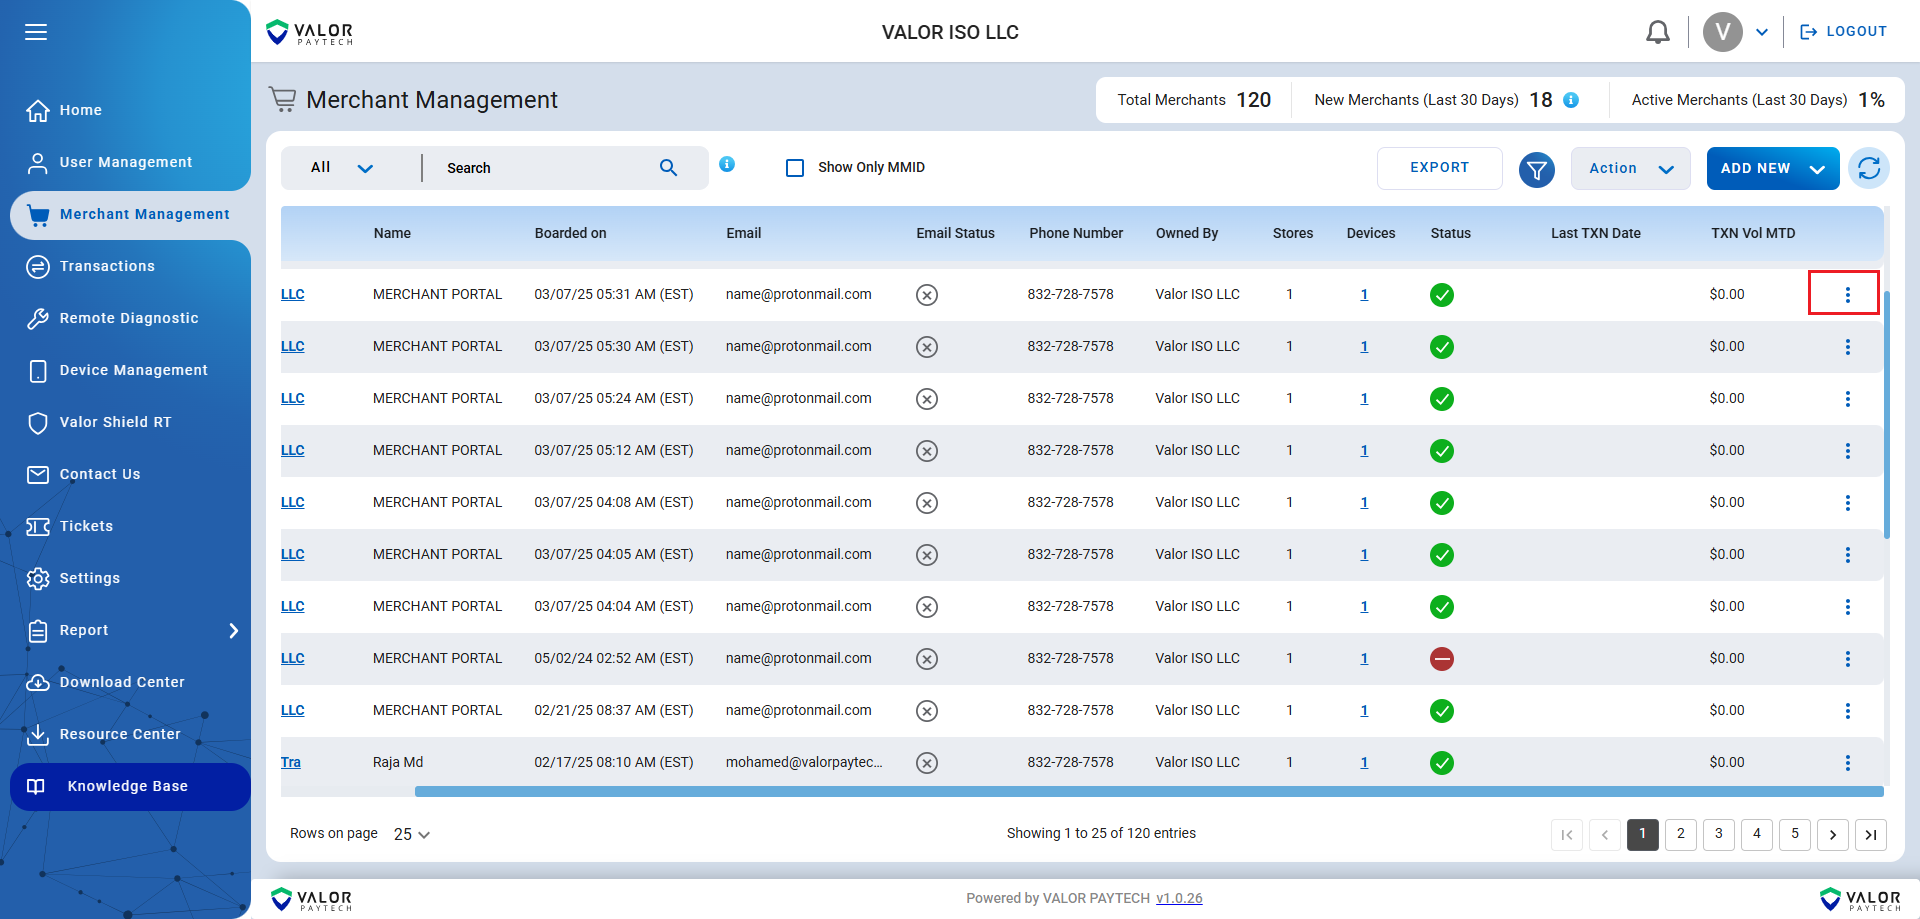
- Click the three dots at the far right of the desired merchant entry

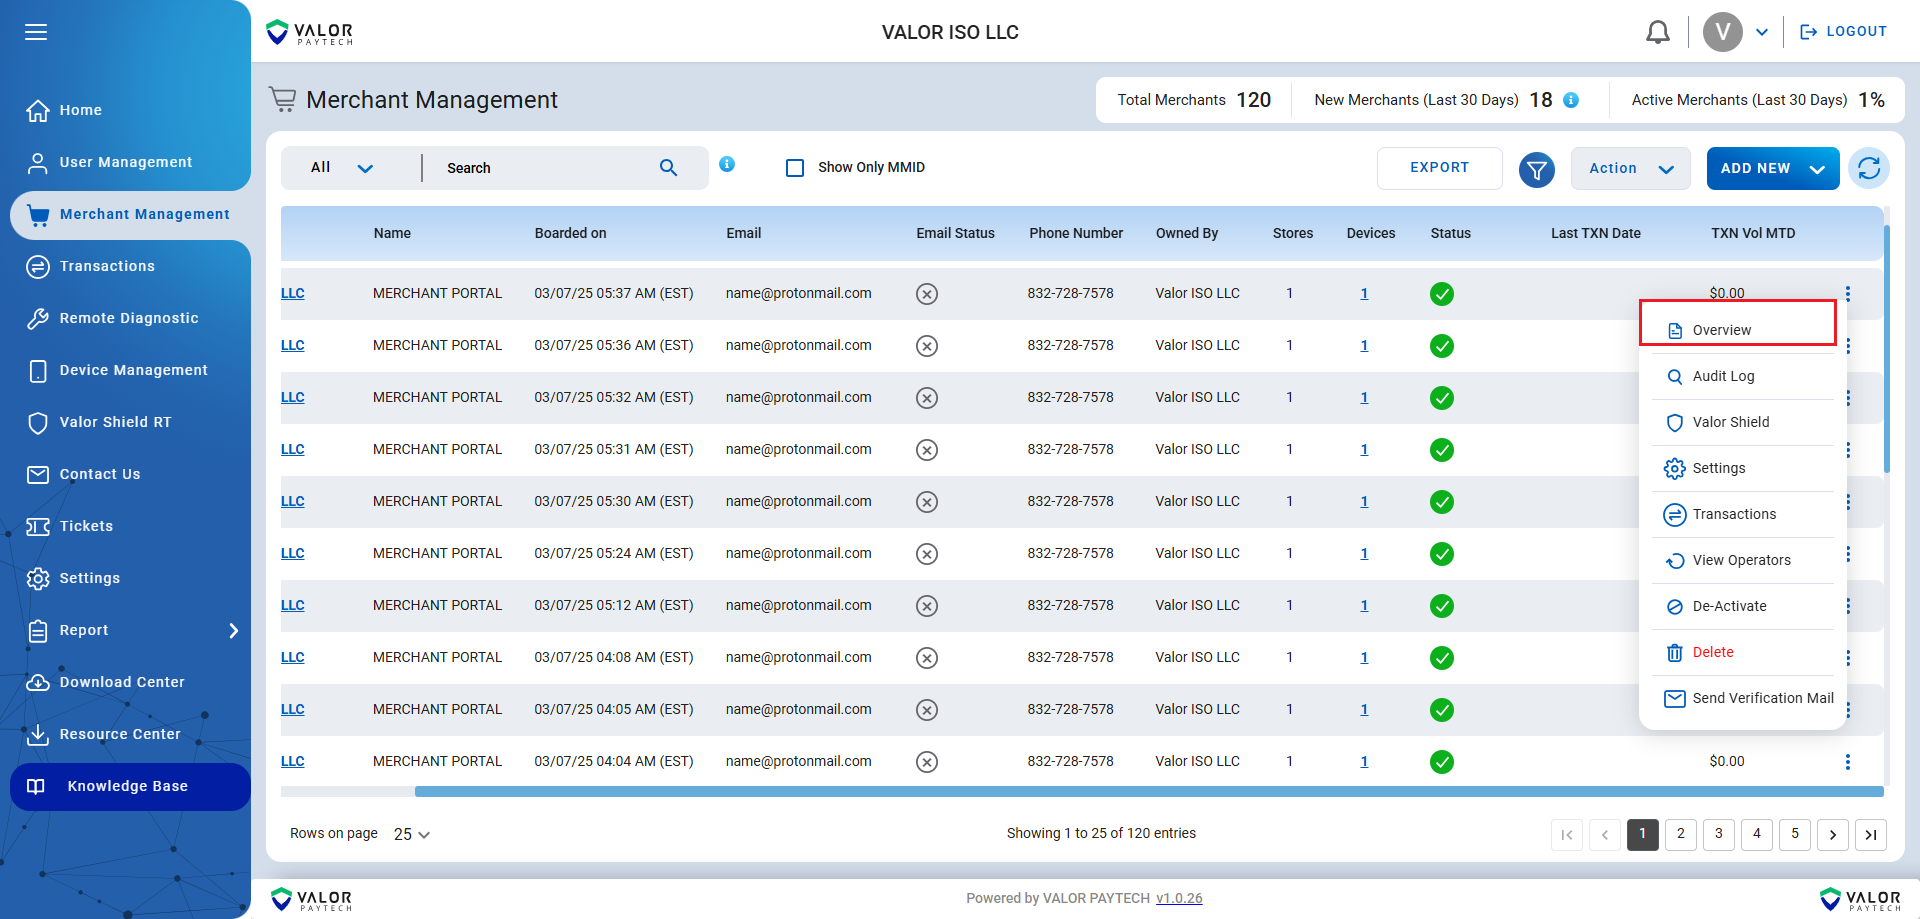
- Select Overview

- Navigate to Devices In Store
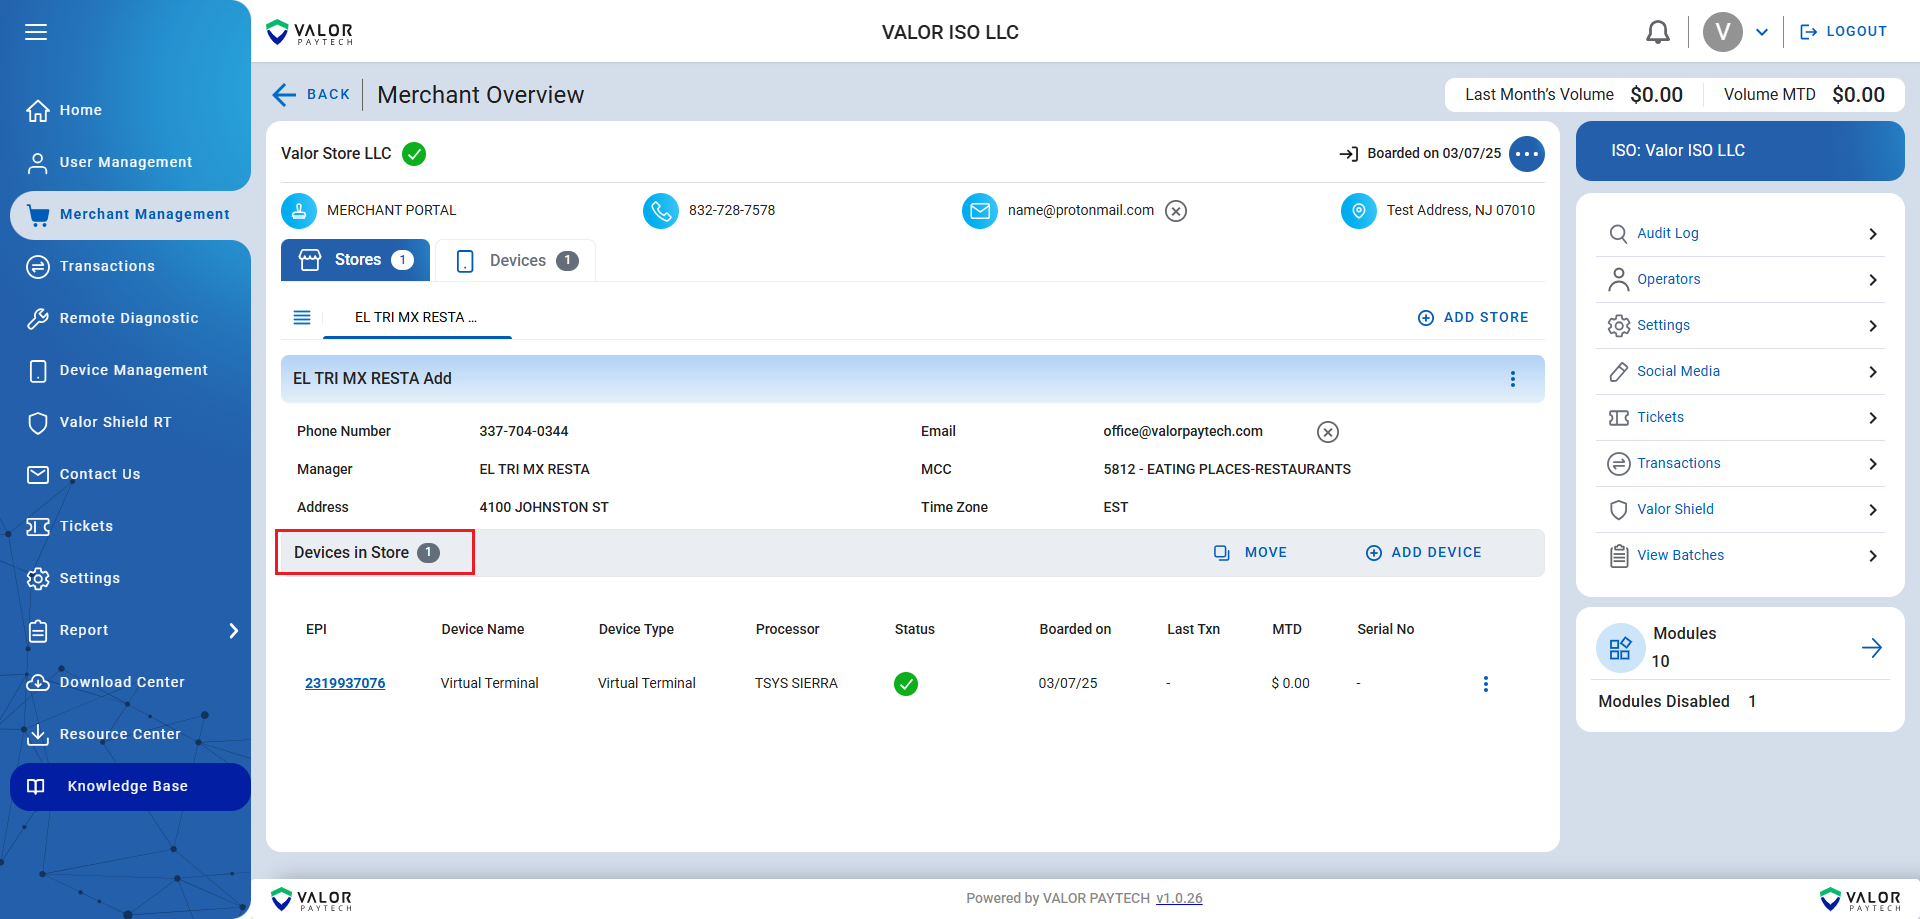
- Click the three dots on the device receiving the error
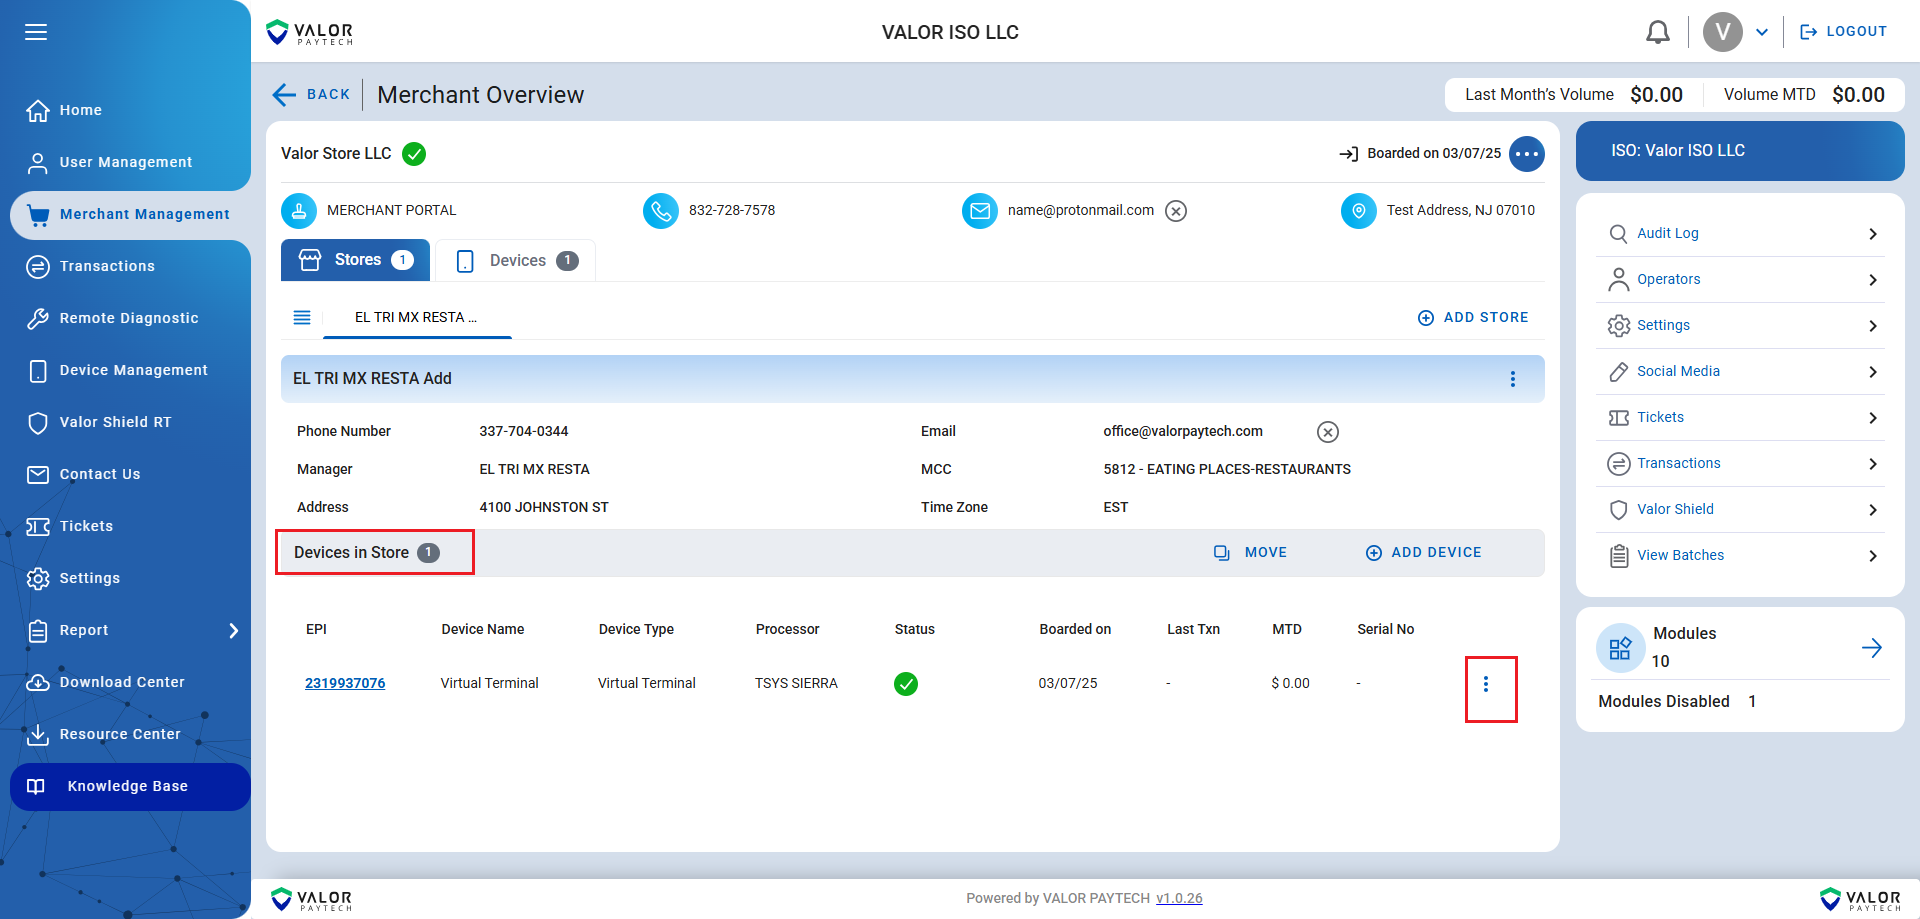
- Click Edit

- Ensure the merchant file build fields for the device match the VAR sheet issued from the processor
Q4: What if I don’t have access to the Valor Portal?
A4: If you cannot log in, contact your ISO (Independent Sales Organization) or support team to request access and assistance with updating the merchant profile.
Q5: How long does it take for the update to take effect?
A5: Once updated, changes usually take effect immediately. However, in some cases, processor verification may be required, which could take a few hours.
Q&A - Transaction Restriction Error (E98, V0, V0573)
Q1: What does the error message "Transaction restricted" (E98, V0, V0573) indicate?
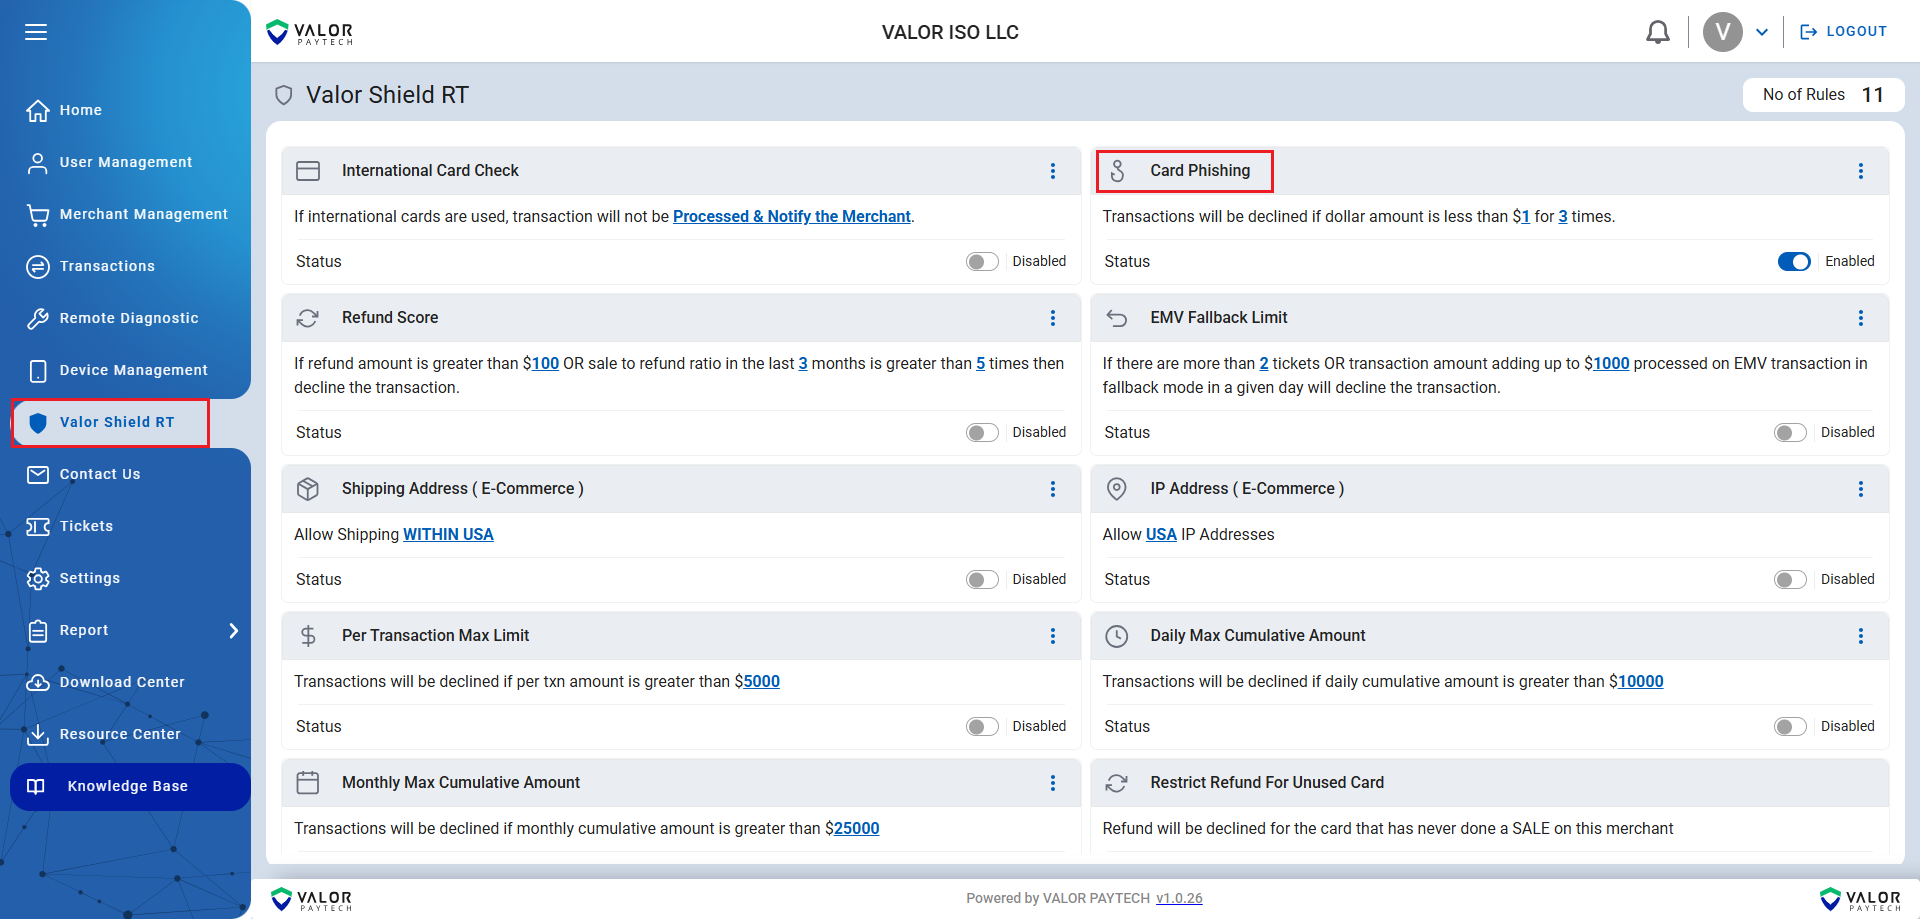
A1: This error suggests that the transaction has been restricted due to a security rule, specifically the Card Phishing RT Shield rule, which is enabled globally for merchants without individual shield rule configurations.
Q2: Why are transactions for the same EPI under $1 being approved, but then later declining?
A2: Initially, small transactions may not trigger the Card Phishing RT Shield rule, but as transactions continue, the rule may activate and start restricting further transactions.
Q3: How can this issue be resolved for the affected merchant?
A3: Ensure that custom Valor Shield RT rules are configured for this specific merchant. Additionally, disable the Card Phishing rule if it is not necessary for their transactions.
Q4: What additional steps should be taken after updating the shield rules?
A4: After modifying the shield rules, run a parameter download on the device to apply the changes and ensure they take effect.
Q&A - Assigning Application Versions for Updating a Terminal
Q1: How do I assign an application version to update a terminal?
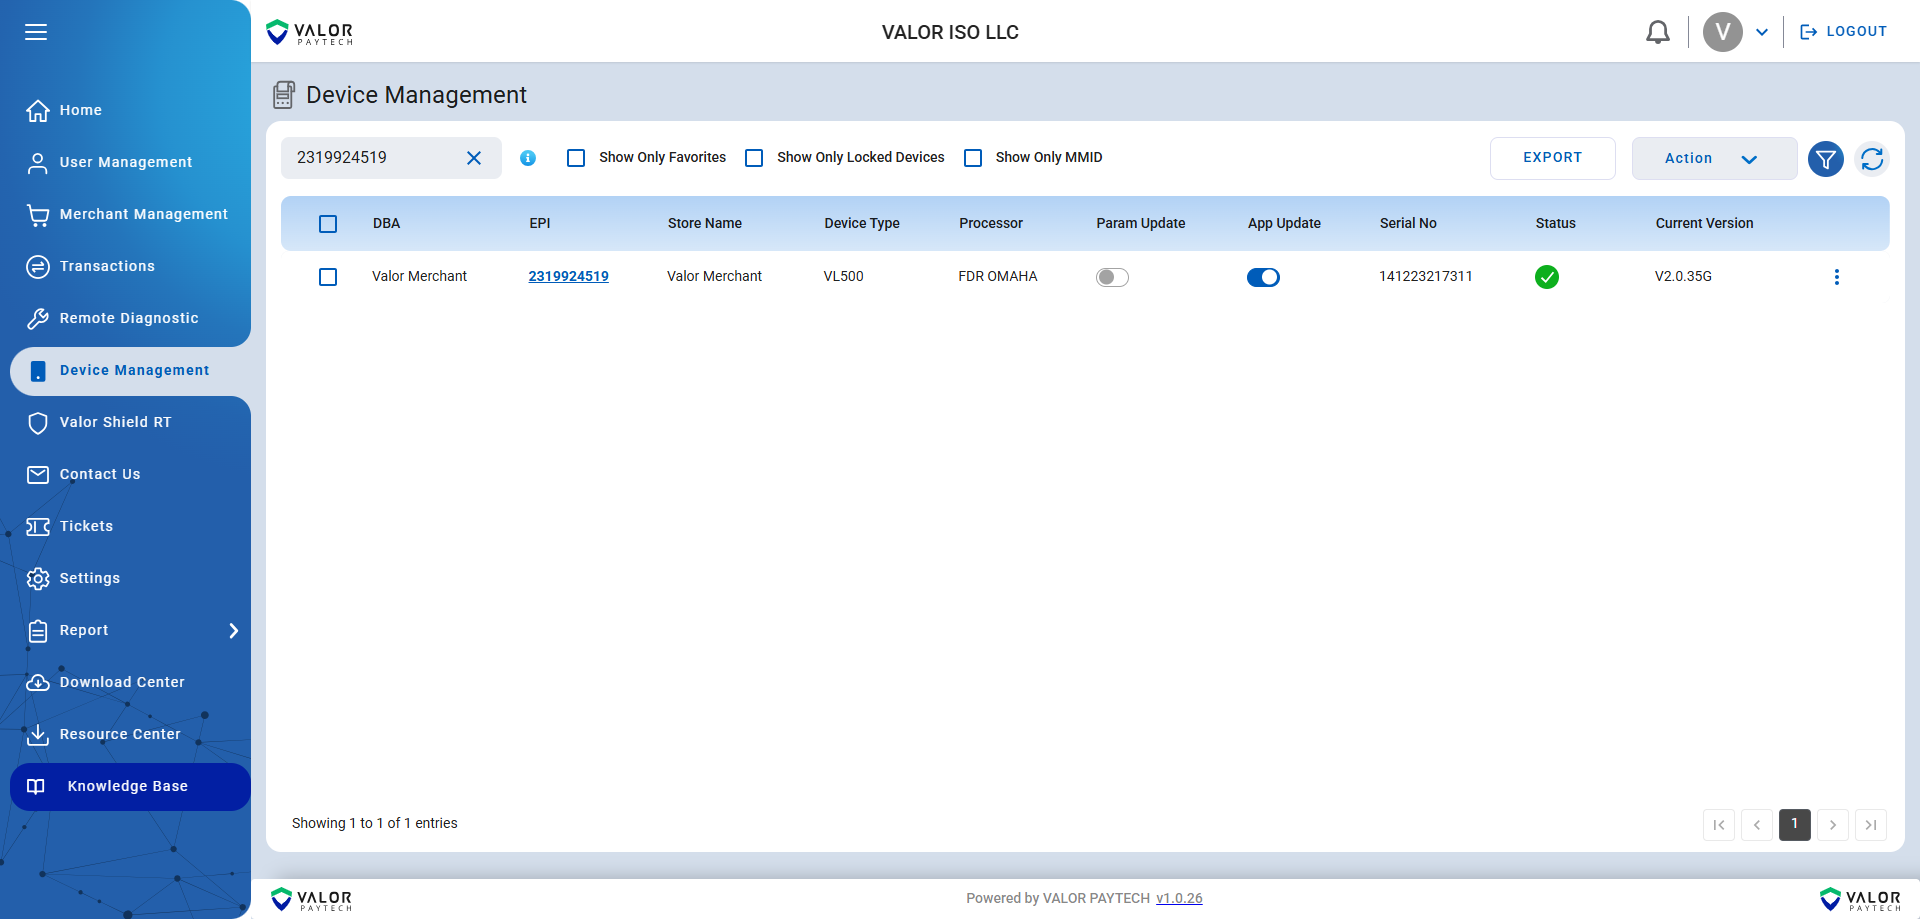
A1: Navigate to Device Management, locate the terminal by searching the EPI, then:
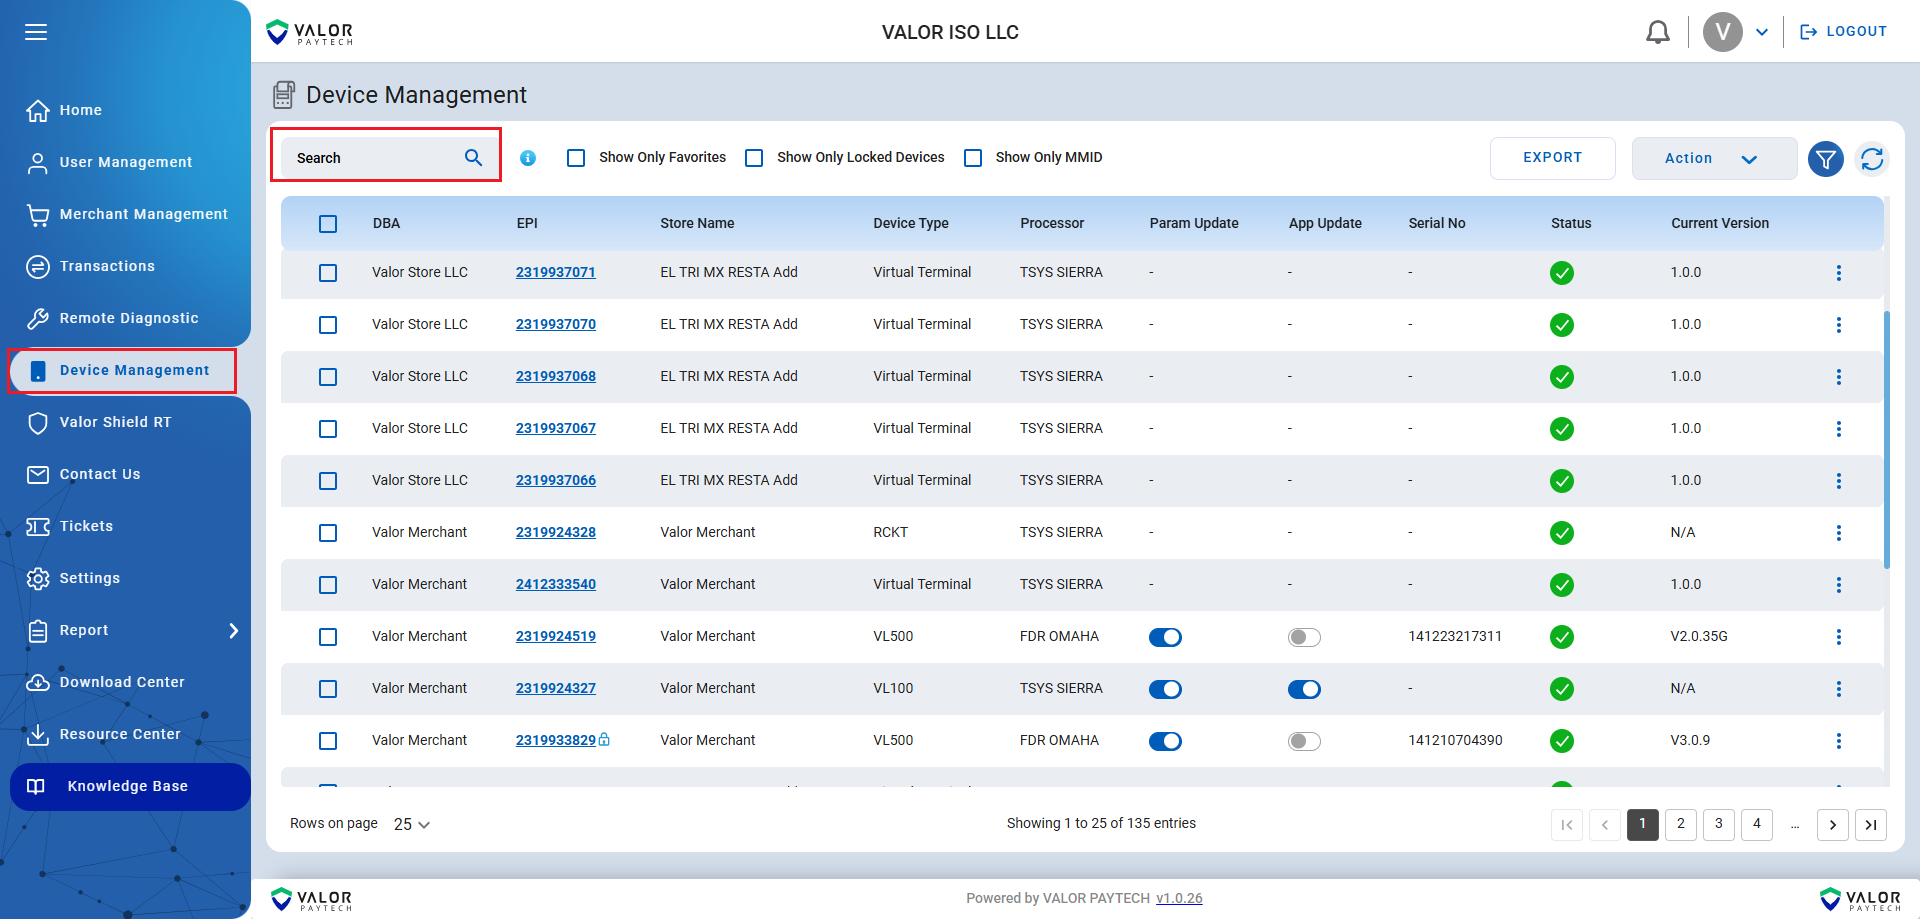
- Select the checkbox on the left

- Click Action and choose Assign App.
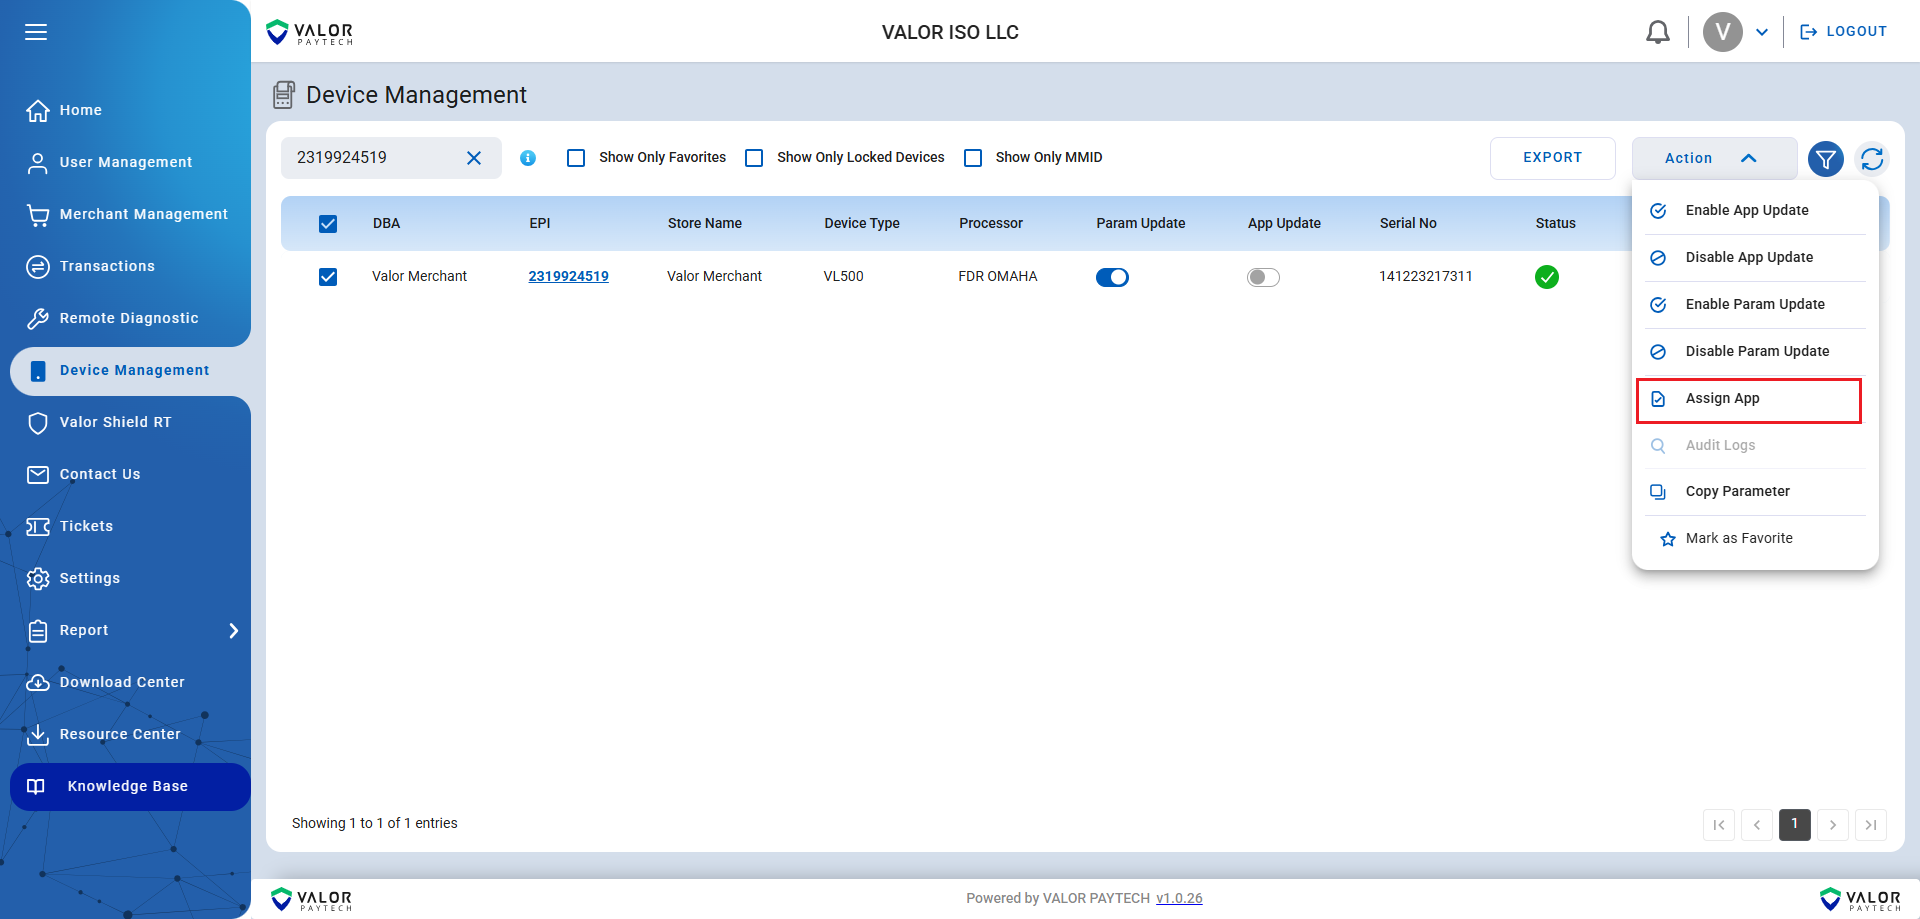
- In the dropdown box, select the available version (e.g., 2.0.22).

- Click Assign and ensure AppDownload is toggled to Enable if not automatically set.
Q2: How do I perform the update on a terminal?
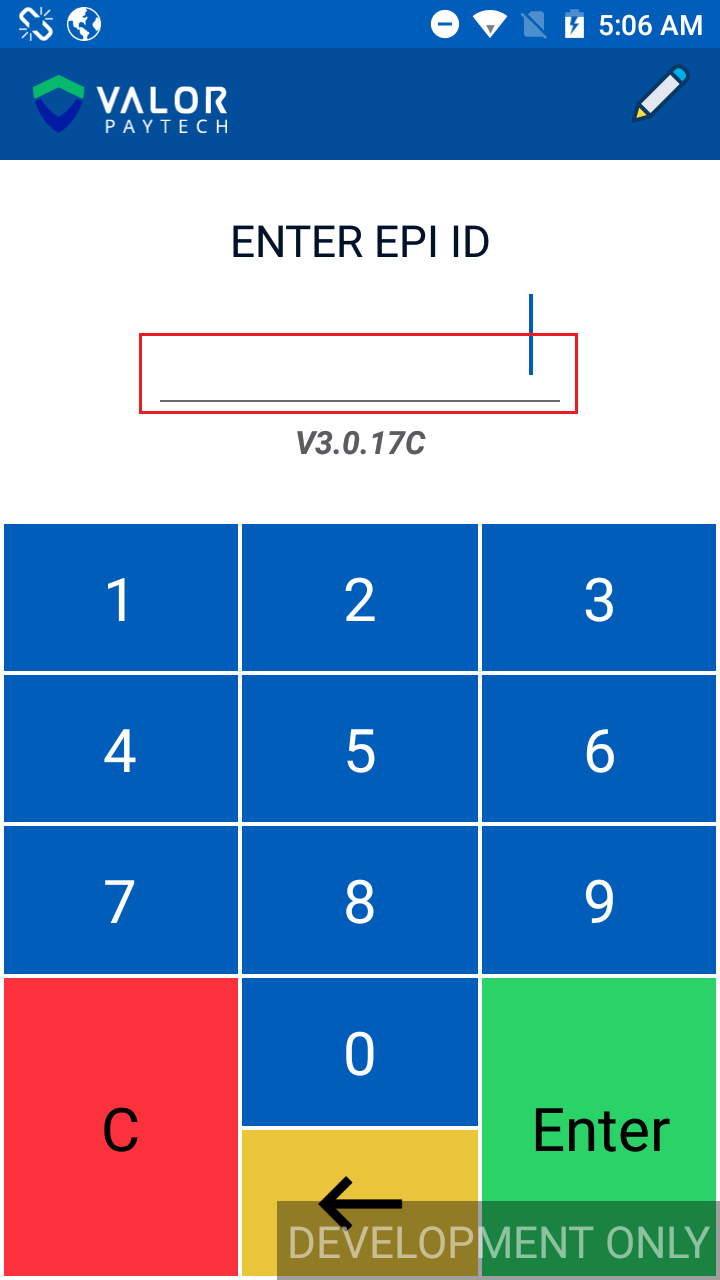
Android Terminal
A2: On the terminal:
-
Press the Menu button (three lines).
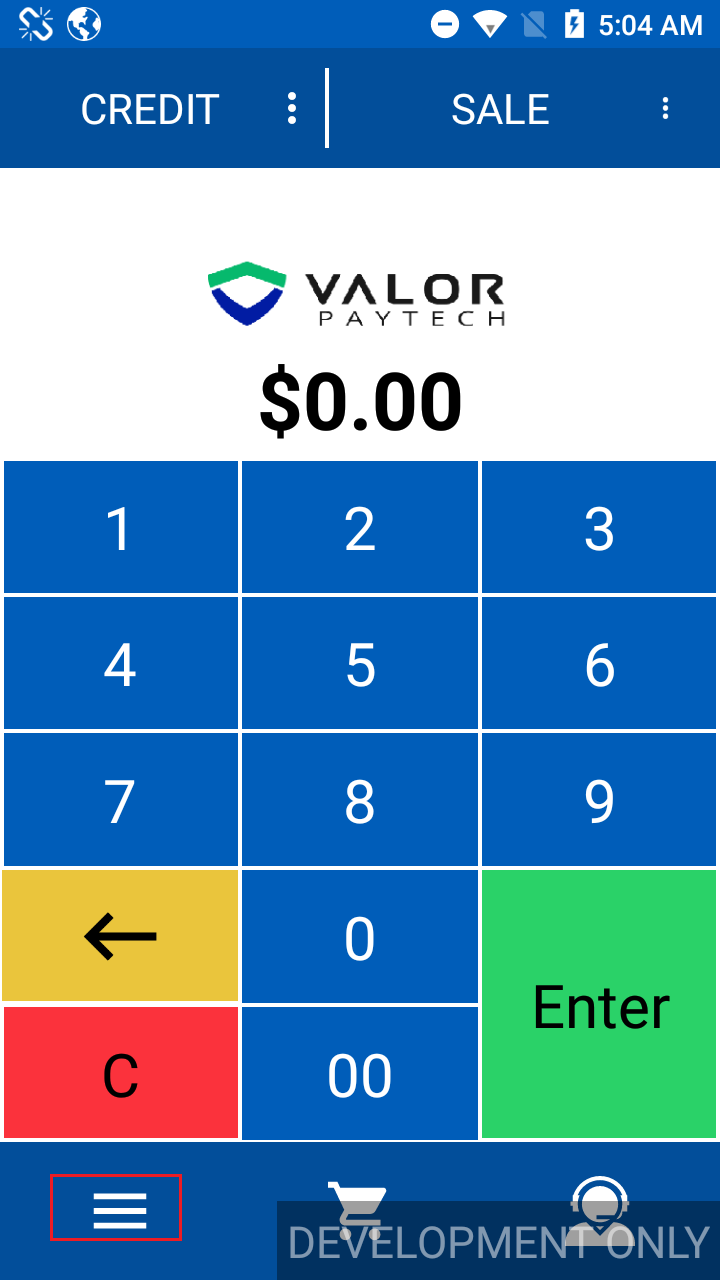
-
Navigate to Updates.
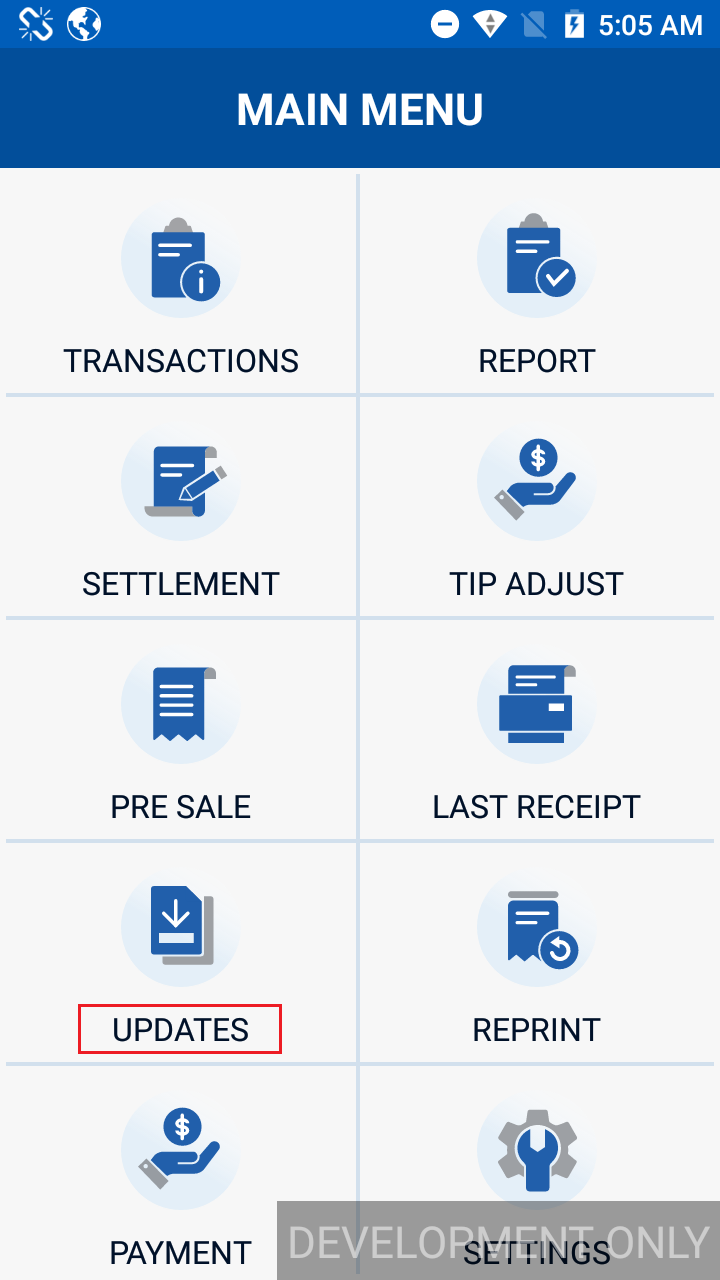
- Verify the EPI and press ENTER to start the update
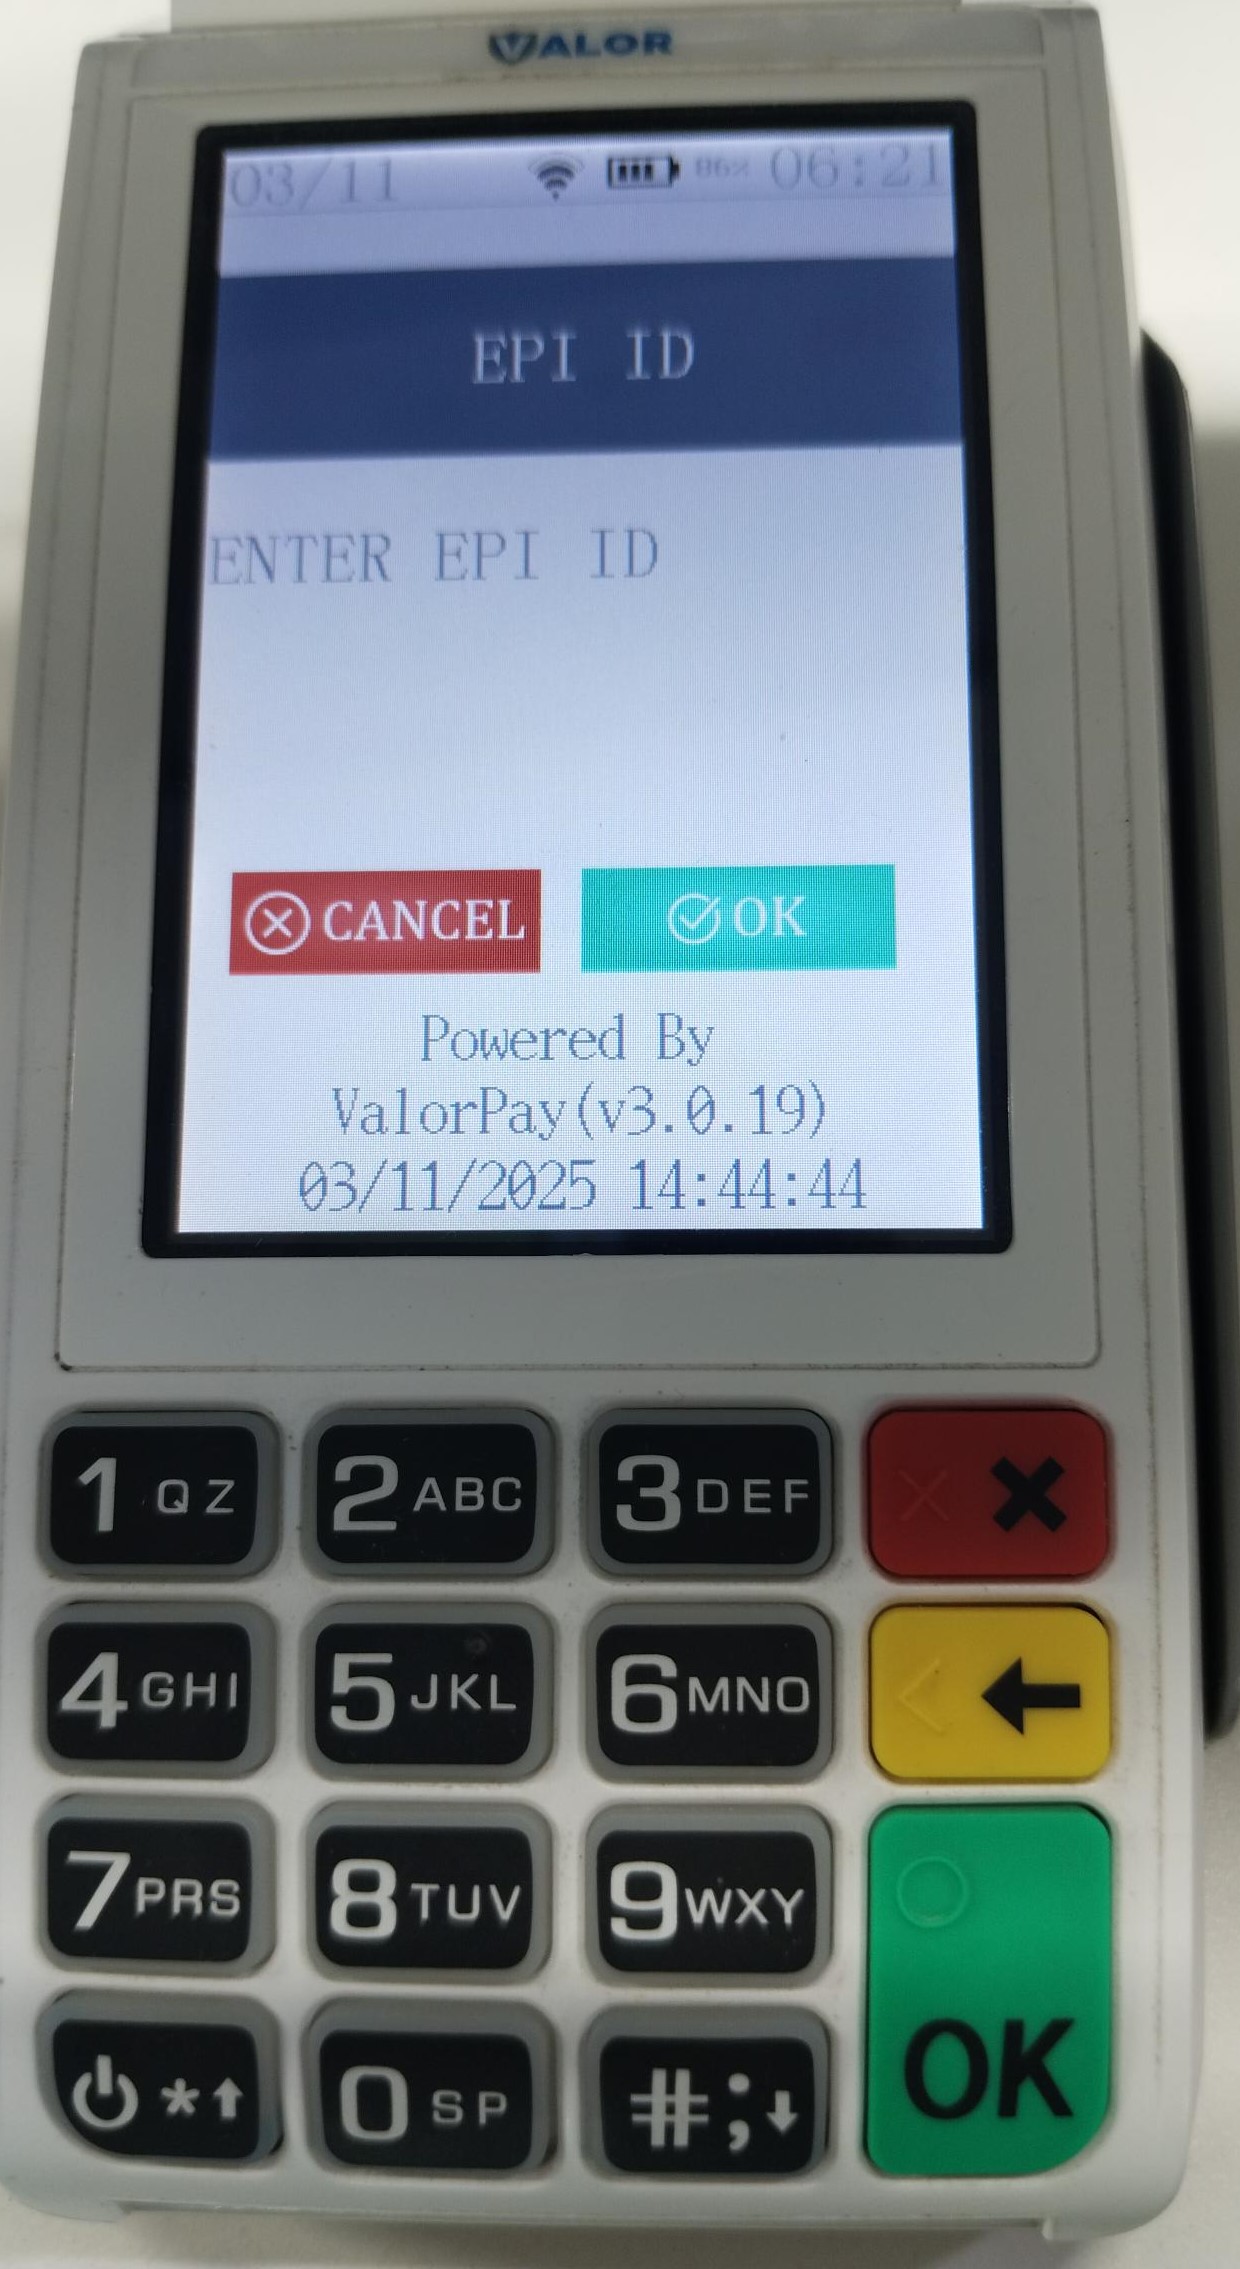
Linux Terminal
- Press the Favorites star button.

- Navigate to Updates
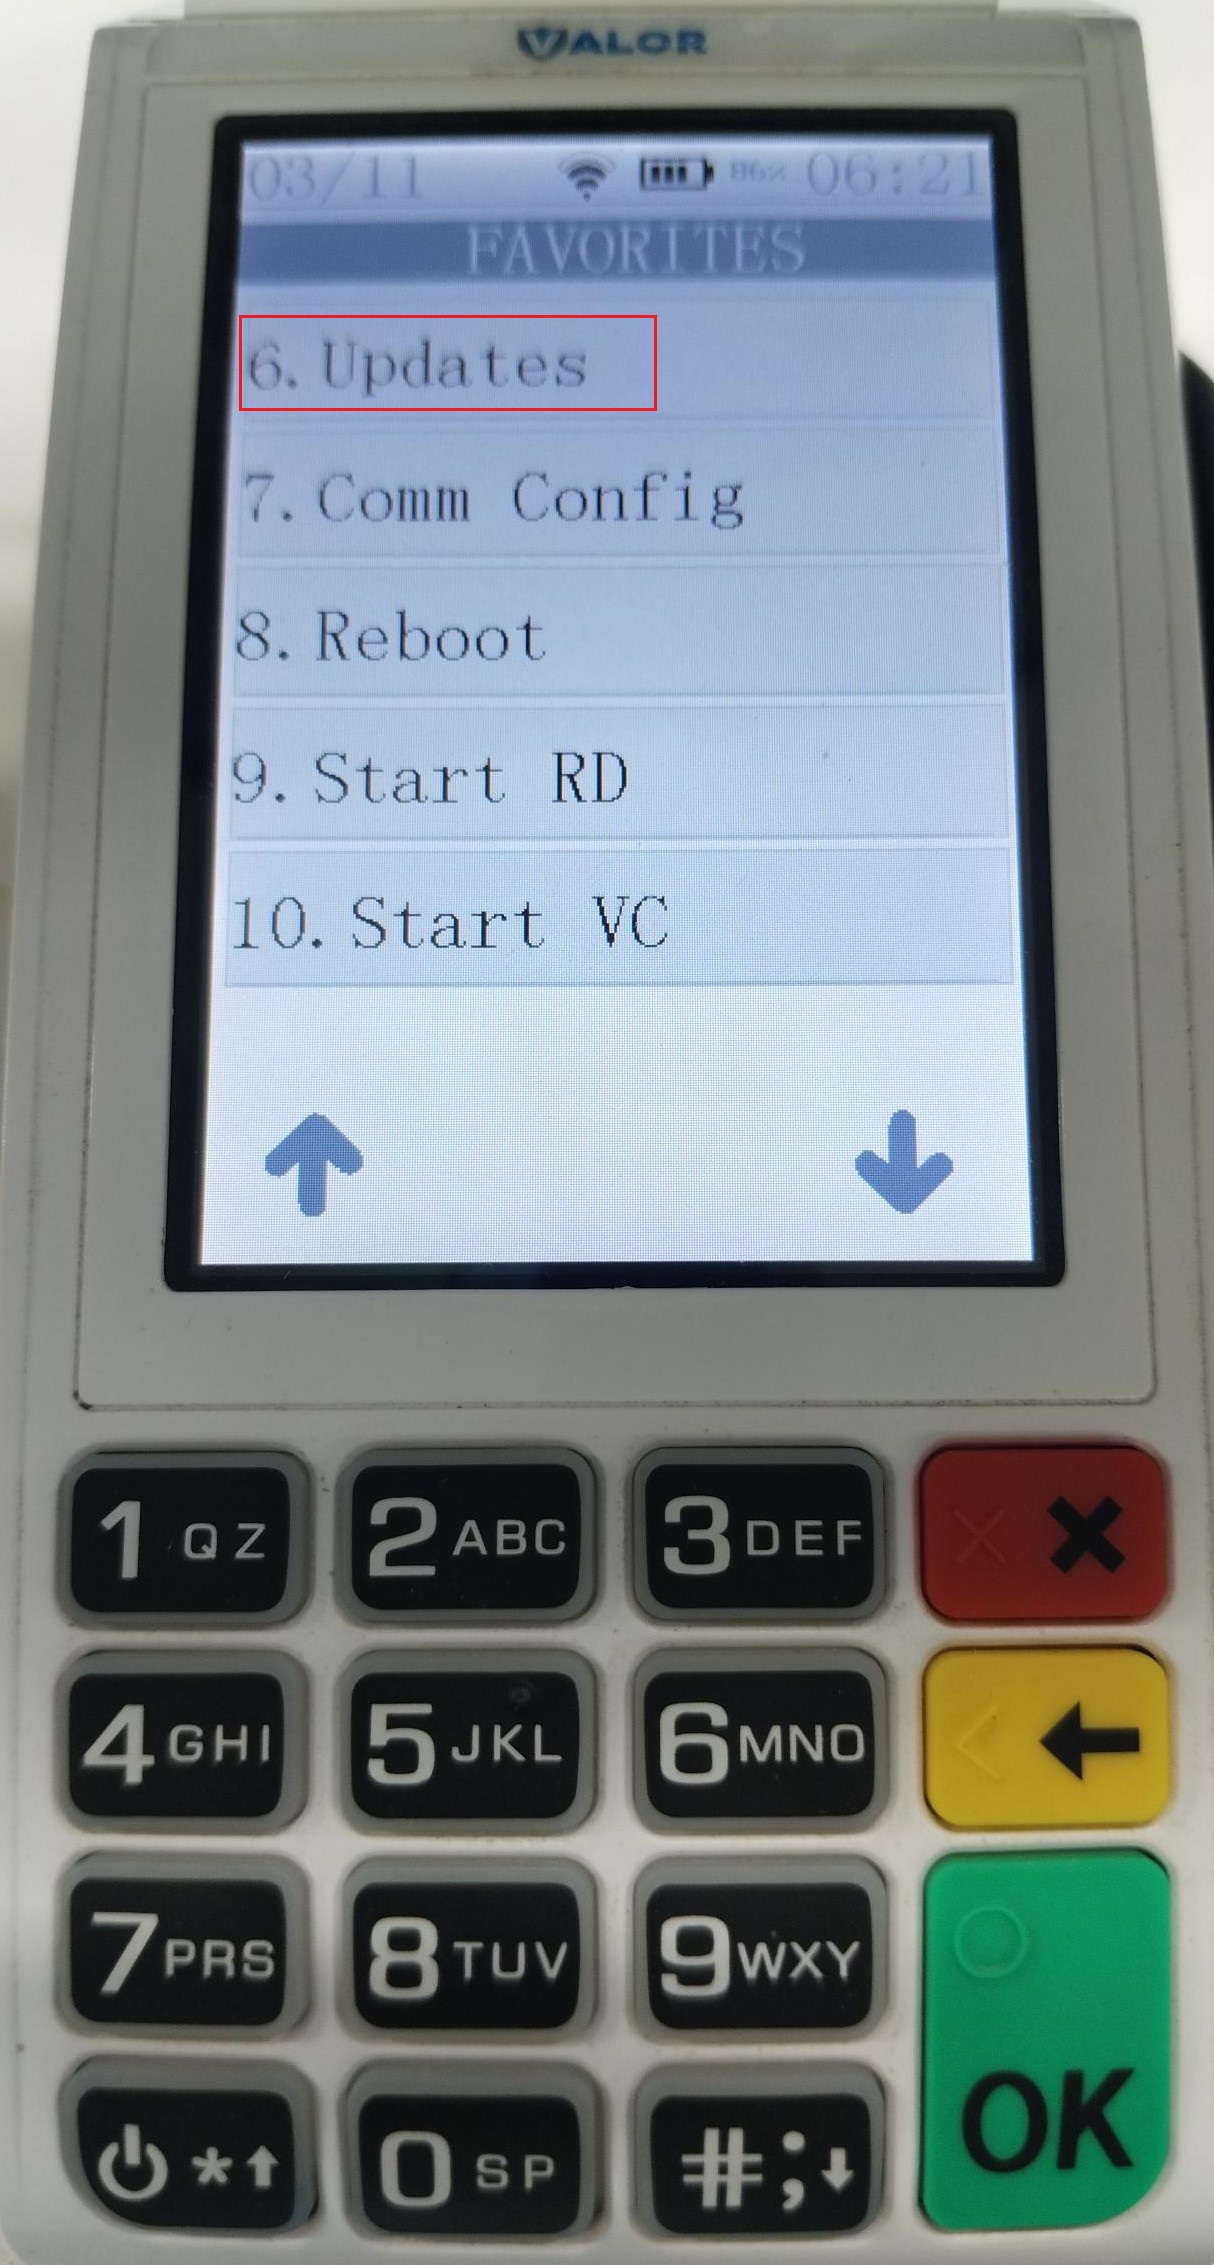
- Verify the EPI and press OK to start the update
Q&A - Resolving "Encryption Key Missing" Error
Q1: What causes the "Encryption Key Missing" error on a terminal?
A1: This error occurs when the terminal does not have encryption keys loaded. The terminal attempts a Remote Key Injection (RKI) when an EPI is first loaded. If this process fails, the terminal cannot process transactions since encryption keys are required.
Q2: How can I resolve the "Encryption Key Missing" error?
A2: To force another attempt at RKI, follow these steps on the terminal:
Android Terminal
- Tap the three lines at the bottom left corner of the terminal screen.
- Select Settings
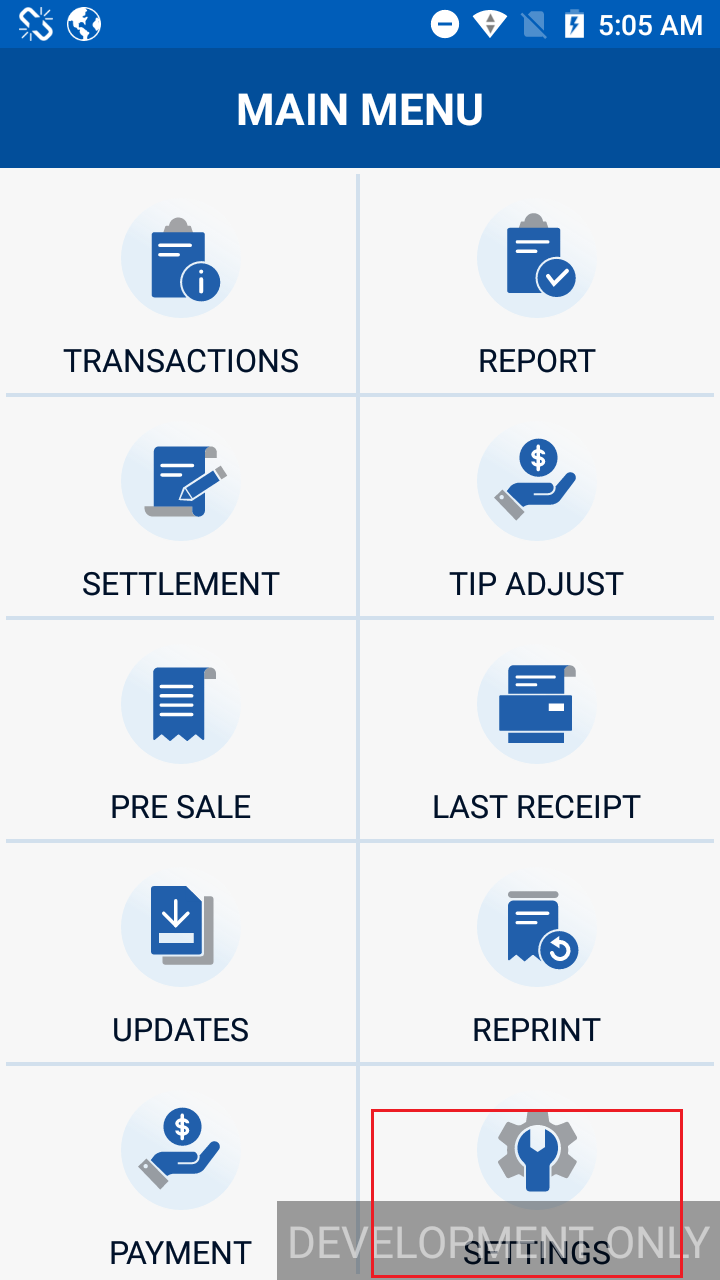
- Click RKI Download and allow the process to complete.
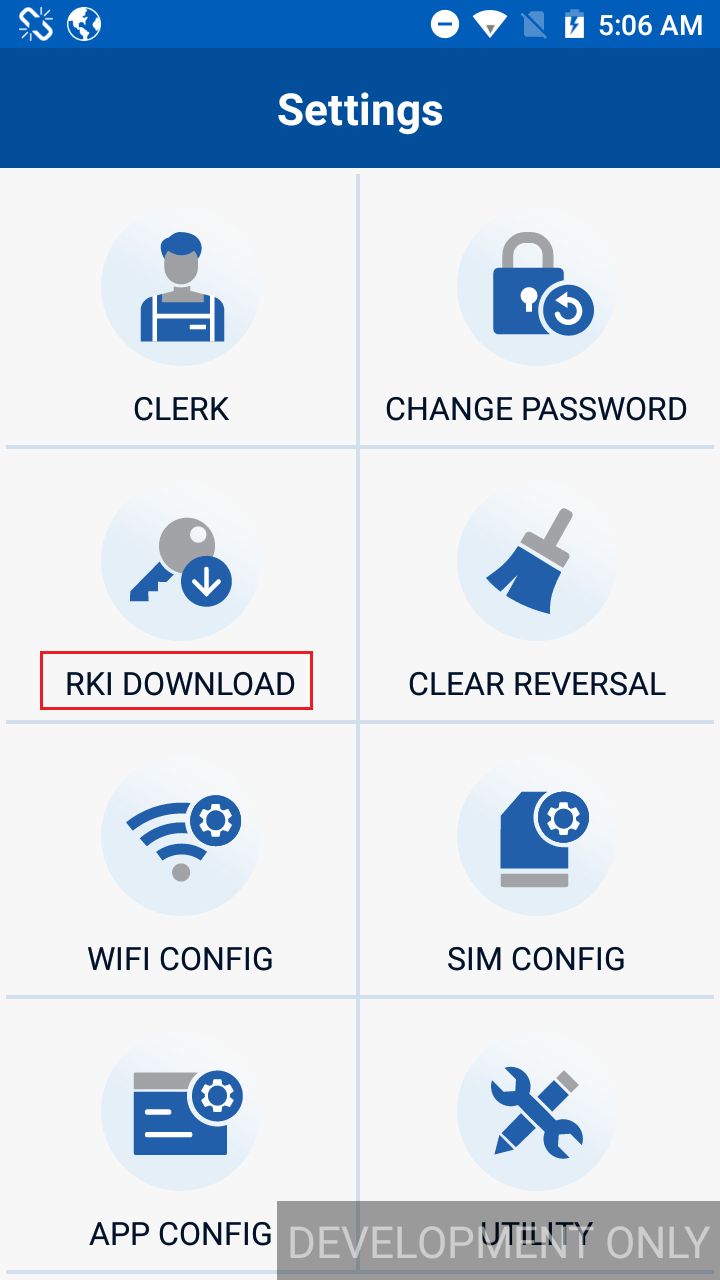
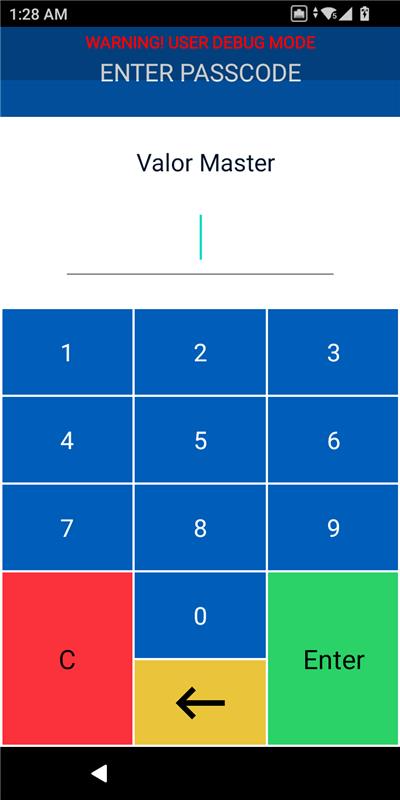
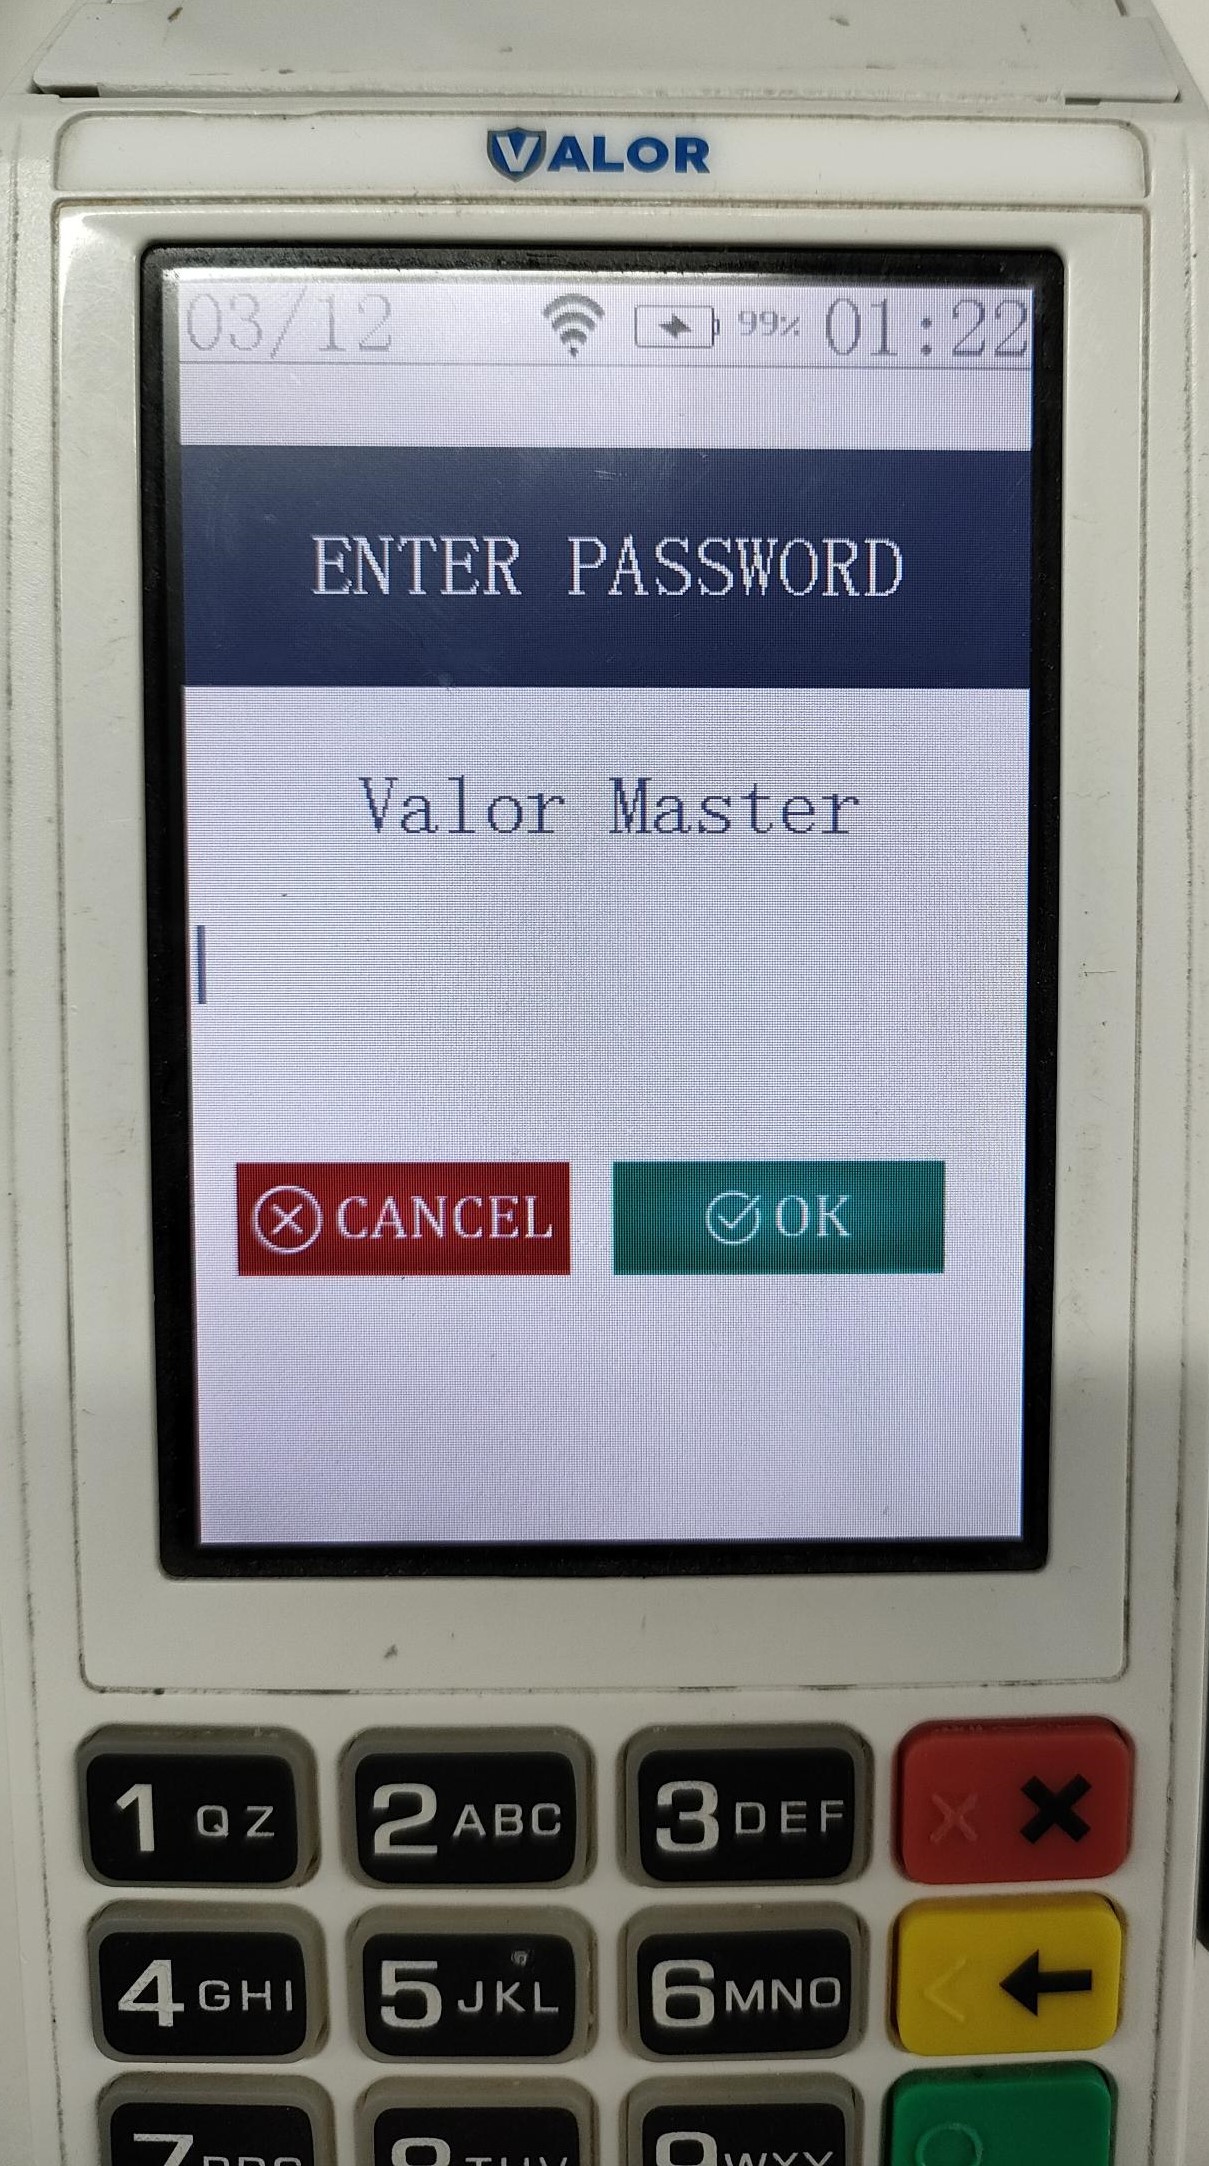
- Enter the passcode 82567729 and complete the RKI download.
- Inform support of the results if the issue persists.
Linux Terminal
- Tap the three lines at the bottom left corner of the terminal screen.
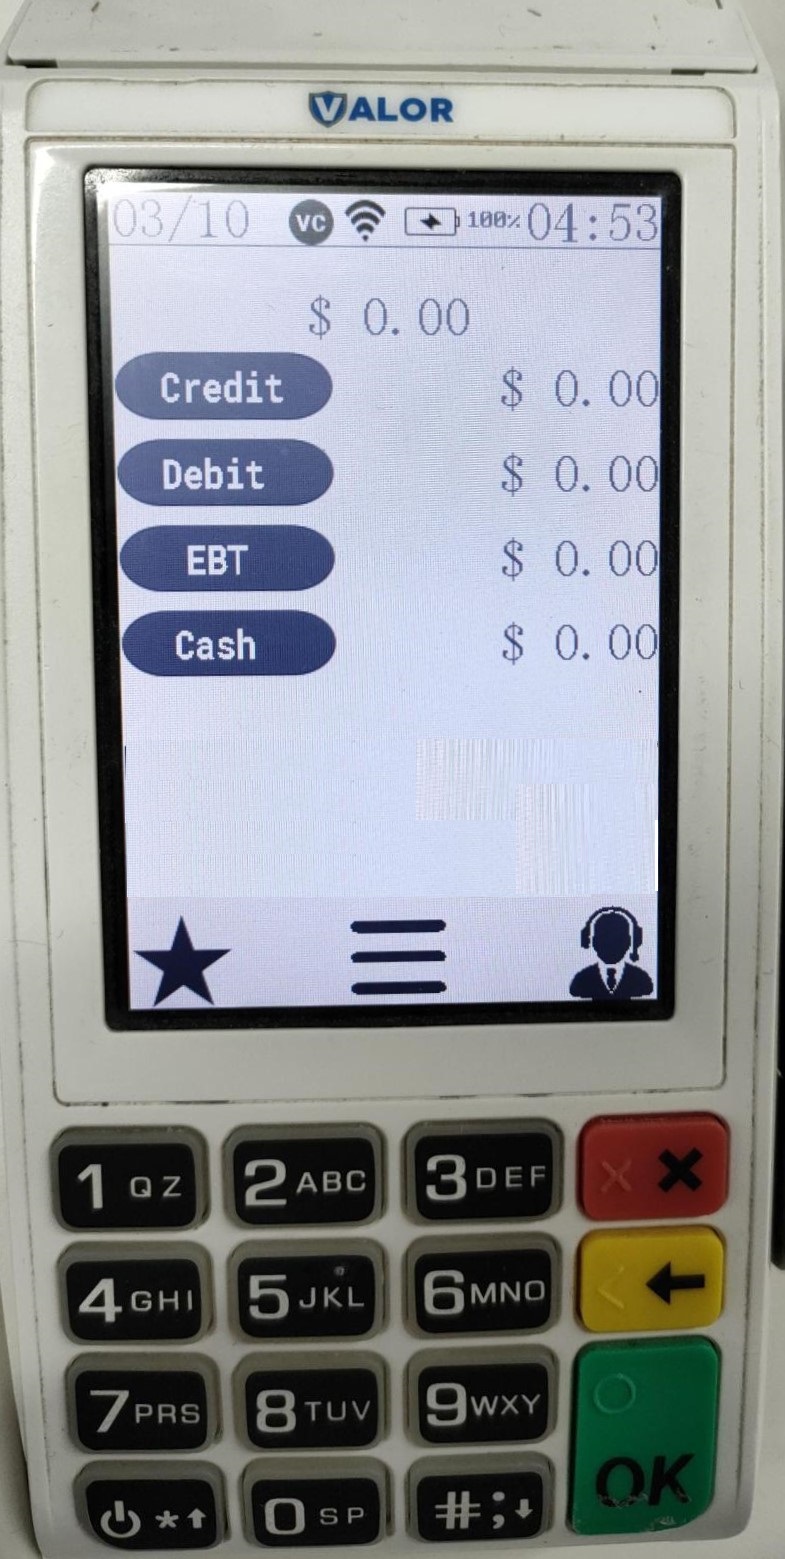
- Navigate to Host Utility.
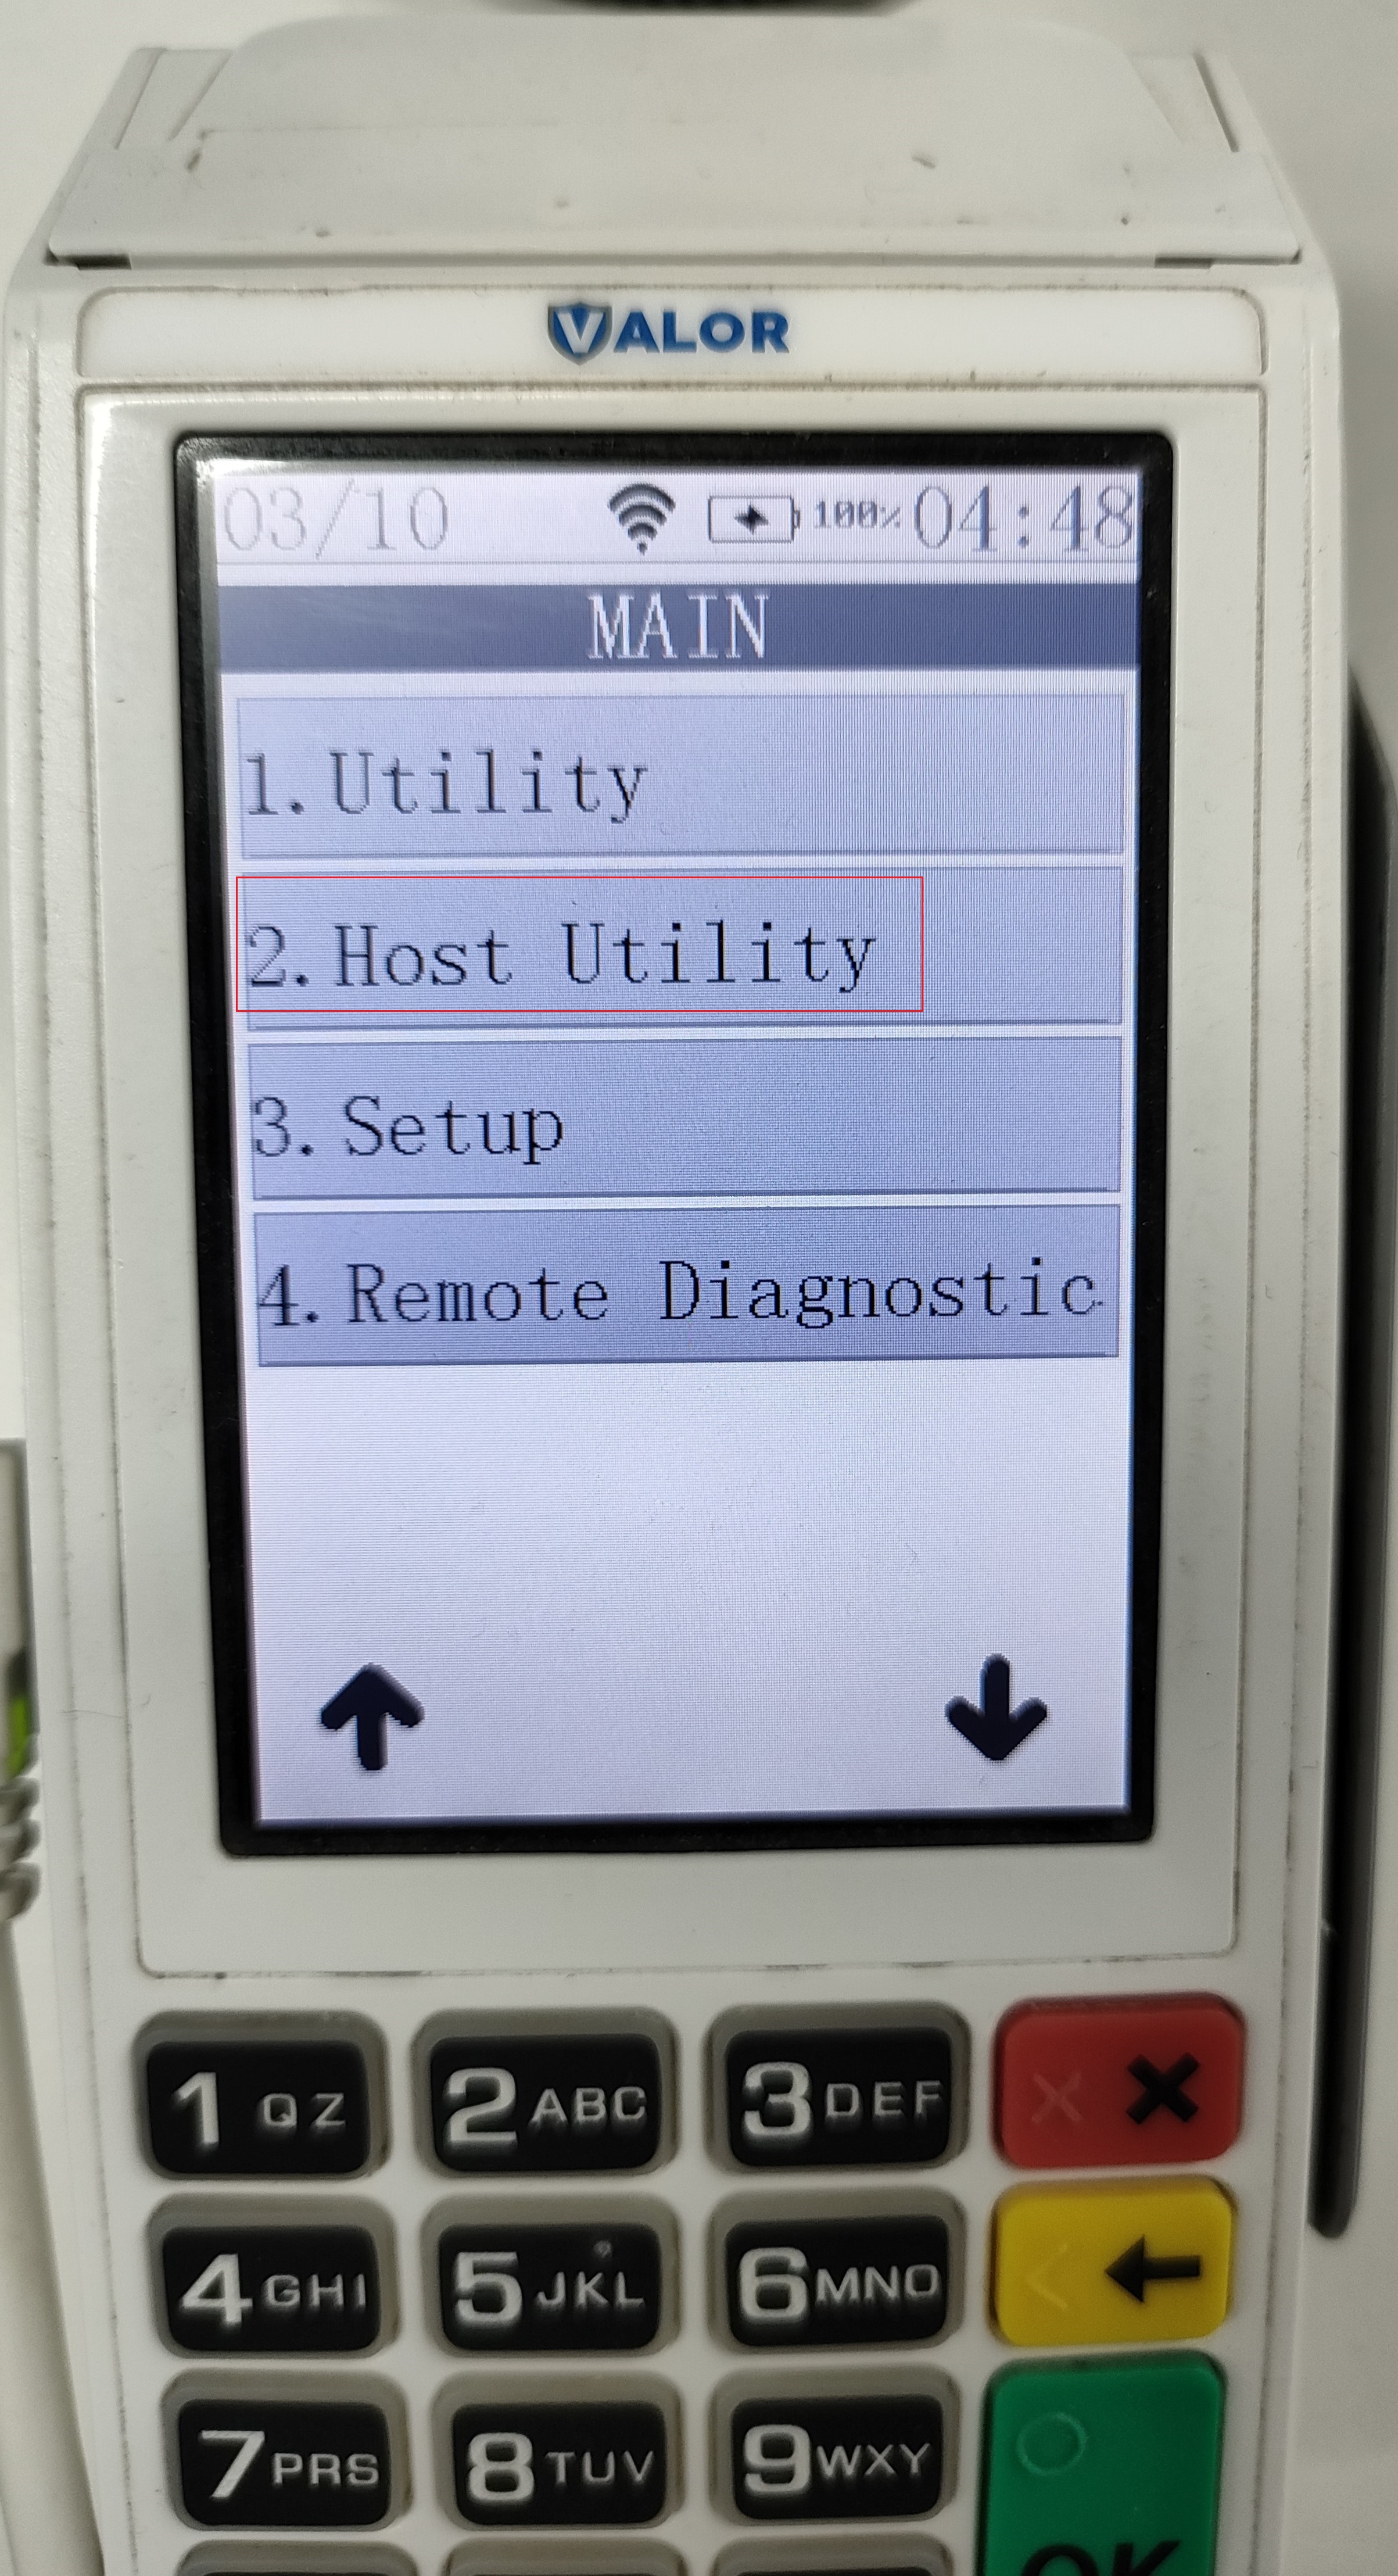
- Click RKI and allow the process to complete.
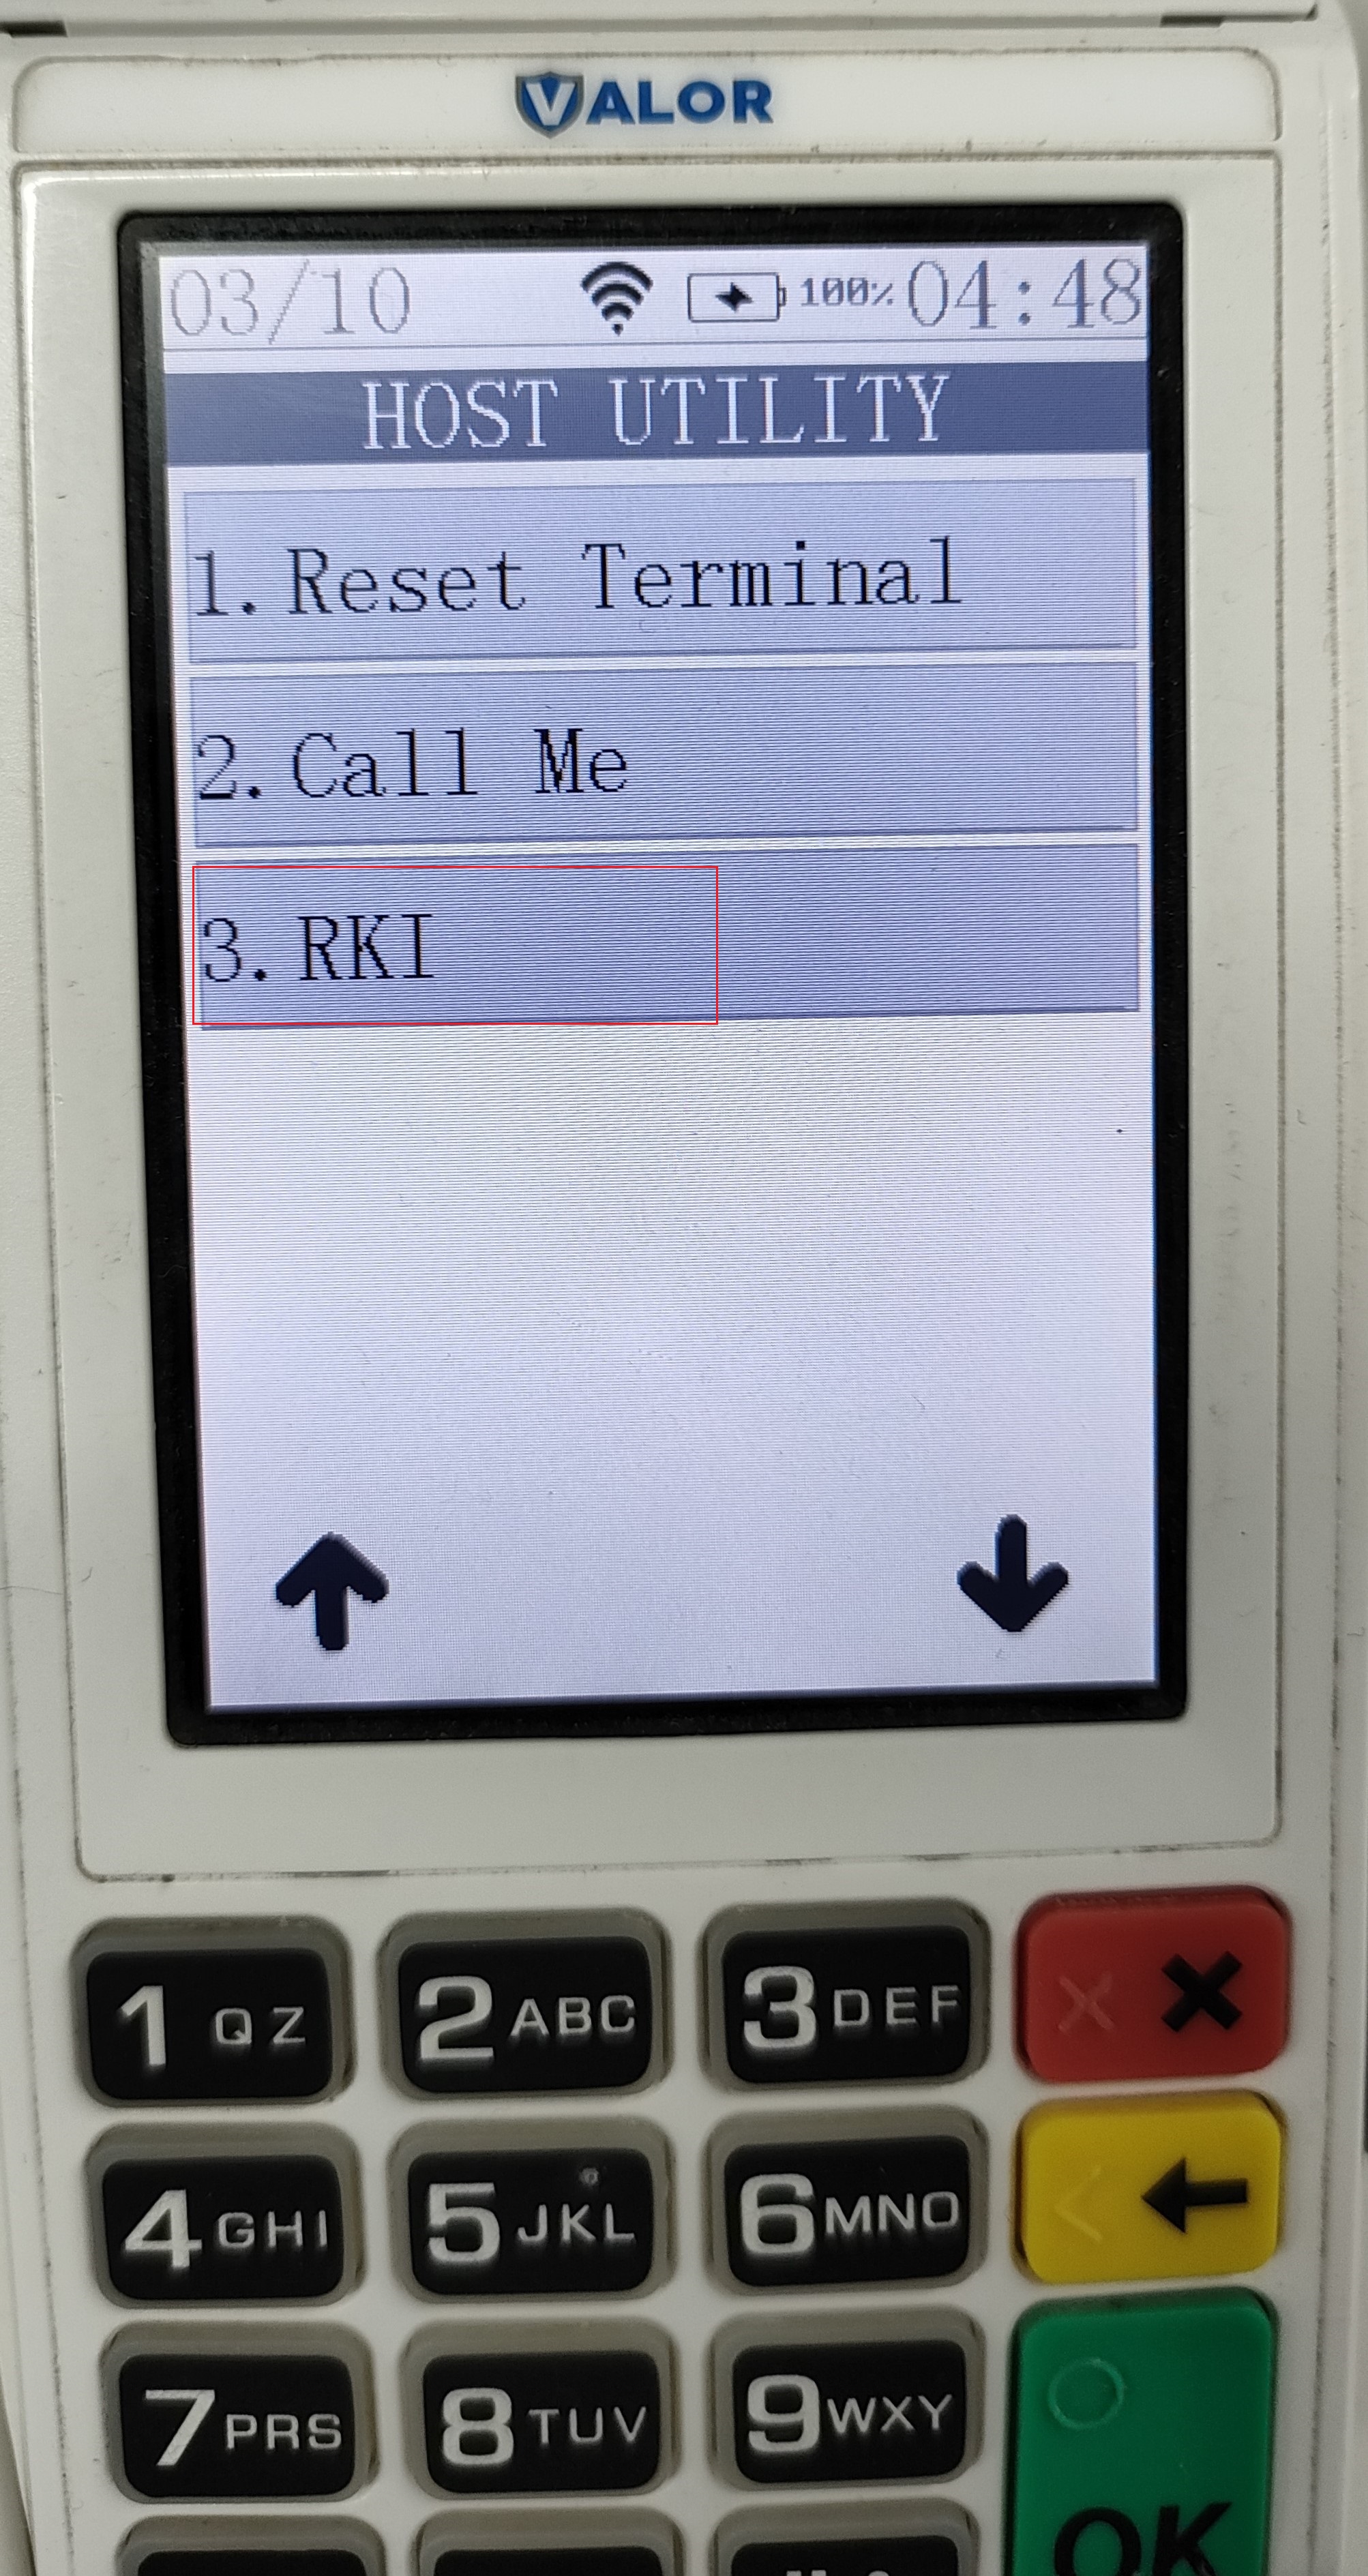
- Enter the passcode 82567729 and complete the RKI download.
Q&A - Enabling "Show Menu Options" on the Valor Connect Listening Screen
Q: How do I enable the "Show Menu Options" feature on the Valor Connect listening screen?
A: To enable this feature, follow these steps:
- Go to Device Parameters.
- Navigate to Terminal & Transaction.
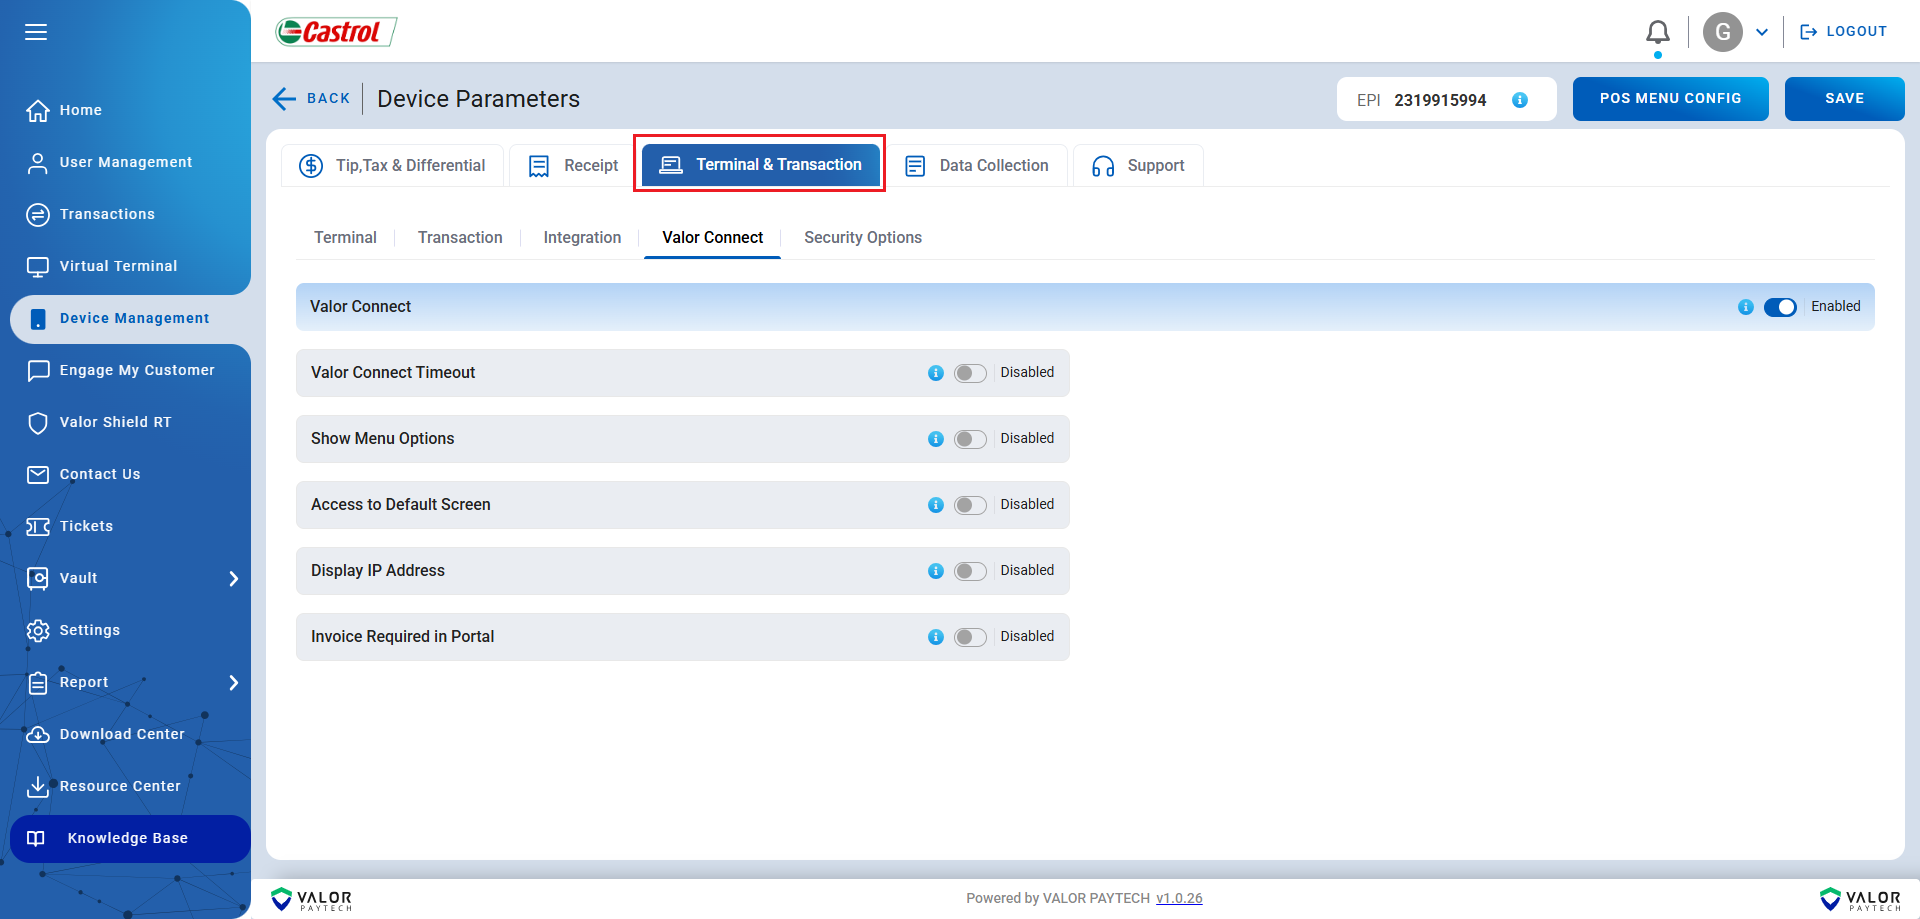
- Select Valor Connect
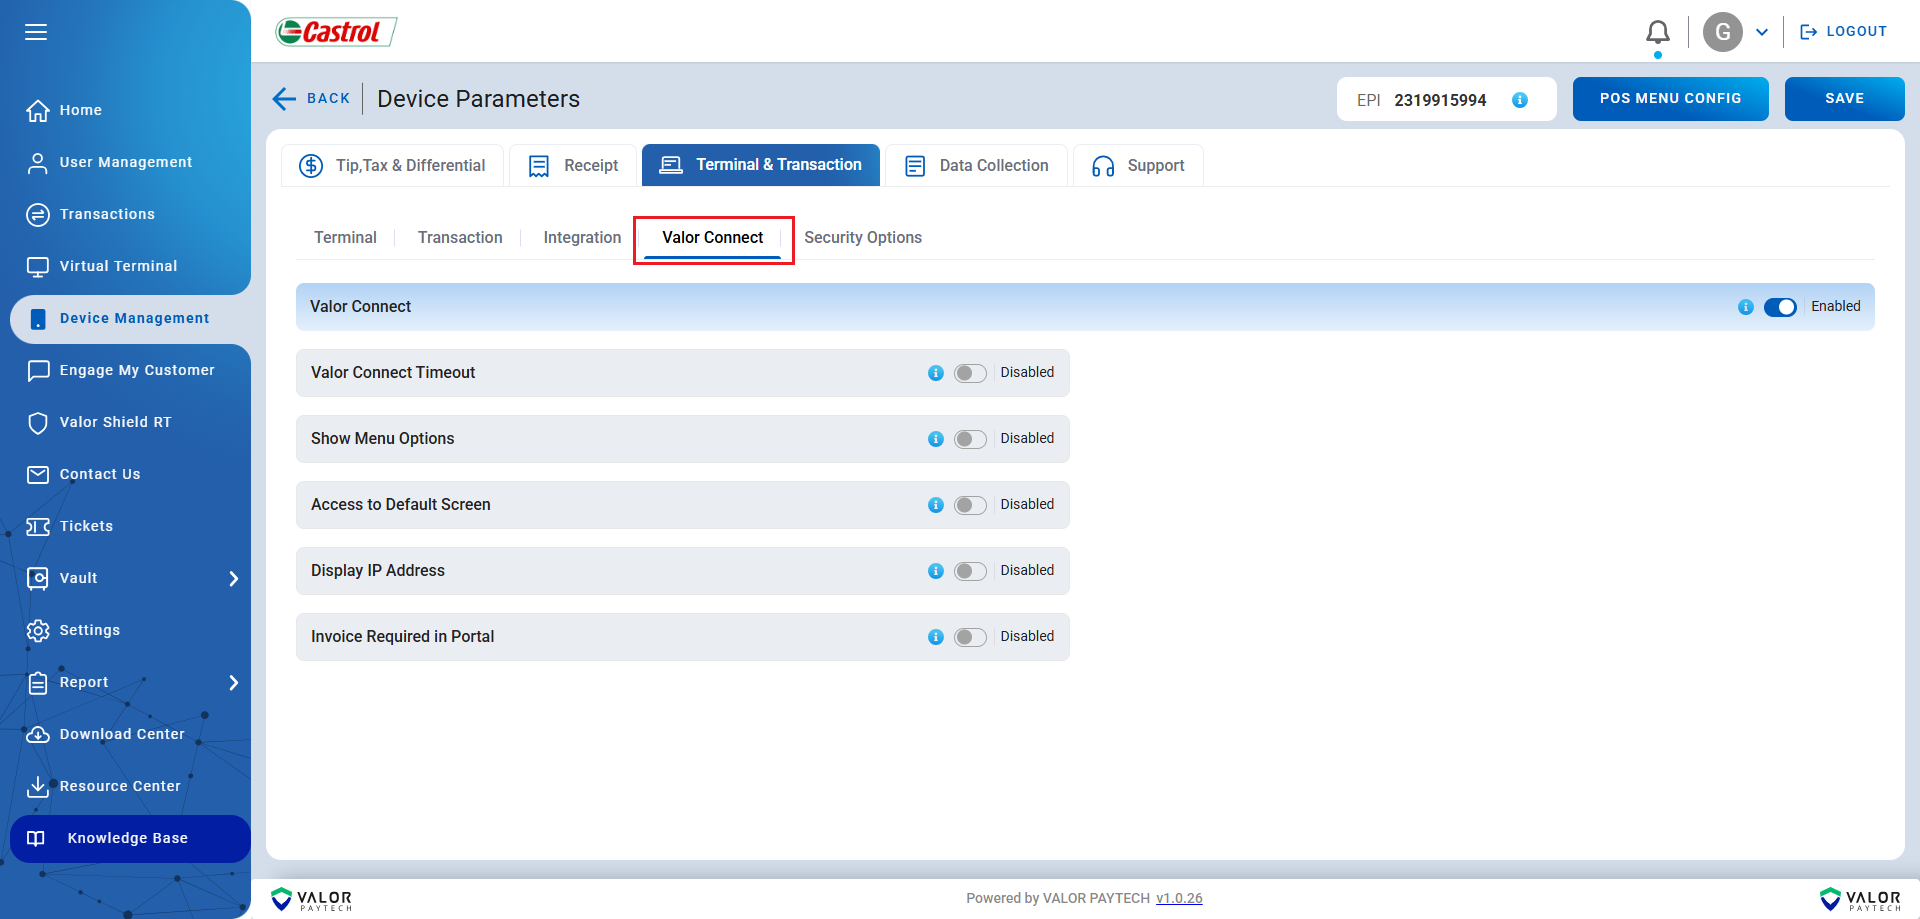
- Toggle Show Menu Options to Enabled
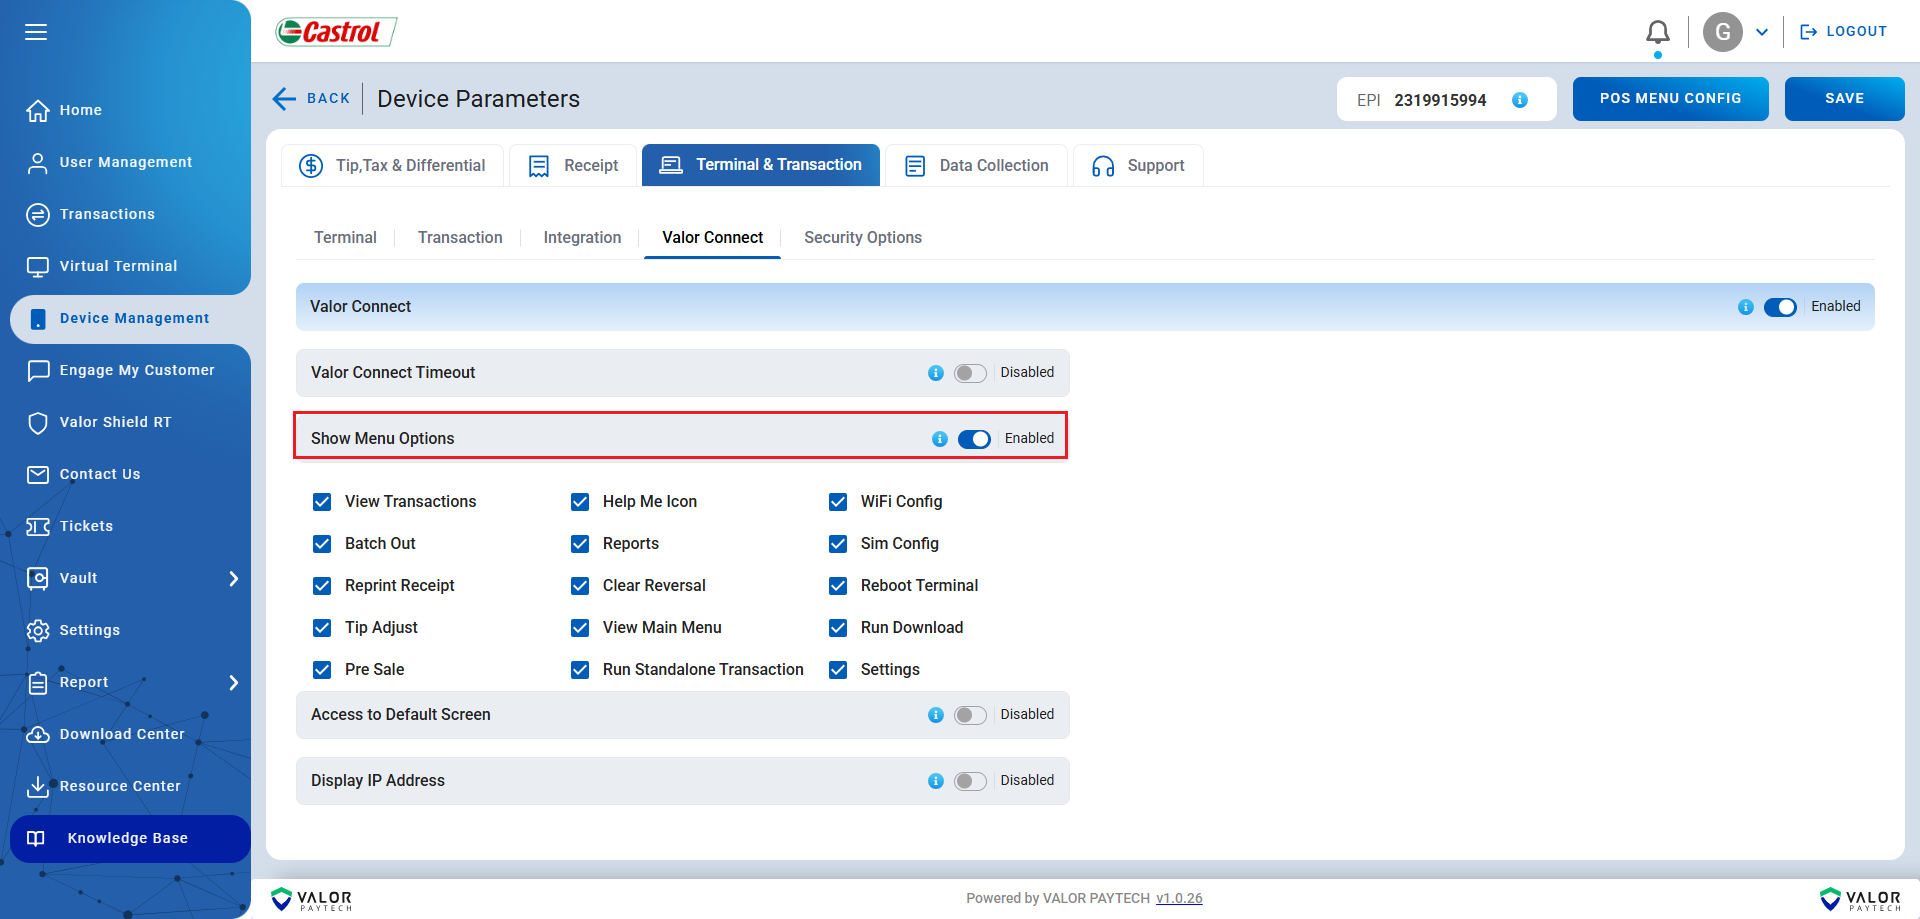
Enabling this setting will allow various menu options to be displayed on the Valor Connect listening screen.
Q: What do the different menu options mean?
Here’s a breakdown of the options shown in the image:
- View Transactions – Allows users to check past transactions processed on the terminal.
- Batch Out – Performs a batch settlement, closing the current batch and sending transactions for processing.
- Reprint Receipt – Enables reprinting of previous receipts for customer or merchant reference.
- Tip Adjust – Allows adjustment of tip amounts on transactions where tipping is enabled.
- Pre Sale – Facilitates pre-authorized transactions, where payment is processed later.
- Help Me Icon – Provides assistance or troubleshooting options for the terminal.
- Reports – Displays various reports related to transactions and settlements.
- Clear Reversal – Resolves pending or failed reversals in case of transaction errors
- View Main Menu – Navigates back to the terminal's main menu.
- Run Standalone Transaction – Allows processing of transactions outside the integrated POS system.
- WiFi Config – Provides settings for configuring WiFi network connections.
- Sim Config – Manages SIM card and cellular data settings for network connectivity.
- Reboot Terminal – Restarts the terminal to apply updates or troubleshoot issues.
- Run Download – Downloads configuration updates, software patches, or parameter changes.
- Settings – Accesses general terminal settings for customization and configuration.
Please note, our linux based device can only have the menu option Run Standalone Transaction” displayed
Q&A: Removing Differential/Custom Fees on Integrated Transactions
Q: Is there a way to remove the differential/custom fee on all integrated transactions?
A: Yes, you can remove the differential/custom fee by following these steps in the Valor Portal:
- Log into the Valor Portal.
- Click Merchant Management.
- Locate your desired merchant account and click the three dots on its card.
- Click Overview.
- Find your desired EPI ( End Point Identifier) and click the three dots on its card.

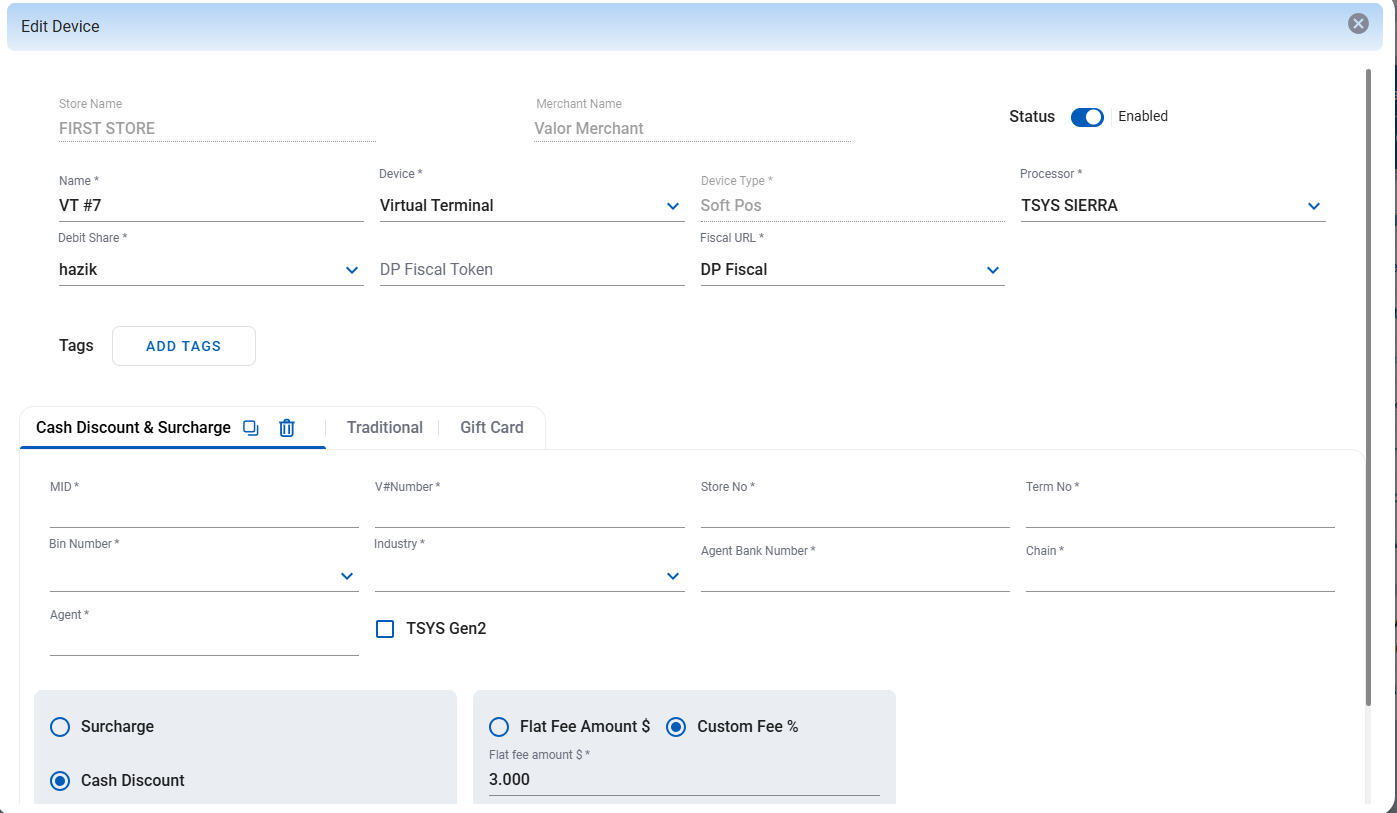
- Click Edit.
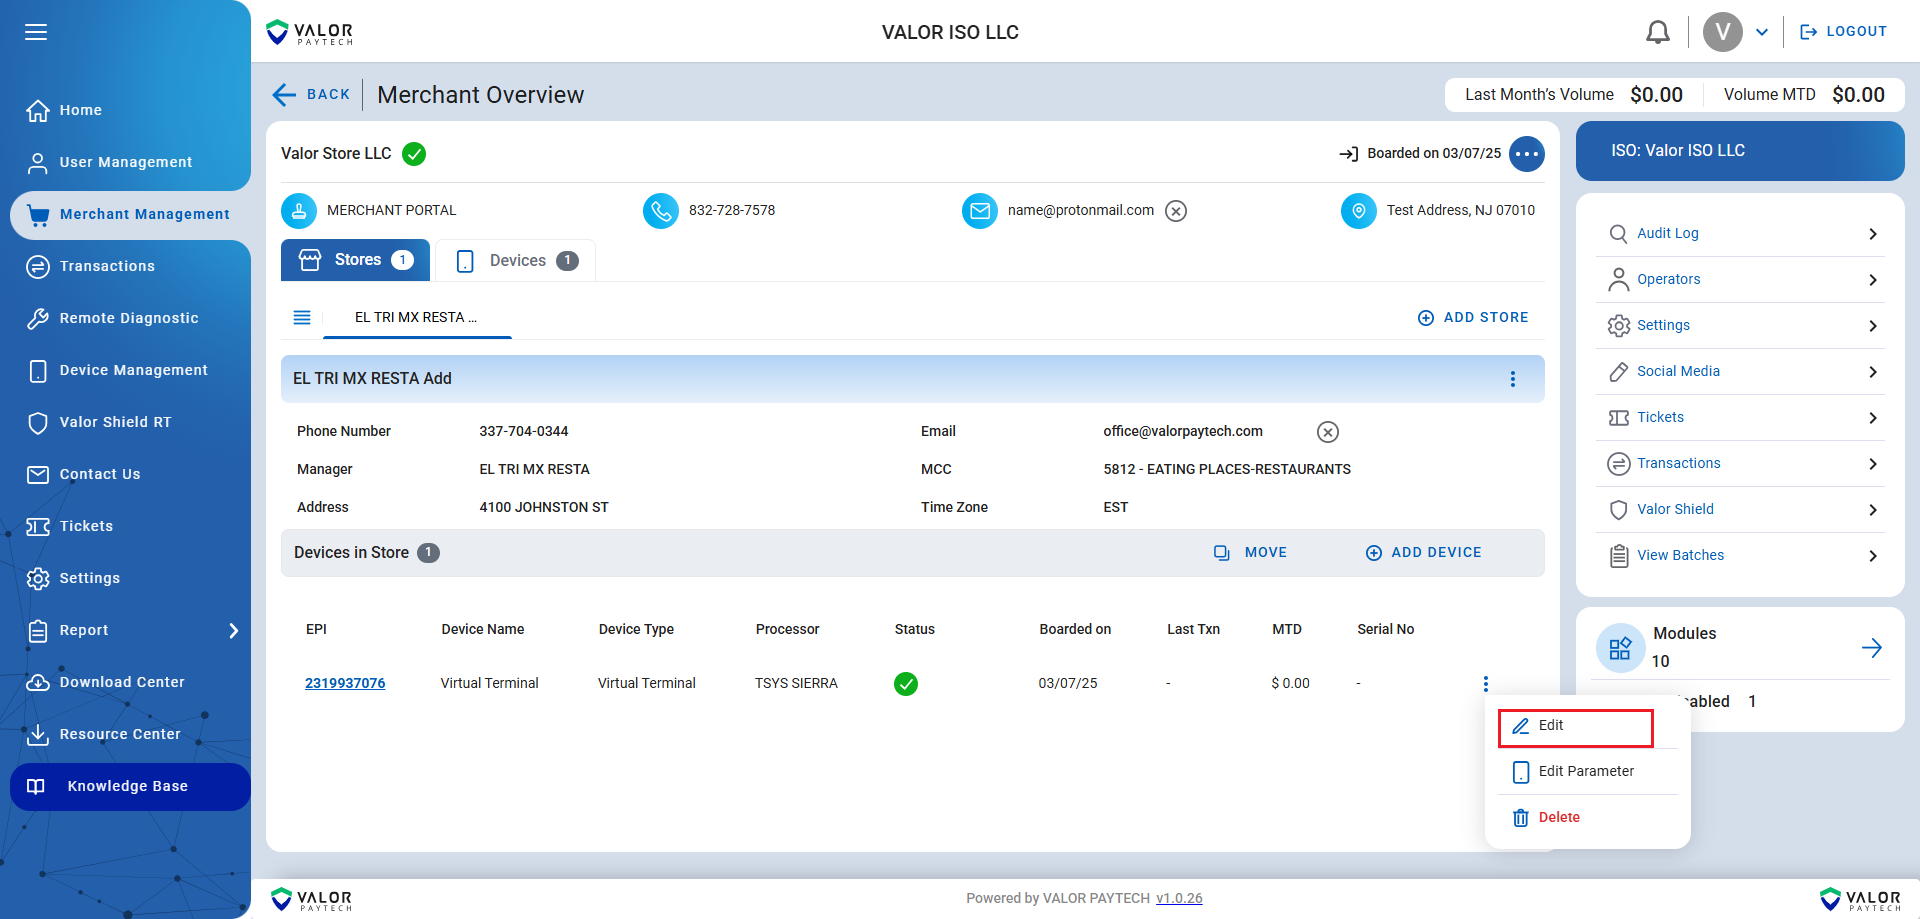
- Click the bin icon next to "Cash Discount & Surcharge" to remove it.

- Click Save & Exit.
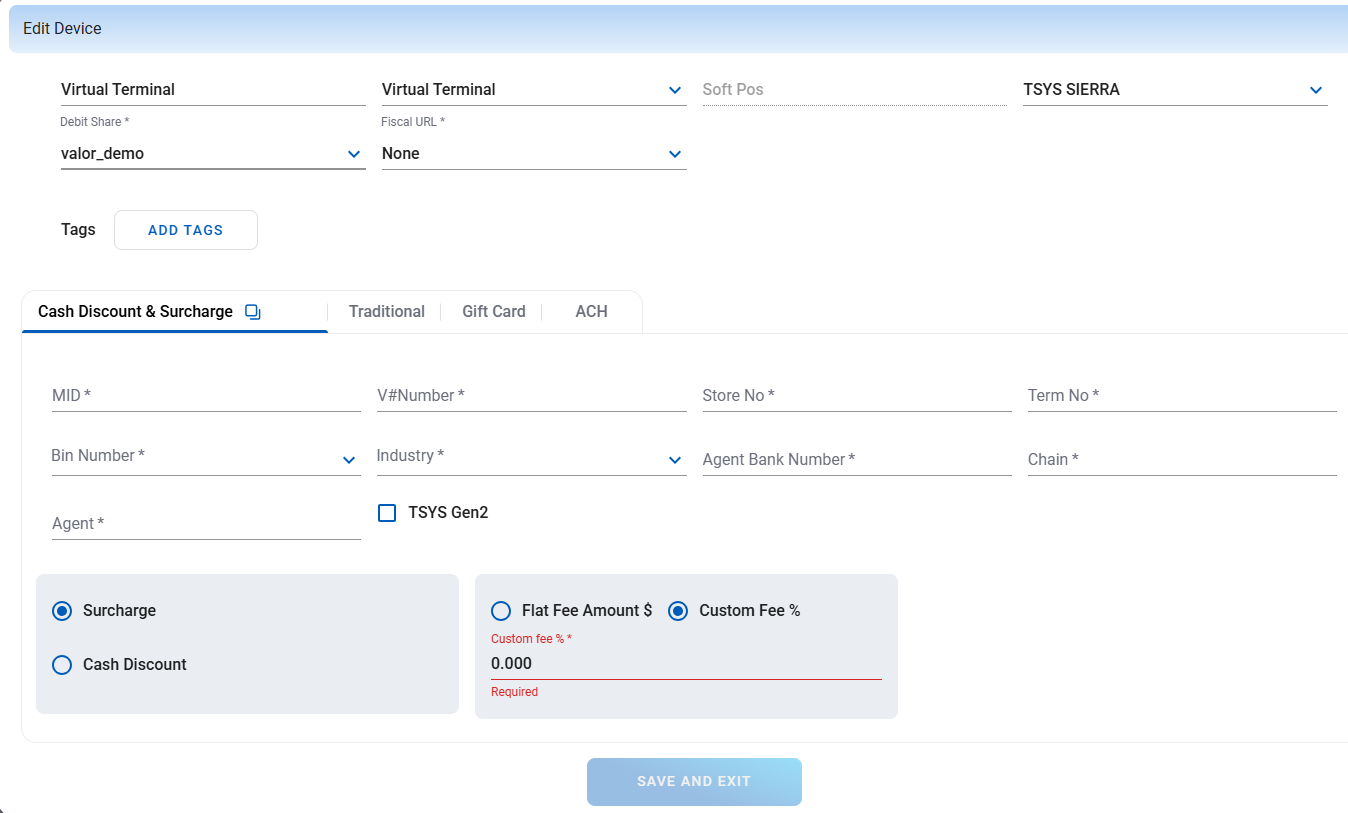
- Power cycle your device (turn it off and on) for the changes to take effect.
After completing these steps, the differential/custom fee should no longer apply to integrated transactions. If the issue persists, consider reaching out to Valor Support for further assistance.
Q: I use the Boarding API to board merchant accounts with devices. How can I set the removal of the Surcharge/Differential fee by default?
A: To ensure that the surcharge/differential fee is removed by default when boarding merchant accounts via the Boarding API, you need to use a specific set of property values in your API request.
Instead of setting values for these properties:
- mid, vNumber, storeNo, termNo, association, chain, agent, EbtNo, binnumber, agentBank, industry
You should use these alternative properties with 1 appended:
- mid1, vNumber1, storeNo1, termNo1, association1, chain1, agent1, EbtNo1, binnumber1, agentBank1, industry1
Example API Request:
 "processorData": [
    {
        "mid": "",
        "mid1": "887000003193",
        "vNumber": "",
        "vNumber1": "75021674",
        "storeNo": "",
        "storeNo1": "5999",
        "termNo": "",
        "termNo1": "1515",
        "association": "",
        "association1": "949006",
        "chain": "",
        "chain1": "111111",
        "agent": "",
        "agent1": "0001",
        "EbtNo": "",
        "EbtNo1": "",
        "binnumber": "",
        "binnumber1": "999991",
        "agentBank": "",
        "agentBank1": "000001",
        "industry": "",
        "industry1": "Direct Marketing",
        "surchargePercentage": "\"\"",
        "surchargeIndicator": 0,
        "EBTfood": 0,
        "EBTfood1": 0,
        "EBTcash": 0,
        "EBTcash1": 0,
        "label": "MERCHANT PORTAL LOGIN",
        "programType": "surcharge"
    }
]
Setting "surchargeIndicator": 0 and leaving "surchargePercentage": "" ensures that the surcharge is disabled by default.
After implementing these changes, newly boarded merchant accounts will not have a surcharge or differential fee applied.
Q&A: Getting Set Up with Valor Connect
Q1: What do I need to complete the certification process for Valor Connect?
A: To complete certification, you will need the following:
- A Valor Demo Device, which can be acquired from reaching out to your Valor Sales Rep.
- Sandbox Credentials, issued to you when acquiring a demo device.
- Selection of a communication method with Valor Connect: REST API or MQTT
- Completion of the required test cases in the demo environment: Test Cases
- Approval from our team for access to the production environment based on your test case submissions.
Q2: How can I acquire a Valor Demo Device?
A: Inquire about purchasing a Demo Valor Device from your valor sales rep
Q3: How do I obtain Sandbox Credentials?
A: Sandbox Credentials are issued to your ISO when you acquire a demo device. If you have not received them, please check with your ISO or contact our support team.
Q4: What communication methods are available for integration?
A: You can integrate with Valor Connect using either:
- REST API for traditional request-response communication.
- MQTT for real-time messaging and event-driven communication.
Q5: What are the required test cases, and where can I find them?
A: The required test cases for certification are outlined in this document: Test Cases. You must complete these in the demo environment before requesting production access.
Q6: How do I get approval for production access?
A: Once you have completed the test cases in the demo environment, submit your results to our team for review. Upon approval, you will receive access to the production environment.
Q7: Who should I contact for support during the setup process?
A: If you have any questions or need assistance, please reach out to our support team or your ISO representative for guidance.
Q&A on Passing Additional Data through POS Integration
Q1: What additional data can be passed through POS Integration:
The client can pass in there preferred additional reference, however there are some limitations on character count, see below:
Number of fields (maximum of 2)
Input type (Numeric or Alphanumeric)
Maximum length:
- VAS_LABEL: Up to 16 characters
- VAS_DATA: Up to 16 characters
Example:
{
    "VAS_LABEL1": "Employee-Name",
    "VAS_LABEL2": "Employee-No",
    "VAS_DATA1": "Jones",
    "VAS_DATA2": "1026"
}
Q2: Can we take user input instead of passing additional values via integration ?
Yes , it is possible and can be configured via device parameters. Under the device parameter section “Data Collection” , enable “Additional input”. You will then be provided with the ability to configure the prompts that come up during a transaction. Please note, with this being enabled, it will override any values passed via Vas_label/Data through integration.